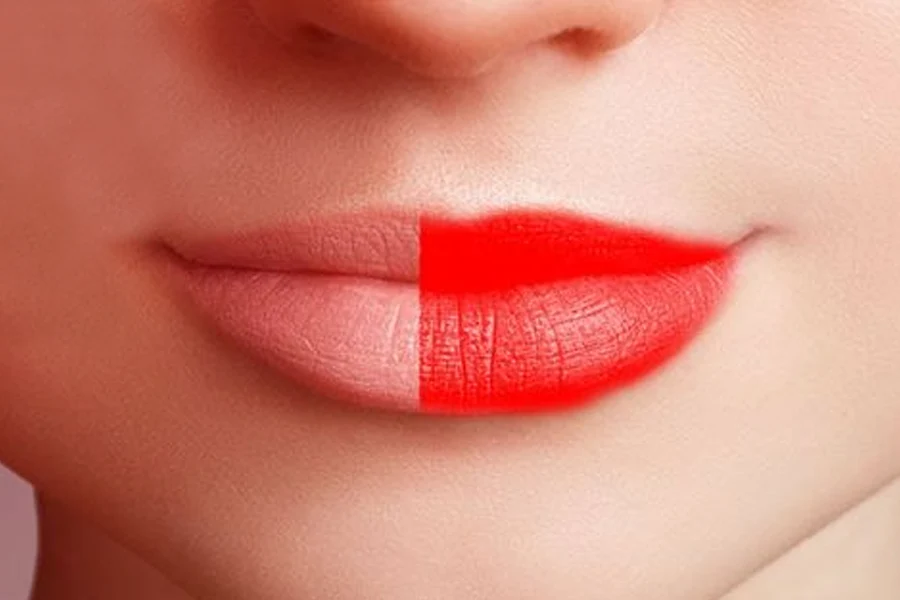
The process of changing lip color in Photoshop is very simple, you can complete the process on any photo in just a few minutes with the help of the various techniques to edit a picture in Photoshop. We have detailed how you can change the color of a lip using Photoshop software and the steps to do it are straightforward.
Please note that while some versions of the Photoshop software may have different tool names or terms, some may even be in different windows, the methods are identical and you can easily follow them.
Now let’s discuss the steps and processes:
5 Steps to Change Lip Color in Photoshop
Here are the step by step guide to changing the lip color in photoshop.
Step 1: Create the Lip Selection
First, we need to select the photo that needs editing and then proceed after doing that. You need to use a picture where the subject’s lips are in focus. Next, you should highlight the subject in focus and bring the subject’s lips closer together.
Step 2: Use the Lasso Tool to Outline the Shape of the Lips
The Lasso tool helps in outlining the boundaries of the lips. If you can’t locate the Lasso tool from the tool tab, you can use the search bar to locate it and begin to work from there. Zoom the image so you can see what you’re editing.
This will ensure you are using the Lasso tool to edit correctly and accurately especially when you’re using it to outline or define the boundaries.
Step 3: Refine the Edges of the Lips
After outlining the lips boundary, you need to scrub the selected area and smoothen the edges so that the sides of the lips are not too heavy. To proceed with this step, you must first click on ‘Select’, and then navigate to Modify, and then select Pen.
Alternatively, you can use short keys Alt+Ctrl D (Windows) or Opt +Cmd D (Mac). The feathers’ intensity should be around 3 pixels. But this value depends on the image size and your desired result.
Step 4: Change the Lip Color from the Adjusted Layer
Navigate to layer palette > adjustment layer button > color balance options. In this way, you will be to access the color balance panel, which will assist you in selecting your color preference.
However, you should note you can’t alter or damage the pixels of the original picture from the adjustment layer.
Step 5: Create Your Creative Lips Makeup
When you finally pick and choose the color you want, hit the OK button and your picture is all set. You have your newly created lipstick color. If you still feel that the lipstick color is too strong, all you need to do is to reduce the image opacity on this special adjustment layer.
How Do I Lighten My Lips in Photoshop?
Step 1: Select a picture where the subject’s lip blends with the face.
Step 2: Above the Layers palette, click the Create Adjustment Layer icon then click Hue/Saturation. Once you open the Hue/Saturation dialog, you will see ‘master’ at the top of the Edit pop-up menu. Change it to red.
Step 3: Move the saturation slider to the right until the lips turn red. Don’t proceed further yet as you don’t want such drastic changes. Anywhere between 15 and 20 is a good start. Select OK to exit the dialog box.
Step 4: The adjustments made in step 3 will enhance all the red tones in the image, but this isn’t what we are looking for. So, let’s focus on the lip.
Press D on your keyboard, then press X to change the color of the foreground to black. Click the Hue/Saturation adjustment layer mask to pick it and press Alt + Backspace or Option + Del (Mac) to fill it with black. This will hide the red boost effect you just created.
Step 5: Press B on your keyboard to select the brush tool, press the X key to change the color of the foreground to white, and begin to paint the lips. At this point, the red tint will reappear on the lips, however, it won’t reappear in the other parts of the image.
If you made a mistake or painted too much, just press the X key again so you can switch the color of the foreground to black and erase it.
At this stage, double-click the Hue/Saturation adjustment layer to adjust the thickness of the red color. The advantage of doing it this way is that they will be effective on the lips alone rather than in the other part of the image.
How to Add Lipstick in Photoshop?
Select “Open Photo” in the middle of the screen and choose the image you want to work on. Navigate to the pallet in the Makeup tab and select the desired lipstick color. Adjust the shine slider and Amount, then click apply.
How to Fix Lipstick in Photoshop?
Click the “Up” layer and select Clone Stamp Tools. In the options tab, change the Pattern to ‘Current Layer’ then leave the Opacity at 100%. Use this tool to neutralize the texture of chapped lips.
Erase the visible lines, however, you must be cautious not to erase too much of the texture as the result may not look real.
Conclusion
Now that we are in the age where editing image is common, changing lip color is gradually becoming a big part of editing companies. So if understand the process of changing lip color via Photoshop.
Please note that constant practice on an individual image or editing pictures, will make you more efficient and you can create more quality work.
If you can follow the afforested steps, you will have the freedom to change or edit the lip color on any image of your choice in Photoshop.