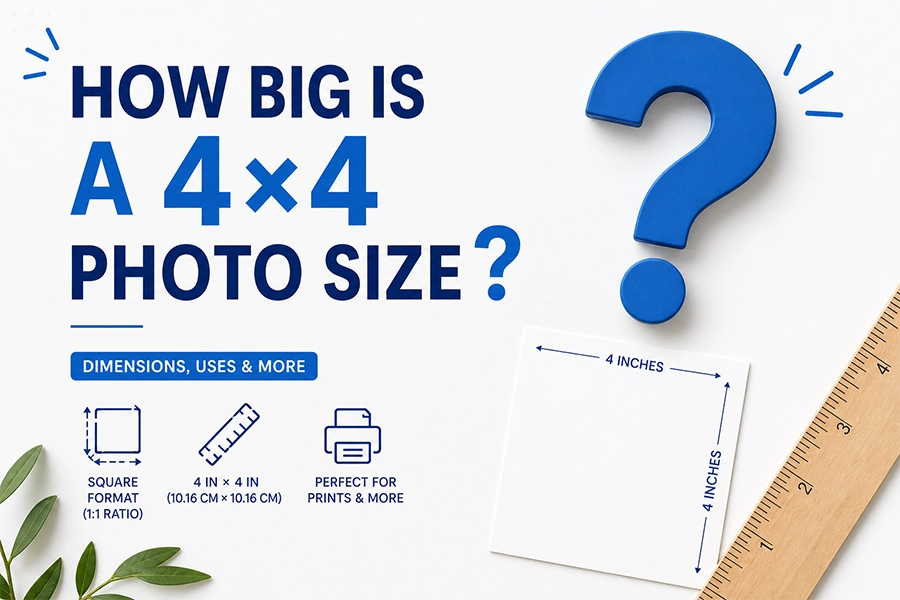
If you have ever tried to print a photo, upload a profile picture, or resize an image for a government form, chances are you have encountered the 4×4 photo size. It sounds simple enough — four by four. But what does that actually mean in practice? Is it 4 inches? 4 centimeters? 400 pixels? The answer depends entirely on the context, and confusing these measurements can lead to blurry prints, rejected ID photos, or distorted social media images.
Many people think 4×4 is just ‘4 inches by 4 inches’ — but that’s only half the story. The full picture (no pun intended) involves understanding units of measurement, resolution, DPI (dots per inch), and the intended use of the image.
In this complete guide, you will learn exactly what a 4×4 photo size means across different units, how many pixels it contains at various resolutions, what it is commonly used for, and how to create or resize a 4×4 photo like a professional — whether you are printing it, posting it online, or using it for an official document.
2. What Does 4×4 Photo Size Mean?
At its most fundamental level, a 4×4 photo size refers to a square image that is 4 units wide and 4 units tall. The most common interpretation is 4 inches × 4 inches, which is the standard physical size used in printing, photo albums, and official documentation in many English-speaking countries.
The key characteristic of the 4×4 format is its perfect square shape — both sides are equal, giving it a 1:1 aspect ratio. This square format has become enormously popular in the digital age, largely driven by platforms like Instagram that originally required square images.
Today, the 4×4 format is used across a wide range of applications — from product photography and social media to passport photos and DIY crafts.
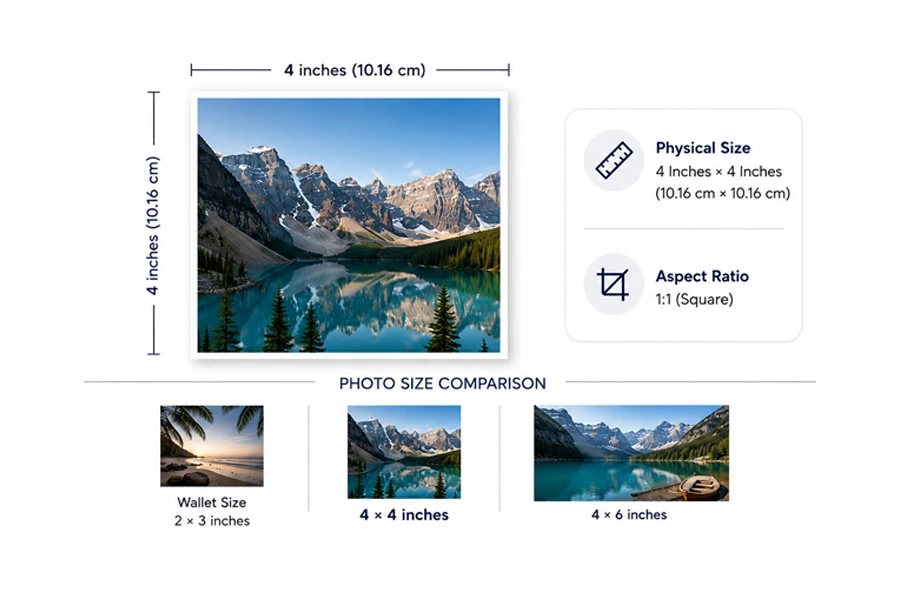
Physical Size: 4 Inches × 4 Inches
In physical terms, a 4×4 photo measures four inches along both width and height. When you hold a printed 4×4 photo, it is slightly larger than a standard wallet-size photo (2×3 inches) but smaller than the very popular 4×6 format.
It fits comfortably in a standard square photo frame and is a favourite for art prints, greeting cards, and Instagram-style photo books.
Metric Equivalent
For those working in metric units, the 4×4 inch photo translates to 10.16 cm × 10.16 cm, or 101.6 mm × 101.6 mm. These dimensions are used frequently in European and Asian countries for photo printing specifications.
Why Square Format Is Popular
The 1:1 square ratio eliminates the need to decide between portrait and landscape orientation. It is visually balanced, works well for product photos, profile images, and thumbnails. It also prints cleanly on standard square photo papers and fits perfectly into grid-based layouts used in magazines, catalogs, and websites.
3. 4×4 Photo Size in Different Units

Understanding the 4×4 photo size across different units is essential for working between print and digital media. Here is a clear breakdown:
| Unit | Width | Height |
| Inches | 4″ | 4″ |
| Centimeters | 10.16 cm | 10.16 cm |
| Millimeters | 101.6 mm | 101.6 mm |
| Points (pt) | 288 pt | 288 pt |
| Picas | 24 pica | 24 pica |
These conversions are useful when setting up print templates in software like Photoshop, Illustrator, or InDesign. Always double-check the unit setting in your software before entering dimensions to avoid size errors.
4. 4×4 Photo Size in Pixels
This is where most people get confused — and where understanding the concept of DPI (dots per inch) becomes critical. The pixel dimensions of a 4×4 photo are NOT fixed. They change depending on the resolution you are working at. Resolution, measured in DPI,
tells you how many dots (or pixels) are packed into each inch of the image.
Understanding DPI
DPI stands for Dots Per Inch and refers to the density of pixels in a printed image. Higher DPI means more detail, better sharpness,
and larger file sizes. Lower DPI is fine for screens but will look blurry if printed. The three most common DPI settings you will encounter
are:
- 72 DPI — the standard resolution for web and screen displays (monitors, phones, websites)
- 150 DPI — a medium quality setting suitable for casual home printing
- 300 DPI — the professional print standard used by photo labs and commercial printers
Pixel Dimensions at Each DPI
| DPI | Pixel Width | Pixel Height | Total Pixels | Best For |
| 72 DPI | 288 px | 288 px | 82,944 px | Web / Social Media |
| 96 DPI | 384 px | 384 px | 147,456 px | Screen / Digital |
| 150 DPI | 600 px | 600 px | 360,000 px | Home Printing |
| 300 DPI | 1200 px | 1200 px | 1,440,000 px | Professional Print |
| 600 DPI | 2400 px | 2400 px | 5,760,000 px | High-End Print / Archive |
The formula is simple: Pixels = Inches × DPI. So for a 4-inch image at 300 DPI: 4 × 300 = 1200 pixels per side.
When to Use Each Resolution
Use 72 DPI when you are uploading images to websites, social media platforms, or using them in email newsletters — screen displays cannot show more detail than this anyway, and smaller file sizes load faster. Use 150 DPI when printing at home on a standard inkjet printer for casual results. Always use 300 DPI (resulting in 1200×1200 pixels) when sending files to a professional print lab, creating product photos, or producing any image that needs to look crisp and sharp in physical form.
5. Aspect Ratio: Why 4×4 Is Always Square
The aspect ratio of a 4×4 photo is 1:1 — meaning the width and height are identical. This perfect square ratio is what gives the 4×4 format its unique versatility. Whether you scale the image up to 8×8 inches or down to 2×2 inches, the proportions remain perfectly square.
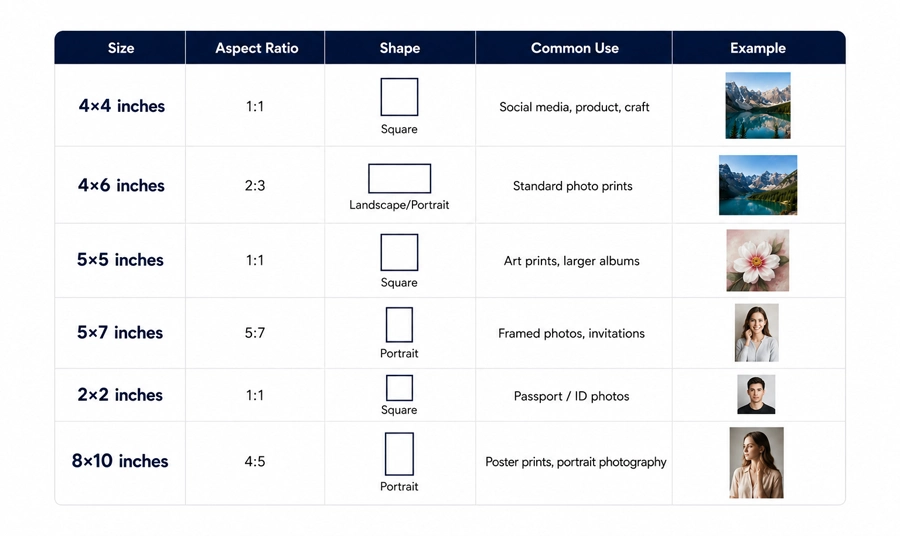
How 4×4 Compares to Other Photo Sizes
| Size | Aspect Ratio | Shape | Common Use |
| 4×4 inches | 1:1 | Square | Social media, product, craft |
| 4×6 inches | 2:3 | Landscape/Portrait | Standard photo prints |
| 5×5 inches | 1:1 | Square | Art prints, larger albums |
| 5×7 inches | 5:7 | Portrait | Framed photos, invitations |
| 2×2 inches | 1:1 | Square | Passport / ID photos |
| 8×10 inches | 4:5 | Portrait | Poster prints, portrait photography |
Why Cropping Matters
When converting a non-square photo (such as a 4×6) to a 4×4 format, cropping is required. This means part of the image will be cut off.
To avoid losing important elements — like someone’s head or a product’s logo — always plan your square crop in advance.
In Photoshop, the 1:1 ratio constraint tool makes this straightforward. Resist the temptation to simply ‘squeeze’ a rectangular image into
a square — this distorts proportions and looks unprofessional.
6. Common Uses of 4×4 Photos

Passport & Visa Photos
While the internationally recognized passport photo standard is 2×2 inches (as required by the US government), several countries
and visa applications use different sizes.
Some visa applications for South Asian and Middle Eastern countries specify a 4×4 cm (approximately 1.57×1.57 inches) photo.
Always verify the exact requirements for your specific document — a rejected photo means wasted money and time.
Social Media Profile Images & Thumbnails
Instagram was built around square photos, and a 4×4 inch equivalent (at 72–96 DPI, so 288×288 to 384×384 pixels) is ideal for profile thumbnails, grid posts, and story covers when cropped to a 1:1 ratio.
Pinterest, YouTube channel icons, and Facebook group covers also benefit from a square format. For best results on social media,
export at 1080×1080 pixels for feed posts and 800×800 pixels for profile images.
eCommerce Product Images
This is arguably the most commercially important use of the 4×4 photo format. Platforms like Amazon, eBay, Etsy, Daraz, and Shopify all recommend or require square product images. A clean 4×4 photo on a white or transparent background allows customers to see the product clearly, compare it fairly with competitors, and zoom in on details.
Consistent 4×4 product images across your store also create a professional, cohesive look that builds buyer trust. For eCommerce, always export at a minimum of 1000×1000 pixels (about 83 DPI per inch at 4 inches, but acceptable for on-screen zoom).
Print Designs: Albums, Frames & Cards
Many photo book services offer square print layouts. A 4×4 photo prints beautifully in standard square frames available at most home goods stores. They are also popular for greeting card inserts, desk calendars, and mini photo albums.
When printing, always ensure you are working at 300 DPI (1200×1200 pixels) to get sharp, professional results.
DIY Crafts: Scrapbooks, Stickers & Polaroid-Style Prints
The 4×4 format is a favorite in the crafting community. Its square shape fits perfectly into scrapbook layouts, can be printed as sticker sheets, and mimics the look of a larger Polaroid or Instax photo. Many craft enthusiasts print their 4×4 photos at home and use them for journaling, gift tags, photo walls, and handmade cards.
7. How to Create a 4×4 Photo (Step-by-Step)
In Adobe Photoshop
Photoshop gives you the most control over your 4×4 photo creation. Follow these steps:
- Go to File > New and set Width to 4 inches and Height to 4 inches.
- Set Resolution to 300 pixels/inch for print, or 72 for web.
- Set Color Mode to RGB for digital use, or CMYK for professional printing.
- To crop an existing photo to 4×4, select the Crop Tool and set the ratio
to 1:1 (Square) or type 4 in and 4 in in the width/height fields.
- To crop an existing photo to 4×4, select the Crop Tool and set the ratio
- Use View > Guides and place guides at the edges to ensure nothing important gets cut.
In Canva
Canva makes it very easy to create a 4×4 photo. Click ‘Create a design’, choose ‘Custom size’, and enter 1200 × 1200 pixels (which equals
4×4 at 300 DPI). Canva’s grid and alignment tools make it simple to position your subject centrally. Export as PNG for transparency or JPEG for photos.
In Mobile Apps
Apps like Snapseed, VSCO, and Adobe Lightroom Mobile all offer 1:1 square crop options. For quick edits, Instagram’s own camera mode includes a square format. If you need precise 1200×1200 pixel output, use a dedicated photo resize app such as Image Size (iOS) or Photo
& Picture Resizer (Android).
8. How to Resize Any Image to 4×4 Without Losing Quality
Resizing an image to 4×4 is not the same as cropping it. Resizing changes the pixel dimensions while cropping removes parts of the image. To avoid losing quality, follow these principles:
Cropping vs Resizing
Cropping cuts away portions of the image to create a square composition. Resizing stretches or shrinks the entire image to fit the new dimensions.
For converting a wide landscape photo to a 4×4 square, you will almost always need to crop first, then resize if needed. Never resize
a non-square image directly to 4×4 without cropping first — it will look squished or stretched.
Maintaining Quality
- Always start with the highest resolution source image you have available.
- Downscaling (making smaller) preserves quality; upscaling (making larger) can reduce sharpness.
- Use bicubic or Lanczos resampling algorithms in Photoshop or GIMP for the smoothest results.
- If you must upscale, use AI-powered tools like Topaz Gigapixel AI, Adobe Super Resolution, or free web tools like
Upscale.media to intelligently add pixels.
- If you must upscale, use AI-powered tools like Topaz Gigapixel AI, Adobe Super Resolution, or free web tools like
Sharpening Tips After Resize
After resizing, apply a subtle sharpening pass to restore edge crispness. In Photoshop, use Filter > Sharpen > Unsharp Mask with Amount: 80%, Radius: 1.0, Threshold: 2. This prevents the slight softness that often appears after resizing operations.
9. Printing a 4×4 Photo: Common Mistakes & Fixes
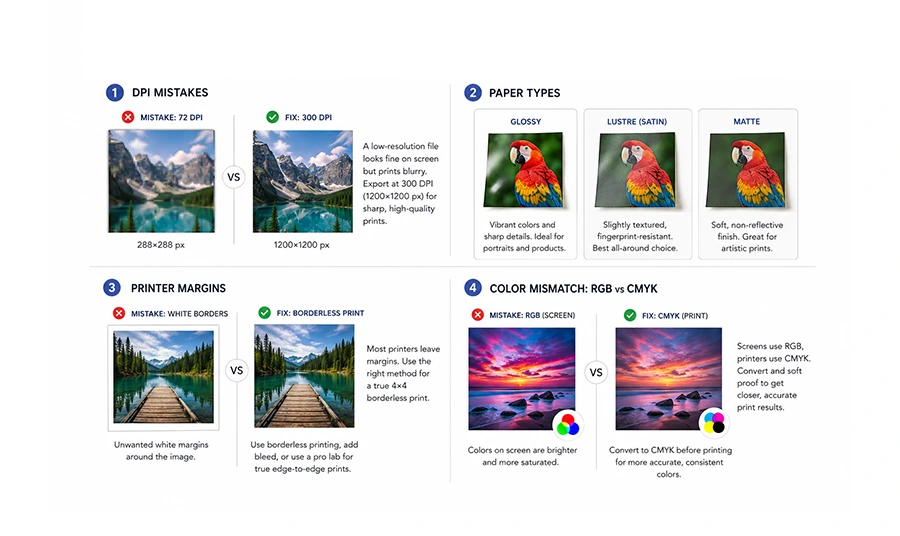
DPI Mistakes
The most common printing mistake is sending a low-resolution file to a print lab. A 4×4 photo at 72 DPI (288×288 pixels) that looks fine
on screen will print blurry and pixelated. Always export at 300 DPI (1200×1200 pixels) for print. If your original file is too small, do not simply increase the DPI setting in Photoshop — this does not add real detail. Instead, use AI upscaling before printing.
Always export at 300 DPI for print — this single rule will eliminate the majority of print quality complaints.
Paper Types
The choice of paper significantly affects the final look of your 4×4 print. Glossy paper delivers vibrant colors and sharp details, ideal for product photos and portraits. Matte paper gives a softer, non-reflective finish popular for artistic prints and scrapbooking
Lustre (satin) is a middle ground — slightly textured, fingerprint-resistant, and the preferred choice of professional photo labs for general use.
Printer Margins
Most home printers cannot print fully to the edge of the paper — they leave a small margin (typically 0.125 to 0.25 inches).
If you need a true borderless 4×4 print, either use a printer with borderless printing capability, add a slight bleed (extend the image 0.125 inches beyond the trim line), or use a professional print service that offers true borderless square prints.
Color Mismatch: RGB vs CMYK
Digital screens display color in RGB (Red, Green, Blue) mode, while commercial printers use CMYK (Cyan, Magenta, Yellow, Black). Bright, saturated colors — especially vivid blues, greens, and reds — often shift or dull when converted from RGB to CMYK.
If color accuracy is critical (such as for product photos or brand materials), convert your file to CMYK in Photoshop before sending to print and do a soft proof to preview the result.
10. 4×4 Photo vs Other Popular Sizes
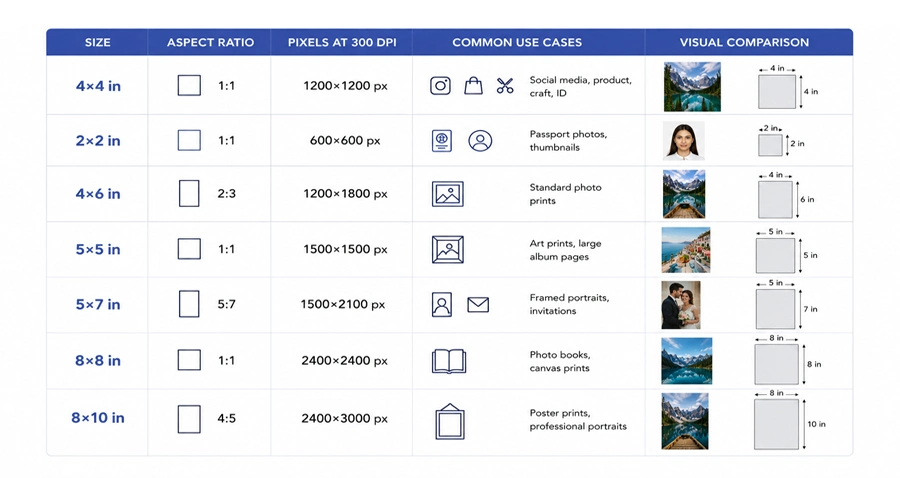
Understanding how the 4×4 photo compares to other common sizes helps you choose the right format for each project:
| Size | Aspect Ratio | Pixels at 300 DPI | Common Use Cases |
| 4×4 in | 1:1 | 1200×1200 px | Social media, product, craft, ID |
| 2×2 in | 1:1 | 600×600 px | Passport photos, thumbnails |
| 4×6 in | 2:3 | 1200×1800 px | Standard photo prints |
| 5×5 in | 1:1 | 1500×1500 px | Art prints, large album pages |
| 5×7 in | 5:7 | 1500×2100 px | Framed portraits, invitations |
| 8×8 in | 1:1 | 2400×2400 px | Photo books, canvas prints |
| 8×10 in | 4:5 | 2400×3000 px | Poster prints, professional portraits |
The 4×4 size hits a sweet spot: large enough for meaningful detail and physical presence, small enough to fit into layouts, albums, and frames without overwhelming the space. For eCommerce and social media, it is arguably the most versatile single photo size available.
11. Best File Formats for 4×4 Photos
JPEG (.jpg)
JPEG is the most widely used format for 4×4 photos. It offers excellent compression, resulting in smaller file sizes that upload quickly to websites and social media. The trade-off is that JPEG uses lossy compression, meaning a tiny amount of quality is sacrificed each time you save.
For final exports, save at quality 80–100% to maintain sharpness. JPEG is the standard choice for print labs, eCommerce platforms, and social media.
PNG (.png)
PNG is the go-to format when you need a transparent background — for example, a product photo on a white or transparent background that will be placed on a colored webpage.
PNG files are larger than JPEGs but use lossless compression, meaning no quality is lost when saving. Use PNG for logos, product cutouts, and any image requiring a clean, transparent background.
TIFF (.tif)
TIFF is a lossless, high-quality format preferred by professional photographers and print production studios. A 4×4 TIFF at 300 DPI retains every pixel of data, making it ideal for archiving master files or sending to high-end commercial printers. The downside is large file sizes. TIFF is generally not suitable for web use.
WebP
WebP is a modern format developed by Google that offers excellent compression with minimal quality loss. It is increasingly supported by web browsers and platforms.
For web-optimized 4×4 product images, WebP can reduce file sizes by 25–35% compared to JPEG, improving page load speed without
visible quality reduction.
12. Tips for Professional Results
Whether you are editing 4×4 photos for a client, your own business, or a personal project, these professional techniques will set your work apart:
Always Shoot in High Resolution
The single most important rule in photography is to capture the highest resolution your camera or smartphone allows.
You can always reduce size later, but you cannot add real detail that was never there.
For eCommerce product photography, shoot in RAW format if possible to retain full color and exposure data for editing.
Avoid Over-Compression
It is tempting to save storage space by compressing files aggressively. Resist this. For print files, never compress below JPEG quality 85.
For web files, use a tool like Tiny PNG or Squoosh to compress intelligently without visible quality loss.
Use Proper Lighting
For product photos and ID images, consistent, even lighting is non-negotiable. Use a two-point or three-point lighting setup to eliminate harsh shadows. A lightbox (photo light tent) is an affordable investment that produces clean, professional results for small product photography at home.
Maintain Sharp Edges
Sharp, clean edges on subjects — especially for product cutouts — are the hallmark of professional editing. Use Photoshop’s Select and Mask tool or AI-powered background removal tools like Remove.bg to create precise, clean edges. Avoid ‘feathered’ or blurry selection edges, which look amateurish in final prints.
Consistent Background for eCommerce
If you are producing 4×4 product images for an online store, consistency is everything. Use the same background color (usually pure white: #FFFFFF), the same lighting setup, and the same camera angle for every product in a category.
This uniformity creates a professional, trustworthy shopping experience that increases conversions.
13. FAQs
Is 4×4 the same as passport size?
No. The standard international passport photo size is 2×2 inches (50×50 mm), not 4×4. However, some countries and specific visa applications do use a 4×4 cm photo requirement. Always check the exact specifications for the document or country you are applying to.
What is 4×4 photo size in pixels at 300 DPI?
At 300 DPI — the professional print standard — a 4×4 inch photo is 1200×1200 pixels. This is calculated by multiplying the physical dimension (4 inches) by the resolution (300 DPI): 4 × 300 = 1200 pixels per side.
Can I print a 4×4 photo at home?
Yes, absolutely. Most modern inkjet printers can handle 4×4 prints, especially if you purchase square photo paper.
Set your print size to 4×4 inches in your printer settings and ensure your image is at least 600×600 pixels (for acceptable home print quality) or ideally 1200×1200 pixels for sharp results. Check if your printer supports borderless printing for edge-to-edge output.
How do I crop a 4×4 photo on my phone?
On iPhone, open the photo in the Photos app, tap Edit, then tap the Crop icon. Select the 1:1 (Square) aspect ratio from the ratio options. Drag the crop frame to your preferred composition and tap Done.
On Android, the process is similar in Google Photos: Edit > Crop > Square (1:1). Many third-party apps like Snapseed also offer precise square cropping.
Is 4×4 good for Instagram?
Yes — 4×4 (1:1 square ratio) is one of Instagram’s native post formats and displays without any cropping or black bars in the feed.
Instagram recommends a minimum of 1080×1080 pixels for square posts, with 1350×1350 being the maximum useful resolution.
A well-composed 4×4 photo at 1080×1080 pixels will look sharp and professional on both mobile and desktop Instagram.
What software should I use to create a 4×4 photo?
For professionals, Adobe Photoshop offers the most control. For beginners and non-designers, Canva is intuitive and free to use.
For batch resizing multiple photos, tools like Adobe Lightroom, XnConvert (free), or BulkResize Photos (web-based) are excellent choices. On mobile, Snapseed and Adobe Lightroom Mobile handle most tasks efficiently.
How do I make a 4×4 photo with a white background?
Start by removing the existing background using Photoshop’s Remove Background (Properties panel), the Remove.bg web tool, or the AI Background Remover in Canva Pro. Then fill the background layer with pure white (#FFFFFF).
This technique is essential for eCommerce product images on platforms like Amazon that require white backgrounds.
What resolution is best for printing a 4×4 on photo paper?
300 DPI is the universally accepted standard for professional photo printing. At this resolution, a 4×4 inch photo requires a 1200×1200 pixel image.
Some high-end print labs support 600 DPI for extra-fine detail, which would require a 2400×2400 pixel file. For home printing, 150–200 DPI (600×600 to 800×800 pixels) is usually sufficient.
14. Conclusion
The 4×4 photo size is one of the most versatile and widely used formats in both print and digital media. At its core, it is a 4 inch × 4 inch square image — but as we have explored throughout this guide, the full story involves pixels, DPI, file formats, color modes, and purpose-driven choices.
To summarize the key points: a 4×4 photo measures 4″×4″ (10.16×10.16 cm), has a perfect 1:1 aspect ratio, and its pixel dimensions range from 288×288 (at 72 DPI for web) to 1200×1200 (at 300 DPI for professional printing). It is used for everything from eCommerce product images and social media posts to photo albums, ID photos, and crafting projects.
The most important rule to remember is this: always match your resolution to your intended output. Web images can use 72–96 DPI, home prints work well at 150 DPI, and professional print labs require 300 DPI. Getting this right is the difference between sharp, professional results and blurry, rejected files.
Whether you are a photographer, designer, online seller, or hobbyist, mastering the 4×4 photo format opens up a world of possibilities.
Now that you understand exactly how it works, you are equipped to create, resize, and print 4×4 photos with confidence and precision.