Clipping Path is a powerful tool in photo editing. It isolates a specific section of an image by creating a sharp outline around the main object. This allows for editing or placing the main object on a new background, allowing you to enhance your photos. This tool is widely used by industries such as e-commerce, advertising, graphic design, and both basic and professional photography.
It’s quite an important tool for these kinds of industries where high-quality images are effective for engaging customers. For photographers who deal with images professionally, understanding the clipping path is critical. The main reason for its importance is that it ensures that objects’ visual appeal is accurate and consistent. It makes products look better and boosts image professionalism.
Taking advantage of our user-friendly and beneficial guide will help you understand the clipping path. So, buckle up; we’re embarking on a voyage.
What is Clipping Path?
Designers and editors use the clipping path, also known as the vector path, to cut out parts of images. This tool enables designers and editors to isolate an object from its previous background to a newer one.
Applying the vector path not only makes the subject visible within the path but also renders everything outside of it transparent, a feature that editors find quite effective. When a designer wants to remove a background and create a clean, minimal shade of background where the main focus is laid on the subject, it greatly assists them.
This is the part where editors can retouch the subject based on clients’ preferences, like color gradation, shadow creation, ghost mannequins, etc.
Types of Clipping Path:
There are many types of clipping paths, which are primarily used for different types of clipping depending on the images.
Simple (Basic) Clipping Path
It simply includes shapes with a few curves. The clipping path process does not include any holes. The basic clipping path removes a rectangular object’s background. So, it’s the easiest and quickest form of clipping. It’s ideal for straightforward objects and shapes with clean edges.
Examples: A straight or rectangular object, such as a box, book, or phone.
Compound Clipping Path
This type of clipping works with multiple curves and holes. It handles intricate or irregular shapes with detailed outlines. Objects with curves or multiple cutouts consistently benefit from its use. When there is a separate editing process, it helps to isolate each section accurately.
Examples: A kind of jewelry, bicycles with a transparent section, or a pair of sunglasses with both lenses and frames that need different paths.
Medium Clipping Path
This type of clipping path is more complex than a simple one, as it is typically used for products that have curves, multiple anchor points, and intricate details, but are not excessively intricate. It is common in fashion or accessory photography to have objects in organic shapes that require constant outlining.
Examples: Shoes with straps, watches with intricate details, or clothing with folds and curves.
Super Complex Clipping Path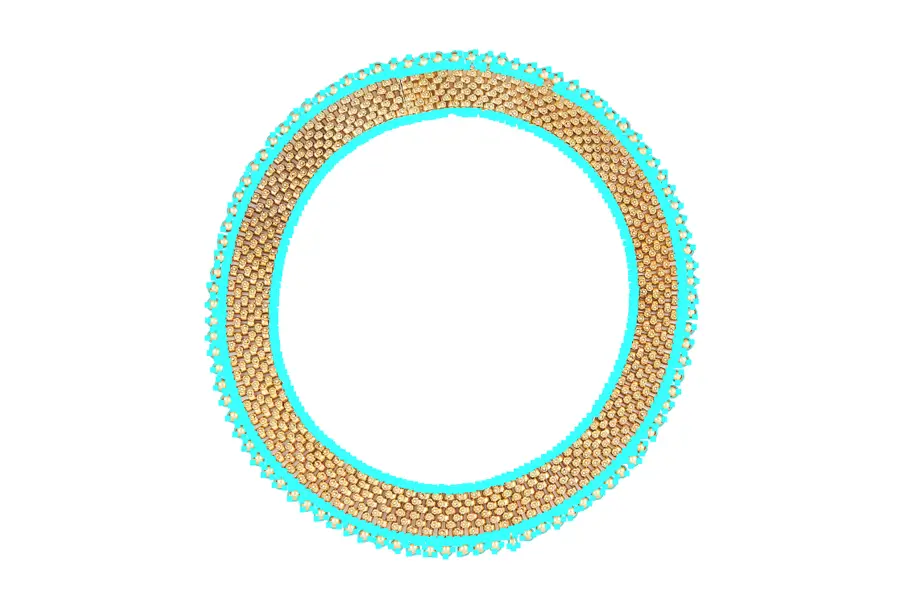
This process contains a large number of anchor points, which are very detailed and complex images. In this system, there are multiple layers of clipping paths within a single image. Products with intricate details, such as garments with lace or embroidery, utilize this system.
Examples: Hair, fur, or highly intricate jewels with engraved gemstones.
Multi Clipping Path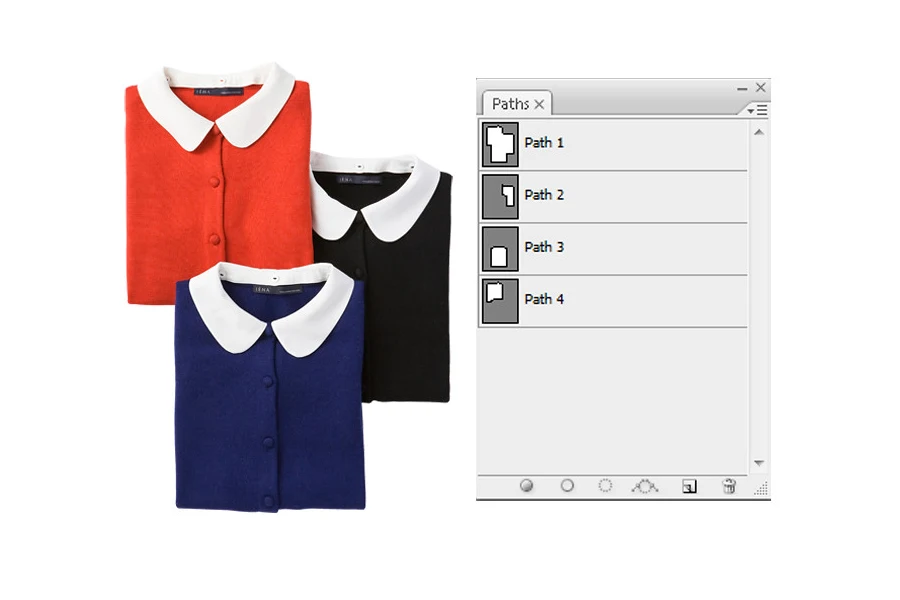
This clipping technique separates different parts of an image, enabling individual adjustments, color corrections, or retouches. Fashion, lifestyle, and product photography heavily utilize it to separately treat different elements within the same image, such as recoloring or retouching various sections.
Examples: Include a model wearing a multi-colored outfit in which each part of the clothing or accessories requires individual retouching.
Color Clipping Path
This clipping process isolates any specific colors in a photo. It can also manipulate sections of an image with easier access than any others. In this way, you must create multiple clipping paths within a single image, where each path focuses mainly on different colored sections of any subject or object.
This is ideal for product or e-commerce photography, where color gradation is required. It changes the product’s color for the online catalog without ever having to re-shoot it.
Examples: Handbags with several portions made of different colored materials, or shoes that match the body, laces, or soles.
Transparent Clipping Path
If you need to isolate the subject from the background with a transparent setting, then this is the perfect method. You can use the photos flexibly over various backdrops. It’s particularly handy for items with see-through or translucent sections, assuring the background remains fully removed while keeping the subject intact.
Examples: Glass or bottles, transparent containers, or clear plastic products.
Clipping Path with Shadows
This method isolates the object from the background while retaining realistic shadows to give depth to the image. E-commerce uses this method to enhance the object’s natural appearance by incorporating shadows or reflections, thereby enhancing its professional appearance.
Examples: Include shoes, furniture, and e-commerce products that require the preservation of natural shadows or the addition of artificial shadows to enhance depth.
Soft Edge (Feathered) Clipping Path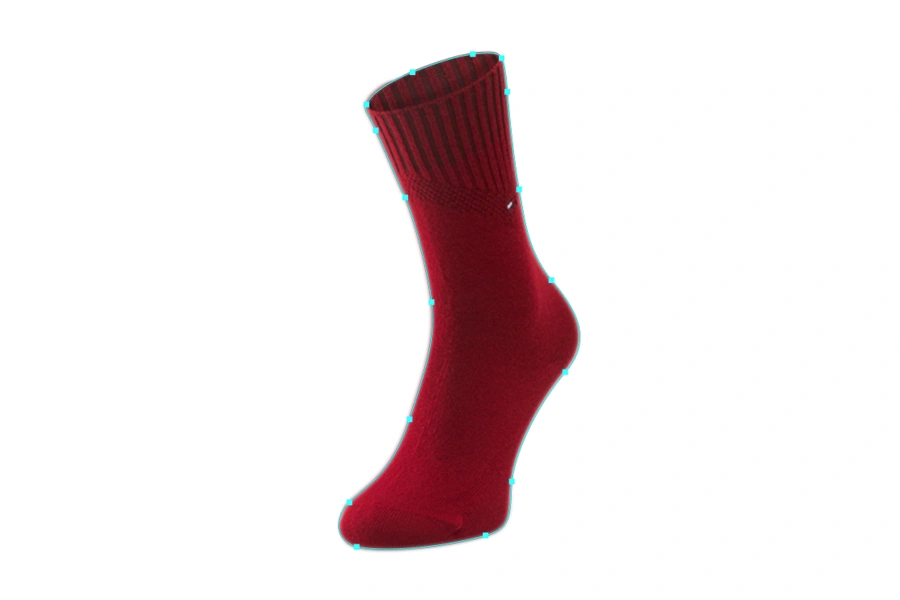
If you don’t want hard or defined edges in an image, this method will help you with a slight feather or any softening to the object’s edges. In the end, it gives a more natural blend between the object and the background.
It works best with objects that have fine, soft edges, such as hair, fabric, or delicate edges with an unnatural look.
Examples: Include hair or fur, as well as natural-looking scarf fabrics.
Inner Clipping Path 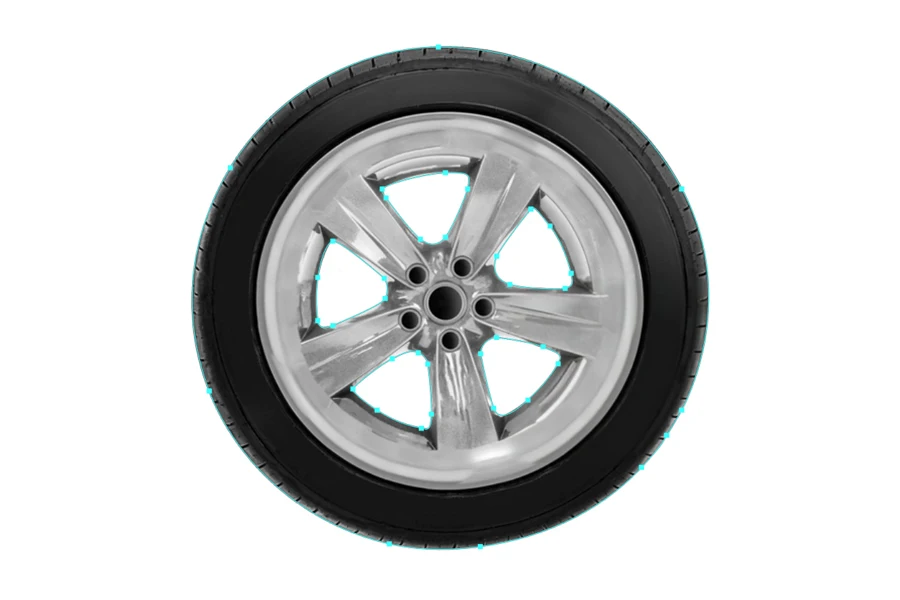
This technique focuses on the inner parts of an object to create holes or areas within a product that are transparent without affecting the outer shape. It is beneficial for objects with hollow tubes, tires, or anything with an internal section that must be transparent.
Examples: Tires, doughnuts, or objects with cutouts that have hollow parts.
Editors use all these types of clipping paths for a variety of product and fashion photography needs, providing them with clear consistency, flexibility, and precision in image editing. It’s important for e-commerce, catalogs, high-end fashion, and marketing materials.
Importance of Clipping Path in Photo Editing:
Clipping paths play a vital role in professional photo editing. As you know, this process helps to improve image quality by isolating the subject from the photo, allowing the editors to focus primarily on the essential parts of the picture.
Now we’re going to demonstrate the importance of clipping paths in photo editing:
Background Removal
One of the main goals of clipping paths is to remove background from the image. By removing the background, you can easily remove any distractions or unwanted objects in the photos.
In the end, it gives the photo a more polished and professional look, which is helpful for e-commerce sites, marketing, and advertising.
Keep Focus on the Subject
After removing the background, the main focus goes directly to the product or person in the images. This emphasizes important details, making it easier to showcase the subject’s qualities or features.
Precision in Editing
The clipping path allows for the outline of an object’s edges, ensuring that the image looks clean and professional without rough edges from backgrounds.
Product Appeal
In business, the quality of product images can directly impact sales. Clipping paths produce clean and crisp photos, which makes products more appealing to potential buyers.
Versatility
You can position the subject on any background you want, making the system more versatile for different uses.
High-Quality Results
The clipping path technique ensures sharp and neat edges of the subject. This results in high-quality images that are important in product photography, advertising, e-commerce, etc.
Clipping paths are essential in making images look professional, enhancing focus, and offering flexibility in design. People widely use this simple yet powerful tool to enhance image quality, particularly in industries where visual presentation is crucial.
Software Used for Creating Clipping Paths:
Adobe Photoshop
Adobe Photoshop is known as the industry standard for creating clipping paths. Adobe Photoshop features tools such as the Pen Tool, Lasso Tool, and Magic Wand Tool, which provide the most precise path creation.
The Direct Selection Tool in Adobe Photoshop helps refine these paths. Because of these kinds of features, Adobe has become the go-to choice for professional editors and retouches.
Adobe Illustrator
Illustrator is known for its vector graphics work. Editors widely utilize Illustrator’s vector capabilities, enabling them to create scalable and accurate clip paths. While it also provides tools like Pen Tools, Illustrator’s main core strength is vector abilities.
GIMP
GIMP is a well-known free alternative to costly Photoshop. It offers tools like the Free Select Tool and Path Tool, which are similar to the Pen Tool in Photoshop. Due to its cost-free nature, beginners and small photo studios find it useful.
Pixlr
Pixlr is an online photo editing tool often used for its ease and web-based functionality. But it doesn’t offer the same depth or tool as Photoshop.
For quick and basic clipping paths, it offers a Lasso Tool and Magic Wand Tool. It has user-friendly interference and is easily accessible to everyone.
CorelDRAW
CorelDRAW is another vector-based software, similar to Adobe Illustrator. People often use CorelDRAW for its powerful path editing features.
It has a clipping tool called the Bezier Tool, which is similar to Photoshop’s Pen Tool. This tool allows the editors to create complex clipping paths with precision.
Affinity Photo
Affinity Photo is known for its affordability and high-performance features that cater to both professionals and beginners. Affinity Photo software is a strong competitor to Adobe Photoshop. It offers a variety of tools, including the Pen Tool for creating clipping paths.
Inkscape
Inkscape is another vector-based graphics editing software similar to Illustrator. But Inkscape is free and open-source, whereas Illustrator isn’t.
It features a Path Tool for creating a clipping path, which is a better alternative for vector-based photo editing.
Fotor
Fotor is an easy-to-use online photo editor, similar to Pixlr. It has a basic path tool like the Magic Clipper, but it doesn’t offer the precision of the Pen Tool in Photoshop.
It’s useful for those looking to make quick edits without the cost of professional software.
Canva
Canva allows the editors to use the basic clipping path, like removing backgrounds and isolating objects. It is another online photo editor that mainly focuses on design. That’s why it’s popular among content creators and marketers who need simple image manipulation without the complexity of fully-developed editing software.
These tools range from beginner-friendly to professional-grade, offering various precision levels and features for creating clipping paths. Each software has unique tools, making them affordable and ideal for different user needs and budgets.
Photoshop Tools That Are Used for Creating Clipping Path:
For using a clipping path, various tools are widely used depending on the complexity and requirements of the image. I have compiled a detailed analysis of these tools and the software that utilizes them will display all the relevant information here:
Pen Tool
The pen tool in photo editing is the most widely used tool for creating clipping paths. It allows anyone to manually draw precise outlines around the subjects. It’s perfect for photos with neat edges or complex shapes. It provides constant control over anchor points.
Magic Wand Tool
It’s a known selection tool that works by selecting specific pixels based on the color tone. The Magic Wand tool is helpful for these kinds of images with consistent backgrounds.
Not only is it faster than the pen tool, but it is also frequently used for simpler tasks. However, a drawback of this tool is its lack of precision compared to the pen tool.
Lasso Tool
If you are looking for a freehand-draw selection tool, then the lasso tool is the one. It offers a freehand drawing around the object you want to clip.
It’s also easier to make quick selections, but it doesn’t have the same precision as the pen tool. That’s why it’s better suited for images with simple shapes.
Polygonal Lasso Tool
The polygonal lasso tool is a variant of the lasso tool. It lets you create a straight line between points. It’s useful for clipping paths around objects with angular edges.
However, it’s not suited for photos that have curved or intricate shapes.
Quick Selection Tool
The Quick Selection Tool automatically selects different areas of the image based on their contrast. It works fast and efficiently for images with clear boundaries between objects and backgrounds.
But it will require further refinement using the pen tool. The pen tool will provide clear, detailed work.
Direct Selection Tool
The Direct Selection Tool allows editors to fine-tune already-created paths. Editors can then modify the placement of anchor points and curves.
Once outlined, the direct selection tool offers flexibility and versatility for path modification.
Layer Mask and Clipping Mask
These tools allow non-destructive editing, meaning they can hide or reveal parts of a photo without permanently altering it. They are ideal for complex photo edits. Layer masks and clipping masks are not known as traditional clipping path tools, but rather as complementary clipping processes.
Many of these tools are industry standards for high-end quality image editing, especially the pen tool. The other tools, such as Magic Wand and Quick Selection, are renowned for their speed in handling simpler tasks.
Combining multiple tools yields the highest quality, particularly when handling intricate images such as those in fashion, product, jewelry, or e-commerce photography.
When to Use Clipping Path: Simple Guide
Various industries widely use clipping paths for their specific purposes due to their images’ visual quality and appeal. Below, you will find which industries use the clipping path process and how it benefits them.
E-Commerce Image Editing
E-commerce heavily relies on high-quality product images to create sales. So, it’s important to remove the backgrounds from product images. Consequently, the clipping path guarantees a clear presentation of the products against a white or transparent background across various frameworks.
It allows e-commerce websites with lighter images to load faster. It also allows for simple background changes to match branding or seasonal campaigns.
Fashion and Apparel Image Editing
Fashion brands often need to separate models or clothing from backgrounds to highlight the design, texture, or colors.
The clipping path allows for accurate isolation of intricate details, enabling the creation of composite images that mix different styles or themes. It improves the visual impact by focusing on the fashion rather than the whole setting.
For Professional Photography
In portrait or product photography, professional photographers frequently use clipping paths to retouch images. By simply isolating subjects, they can easily adjust lighting and shadows or add effects to certain areas without affecting the entire photo.
It assures detailed image enhancements. Another thing that offers is flexibility in placing subjects in different surroundings. This, in turn, enhances the overall composition and visual impact.
Advertising and Marketing Sector
To create compelling visuals for ads, brochures, and social media posts, advertising agencies use clipping paths. By isolating and manipulating elements within images, they can create visually more engaging and appealing ads.
Creative freedom is the primary application for ad compositions. It allows for precise editing to meet branding and visual identity standards.
Jewelry Industry
Jewelry photography requires a high level of precision to display intricate details. Isolating the jewelry from backgrounds enables editors to focus on product details such as reflections, stones, and metallic shine.
It enables high-quality close-ups to display fine details. In turn, it allows for precise color corrections and focused presentation.
Publishing and Print Media
In publishing and print media, the clipping path requires frequently integrating images with text and design elements. Magazines, books, posters, and leaflets primarily use it.
As a result, the visual blend seamlessly integrates into layouts without cluttering the design. It enhances the overall aesthetic appeal of printed materials.
Automotive Industry
Automotive photography uses the clipping path to isolate cars from backgrounds when showcasing in catalogs, advertisements, or listings. It facilitates easy background swapping when highlighting specific features. It focuses clearly on vehicle details, flexible background changes, and consistent visual presentation across platforms.
In summary, the clipping path is a vital tool that is used across multiple industries, from e-commerce to the automotive industry. Its processing system allows editors to alter isolation and manipulation with clarity, precision, and creative freedom.
How to Make a Clipping Path for an Image: Step-by-Step Guide
Creating a clipping path is a detailed process that uses isolation and manipulation to outline an object. The most common software with the best tool to clip a path is Adobe Photoshop. Below you will find a step-by-step guide on how to create a clipping path on Adobe Photoshop.
This guide on Adobe Photoshop will walk you through making a clipping path from start to finish using the pen tool. The similar steps can be applied to other software like GIMP, Affinity Photo, and CoralDRAW.
Step 1: Open Your Image
What to do: First, open the image you want to edit in Adobe Photoshop. Make sure it isn’t corrupted or has any other problems.
How to do it: Look for the File in the top menu bar, then click Open and choose the image you want to edit. After choosing your desired image, it’ll take a moment to load it into Photoshop.
Step 2: Select the Pen Tool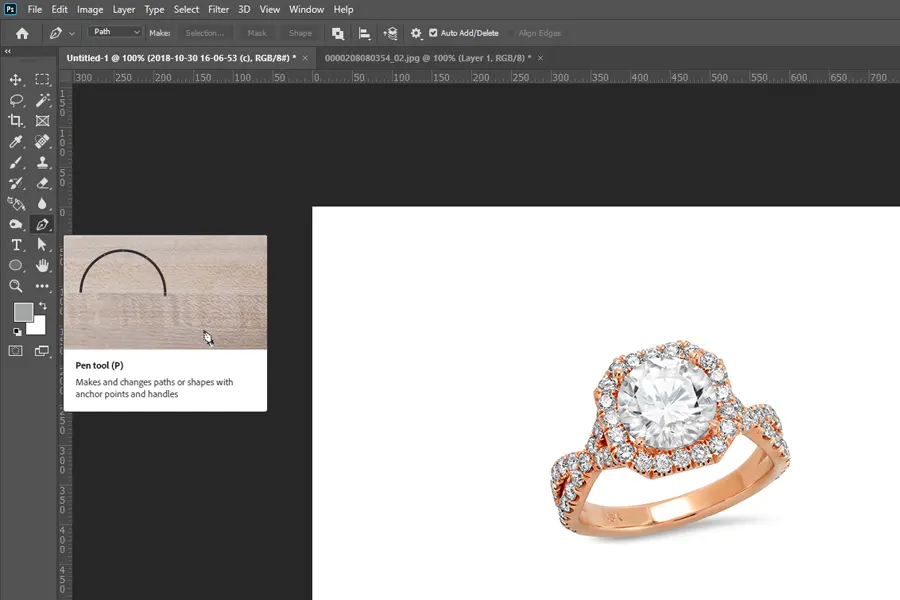
What to do: The Pen Tool is used to manually clip a path around the object you want to isolate from the background. It’s the most effective tool there is for clipping paths.
How to do it: There is a Toolbox on the left-hand side, select the Pen Tool (Shortcut: P). If you can’t find the Pen Tool, then Right-Click on any other Pen-related tool. You can find the Pen Tool in the Dropdown Menu.
Step 3: Start Drawing the Path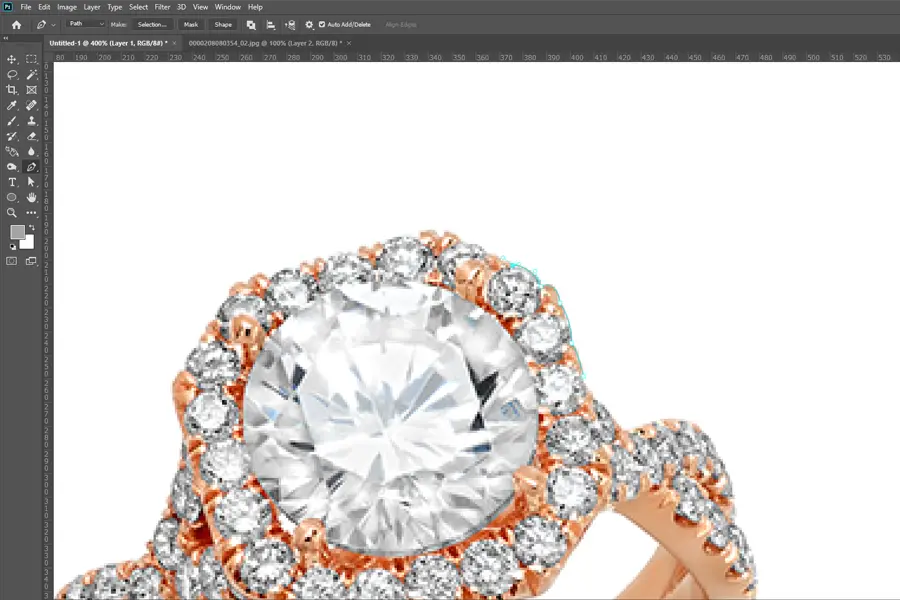
What to do: After getting the Pen Tool, you need to outline the object using the Pen Tool. The Pen Tool helps you to create anchor points around the object edges.
How to do it: Start clicking on the edges of the object to place your first Anchor Point. You need to continue clicking to create a series of anchor points that trace around the object. If you need to create Curved Lines, click and drag to adjust the curve.
Zoom in for better accuracy by pressing Ctrl + Win for Windows, or Command + Mac for MacOS.
For more control, hold the Alt/Option then click on an anchor point to adjust. In turn, you can handle each anchor point individually.
Step 4: Complete the Path
What to do: Close the path, once you have outlined the entire object.
How to do it: After you’ve traced around the object, you need to hover your Pen Tool over the first anchor point you created.
You’ll notice that a small circle appears next to the Pen Tool icon. It indicates that you can close the path anytime. Click to complete the path process.
Step 5: Save the Path
What to do: After completing the path process, your path needs to be saved in Photoshop for further use. It helps if you ever need to alter something.
How to do it: To save your path, you need to go to the Paths Panel by clicking Windows > Paths in the Top Menu if it’s not already open yet. The newly created path is listed as the Work Path. Just press Double-Click on it to rename and save it.
Step 6: Removing the Background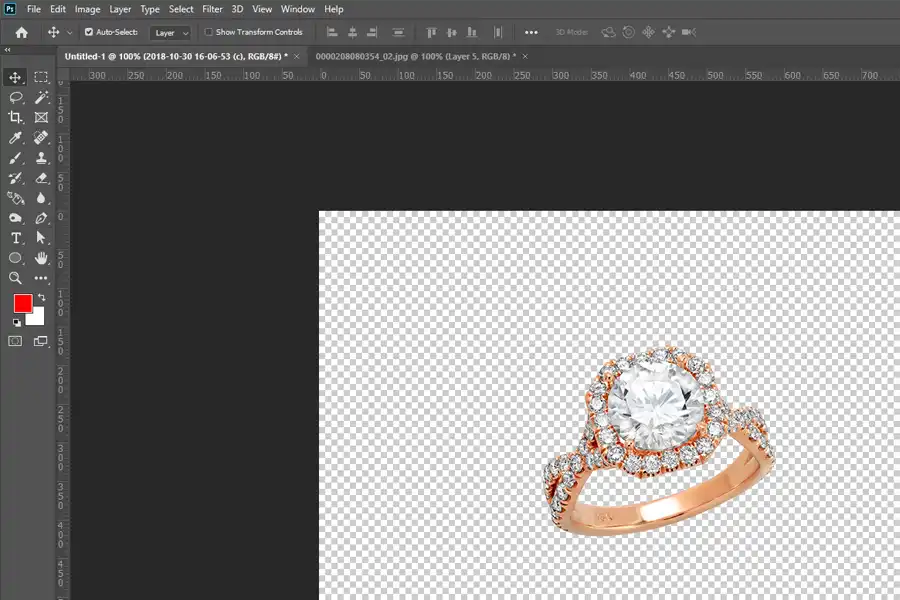
What to do: In this step, you have to use the path to Isolate the Object from the background.
How to do it: You have to go back one more time to the Path Panel and Right-Click the path, then choose Make selection. Now, press Shift + Ctrl + I for Windows or Shift + Command + I for MacOS to invert the selection.
It will select the background then you can press Delete or Backspace to remove the background. In turn, leaving only the isolating object.
Step 7: Save Your Image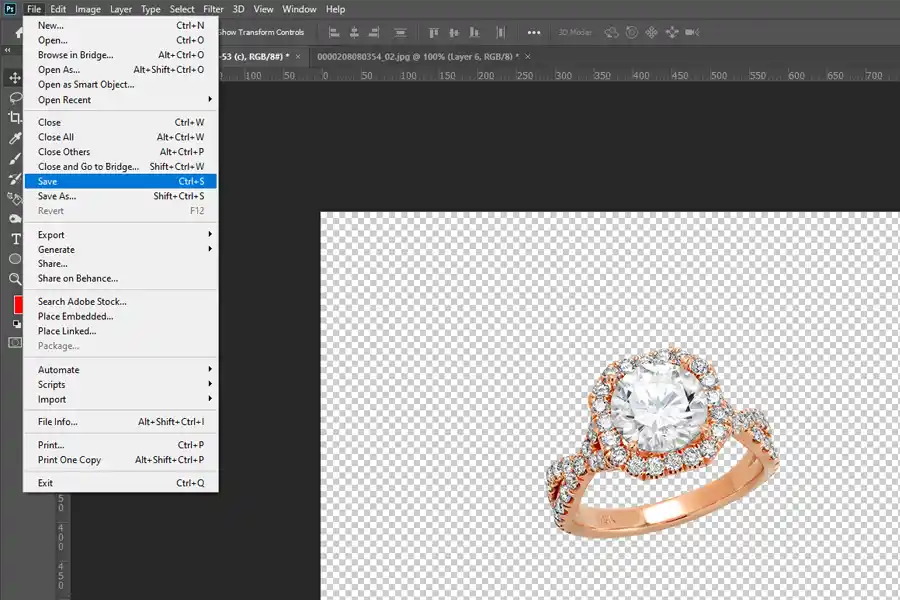
What to do: This is the last step where you’ll save your file with the clipping path. Later, you can Reuse it or Export it with a transparent background.
How to do it: Save the file as a Photoshop Document (PSD), you need to go to the File, and there you will find Save As. Press it to save as Photoshop from the Format Dropdown.
To save it with a transparent background for web use, go to File > Export > Export And choose PNG format. Make sure the Transparency Box is checked.
Tips for Better Clipping Path:
Zoom in Closely
When you create paths around intricate edges zoom in closely for more precision and accuracy.
Use Fewer Anchor Points
It’s necessary to keep the paths flexible and smoother, especially for straight lines.
Adjust Curves
Try to drag anchor handles when dealing with rounded objects or curved edges.
Clipping Path vs. Image Masking: Differences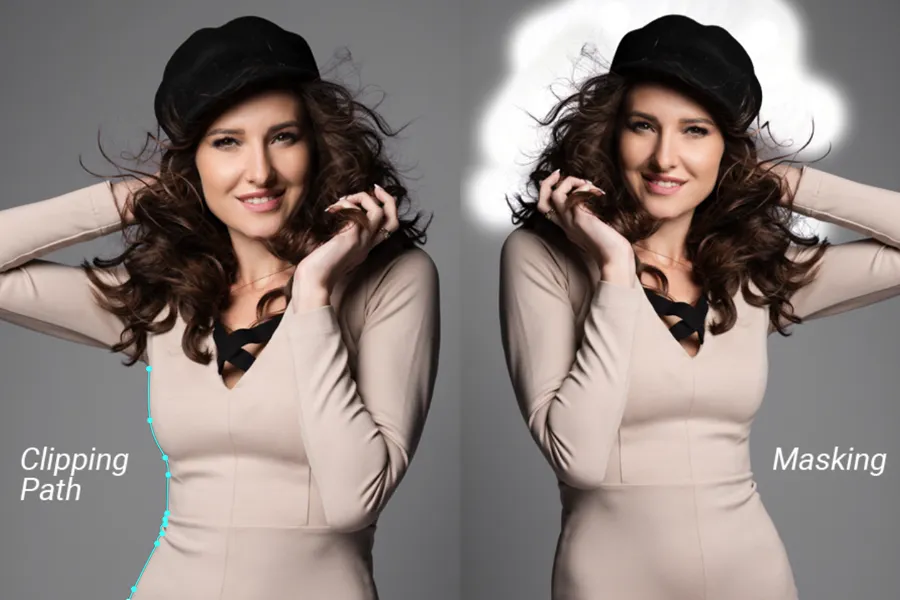
Clipping Path and Image Masking are two essential procedure used in simple and complex image editing. The clipping path is ideally used for isolating parts of an image with a sharp image.
On the other hand, image masking is better suited for images with intricate details like hair or fur. You see, both methods have their specific benefits depending on the complexity of the object and the image. Below is the difference between the clipping path and image masking.
| Viewpoint | Clipping Path | Image Masking |
| Definition | The Clipping Path is a closed vector path technique used to isolate or cut simple objects with sharp edges. This vector path is used by the Pen Tool in software like Adobe Photoshop. | The Image Masking tool uses pixel-based methods. The layer masks or channel masks isolate or remove the parts of an image with fine details. Ideal for objects with soft edges or transparency. |
| Known For | Objects with hard edges like cars, bottles, boxes, or furniture. | Objects with soft edges or transparency-like hair, fur, glass, feathers, or clouds. |
| Complexity of Edges | Works well for simple shapes with clean, sharp edges. | Works well for complex edges that have fine details or transparency. |
| Software Tools | Adobe Photoshop – Pen Tool. Adobe Illustrator. CorelDRAW. | Adobe Photoshop – Layer Mask, Channel Mask, Magic Wand. Affinity Photo. GIMP |
| Accuracy | Accurate for objects with clear edges. | For beginners, it’s quite easy to learn and implement. |
| Time Utilization | Quite fast for simple objects. | Takes more time as it requires careful adjustments of masks. |
| Ease of Usage | For beginners, it’s quite easier to learn and implement. | Requires a more advanced understanding of masking techniques. |
| File Size | It creates smaller file sizes because of vector-based tools. | Due to pixel-based masks, it creates larger file sizes. |
| Editing Flexibility | It is a non-destructive tool. It can easily be modified without altering. | It is also a non-destructive editing tool. It changes can be refined without starting over. |
| Pros | Precise for objects with hard edges. Light-weight vector paths. Quick for simple images. | Ideal for images with soft edges. Can handle transparent areas like veils or glass. Gives high control over details. |
| Cons | Limited to objects with sharp, clear edges. Not suitable for soft or intricate edges like hair. | More time-consuming and resource-intensive. Sharper learning curve compared to the clipping path. |
| Which Industries Use It | E-Commerce: isolates product images with hard edges (shoes, electronics, etc.). Graphic Design: simple object isolation like logo placement. | Fashion and Beauty: for hair and fabric isolation. Advertising: a complex subject with transparency. Creative Agencies: for advanced retouching and composition. |
Using the corrected method ensures a better result, allowing for flexibility and efficiency in image editing based on the specific needs of the project.
Pros and Cons of Outsourcing Clipping Path Service:
Outsourcing clipping path services can be a smart choice for businesses that rely on high-quality images for their operations. Below is a detailed overview of it’s Pros and Cons.
Pros of Outsourcing Clipping Path Services
Cost Savings
Outsourcing to countries with lower labor costs can significantly reduce expenses compared to hiring in-house editors. Whereas, you can avoid the cost of hiring editors and cost of purchasing image-editing software, since the provider already has the necessary tools.
Many service providers offer affordable prices. They have many price models like pay-per-image, where you only pay for the work completed.
Expertise and High-Quality Output
Outsourcing gives you access to highly skilled editors around the globe. You can find professionals who specialize in different clipping path techniques, especially for high-detail images.
These kinds of experienced editors can create more precise clipping paths, ensuring a clean and flawless edited image.
Faster Turnaround Time
Outsourcing companies often have large teams, allowing them to process large volumes of images quickly. With outsourcing, work can be done around the clock, which allows for faster project completion.
This is especially useful for industries like e-commerce, where bulk image editing is essential.
Focus on Core Business Activities
Time-consuming tasks like clipping paths can be done more easily by outsourcing. Outsourcing takes the burden of repetitive tasks off, freeing up resources for more high-priority work. In turn, businesses can focus more on their core activities.
Scalability
Outsourcing offers flexibility, allowing businesses to scale up or down according to their project demands. During busy seasons, companies can outsource more work without worrying about staffing limitations.
Cons of Outsourcing Clipping Path Services
Quality Control Issues
Outsourcing can be difficult sometimes due to the reason of inconsistent quality. If the service provider does not meet your standards or lacks clear communication, the result will not align with your vision.
Communication & Time Barriers
It can be challenging to communicate detailed creative direction to an outsourced team. Depending on the provider, language differences could lead to misunderstandings about project specifications.
On the other hand, time zone differences can offer round-the-clock service but it can also lead to delays in real-time communication and feedback.
Security and Confidentiality Risks
Sending images, especially for sensitive projects to external providers might expose businesses to security risks. Companies may worry about losing control over their images if they have proprietary designs.
It is quite essential to ensure that the provider offers NDA and data security practices.
Loss of Direct Control
By outsourcing, you give up some creative control over the process. It will be difficult for you to make immediate adjustments to your images. It also means you are dependent on the provider for delivery. It can be a bit of a problem if your service provider delays.
Outsourcing clipping path services can offer significant advantages where it saving time, reducing cost, and gaining access to high-quality image editing expertise. Choosing the right service provider often outweighs the cons.
Instead of hiring in-house editors which is costly, you can outsource the task at a fraction of the cost, maintaining quality without the overhead.
Conclusion
The clipping path is quite vital in photo editing, particularly for businesses looking to enhance their product images. By creating clean, precise edits, clipping paths ensure images that look professional and appealing to potential customers.
Outsourcing these services can save time and ensure quality, which is a valuable option for businesses. In the end, understanding clipping paths will help you make informed decisions about your photo editing needs.
Hadi Zaman is a marketing specialist and content writer who loves tech, story writing, and content creation. With years of experience, he creates easy-to-read content that connects with readers. Inspired by new ideas and personal experiences, Hadi makes complex topics clear and relatable.
