High-quality furniture images are essential for attracting customer’s attention, especially when selling online. It can directly impact customer engagement and purchasing decisions. Customers always rely on clear, appealing images to evaluate products, making editing furniture photos an essential practice.
In today’s competitive e-commerce market, simply capturing furniture with a camera isn’t enough anymore. Factors like lighting, angles, and background can make or break the appeal of your images. Sometimes, these factors can also break the appeal of your image like poor lighting, distracting backgrounds, or imperfect angles. When it does that’s when professional editing corrects these flaws. In turn, this ensures each photo showcases the furniture’s details, texture, and design in the best way.
This guide explains the importance of editing furniture photos, the steps involved, and how to select the right editing service. Whether you’re a small business owner or part of a large e-commerce platform, learning about furniture photo editing can transform your product listings and boost sales.
Why Do You Need to Edit Furniture Photos?
Editing furniture photos is essential for presenting your products in the best possible light. You see, raw images often fail to capture the true beauty of furniture due to issues like poor lighting, distracting backgrounds, or unwanted imperfections.
High-quality editing helps fix these problems. Editing furniture photos ensures your product looks polished and professional, attracting customers and building trust in your brand. Remember, in e-commerce “First impressions always matter”.
One major reason to edit furniture photos is to enhance visual appeal. Shoppers are drawn to clean, professional images that highlight the features of a product. Editing allows you to adjust colors, lighting, and sharpness to make your furniture look realistic.
Creating consistency for your furniture catalog is another key factor for editing furniture photos. Standard photos make your e-commerce store look professional. For example, aligning backgrounds, adding natural shadows, and ensuring the same color tones across all images create a cohesive brand identity.
Additionally, furniture photo editing ensures your images meet e-commerce platform requirements, such as size, resolution, and background color. This compliance prevents rejection and maximizes visibility on platforms like Amazon, Walmart, eBay, Costco, Wayfair, etc.
Lastly, editing highlights product details, such as fabric textures, wood finishes, or intricate designs, making your furniture stand out from competitors. Well-edited photos are an investment that leads to better customer engagement and higher sales.
Benefits of Furniture Photo Editing:
Enhances Visual Appeal
Furniture photo editing improves the overall look of an image by correcting imperfections such as scratches, dust, or uneven lighting. Adjustments to brightness, contrast, and color ensure the furniture appears vibrant and attractive.
for example, studies in visual perception show that brighter and more visually balanced images are more likely to capture customer attention.
Builds Brand Trust
Professional and consistent photos reflect a brand’s commitment to quality. Customers associate high-quality images with high-quality products.
Consistency across images also fosters a cohesive visual identity, a key factor in customer retention.
Better Compatibility with E-Commerce Platforms
Online marketplaces like Amazon and eBay require product images to meet strict guidelines. Edited photos ensure compliance by using proper background removal, aspect ratios, and resolution settings.
Keeping to these standards prevents your listings from being rejected while improving their visibility in search results.
Highlight Key Product Features
Edited photos allow you to focus on critical details, such as fabric texture, wood grain, or intricate designs. Enhancing these elements provides a realistic representation, reducing customer complaints and returns.
Time and Cost Efficiency
With editing, photographers don’t need to invest in expensive photography setups for each shoot. Professional editing can transform average photos into high-quality visuals, saving time and money.
Increase Sales and Conversions
High-quality images drive engagement. A well-edited photo can result in higher click-through rates (CTR) and conversions.
Research indicates that 67% of e-commerce customers consider product images more important than descriptions or reviews.
Improved Customer Trust
High-quality images build trust.
When furniture is presented professionally, buyers feel more confident about the product and your business.
Support Cost-Effective Marketing
Professional-looking furniture photos can double as advertising assets for social media, catalogs, or email campaigns. With the same set of high-quality images, the studio can save money on additional content creation while maintaining an impactful marketing presence.
By investing in furniture photo editing, you ensure your products stand out, improve customer trust, and increase sales potential.
Essential Software for Editing Furniture Photos:
Choosing the right tools can make a huge difference in the final result when it comes to furniture photo editing. Below, you’ll find some of the popular editing software and its tools, along with how they help in creating professional-quality furniture images.
| Software Name | Tools Provided | Pro Tips |
|
Adobe Photoshop: With its sophisticated tools for color grading, background removal, and retouching, Photoshop is the industry standard for editing furniture photos. Photoshop is a must if you want your images to appear expert and up to industry standards. |
Pen Tool: Ideal for creating clipping paths around furniture, allowing precise selections and background removal. Clone Stamp & Healing brush: Used for furniture retouching imperfections, such as dust, scratches or blemishes. Layer Masks: Helps in non-destructive editing by hiding or revealing parts of an image. Adjustment Layers: Helps adjust exposure, brightness, and contrast to make the furniture pop. |
Use the Content-Aware-Fill feature for quick background removal and object removal. Utilize Smart Objects for Non-Destructive transformations. Adobe Photoshop is known for high-end professional photo editing software. Photoshop is a subscription-based tool with a monthly fee. For smaller studios, it may not be the ideal software budget-wise. |
|
Adobe Lightroom: The finest for batch editing is Lightroom. Preset functionality, lens correction tools, and HSL adjustments are among Lightroom’s most important features. |
Basic Adjustments: lightroom provides the basic fine-tunes brightness, contrast, exposure, and saturation of furniture images. Lighting Filter: Elevates lighting, making the furniture stand out as the main object with subtle lighting effects. Lens Correction: Sometimes the camera lens causes distortions, especially when photographing large furniture. Lightroom can fix these kinds of distortions. |
Use the Presets feature that is built in Lightroom. This feature offers consistent editing across multiple images. Lightroom is known for its efficient batch-processing methods. It saves a lot of time and cost for large inventories. Lightroom is more affordable than Photoshop. |
| GIMP (GNU Image Manipulation Program): For newcomers or editors with limited funds, GIMP is a free and open-source alternative to Photoshop offering good editing features. |
Cloning Tool: it’s similar to Photoshop’s clone stamp. It’s used for cleaning up images and removing imperfections. Path Tool: Used for creating precise clipping paths and selections of furniture. Filters: offers various filters for sharpness, smoothing, and enhancing textures. |
GIMP is a layer-based editing software that allows detailed adjustments without affecting the original image. It’s free to use, making it ideal for small studios or beginners who are just starting with basic photo editing. |
|
Fotor: Fotor is an online picture editor that is simple to use. It lacks the accuracy of Photoshop’s Pen Tool, but it does provide a simple path tool similar to the Magic Clipper. It is helpful for people who need to make fast changes without spending a lot of funds on expensive tools. |
Background Remover: Fotor easily removes backgrounds and replaces them with clean, white, or custom backgrounds. Enhance Tool: After loading the image, it automatically adjusts brightness, contrast, and saturation to improve furniture photo quality. Collage Maker: Fotor offers grids to create attractive products. This is for showcasing multiple furniture items. |
To speed up the editing process, the editor uses Fotor’s AI-driven enhancement. Fotor offers both free and pro versions, with the pro version being quite affordable for mini studios. |
|
Canva: Canva’s easy-to-use tools make basic photo editing simple. Canva is a fantastic, easy-to-use application for newcomers that offers basic editing. Perfect for fast adjustments or social media posts. |
BG Remover: Perfect for quickly removing cluttered or distracting backgrounds from furniture photos. Photo Enhancer: Automatically improves image quality with a single click. Templates: There are millions of easy-to-use templates for all kinds of images. |
If you want to use multiple pieces of furniture in a single image, you can use Canva’s grid layout. Canva offers a free version with basic tools, and its paid version is affordable for anyone. |
|
Capture One: Capture One’s excellent color grading tools are well-known. Professionals who work with decor for e-commerce companies would find it excellent. |
Advanced Color Editor: Provides precise color grading and adjustment. It’s perfect for matching furniture tones to their real-life appearance. Tethered Capture: During the photo shoot, it allows the camera to connect directly to the software for real-time photo edits. Layered Editing: Similar to Photoshop, it enables advanced adjustments on separate layers. Clarity and Structure Tools: It enhances textures and fine details, ideal for highlighting wood grains and fabric patterns. |
Capture One uses the High Dynamic Range (HDR) tool to balance highlights and shadows in furniture photos. Use Custom Style to maintain consistency across your product catalog. Capture One is more expensive than Lightroom since it offers advanced tools, making it a favorite among high-end professionals. |
Selecting the right furniture editing tool depends on your business size, the volume of photos, and your editing needs. Adobe Photoshop remains the go-to tool for professionals, offering advanced features. Canva and Fotor are ideal for smaller studios, providing easy-to-use, budget-friendly solutions. GIMP is a great free option for those looking for a powerful tool without the cost.
No matter your choice, mastering these tools will ensure your furniture images are sharp, clean, and ready to showcase to your potential customers.
How to Edit Furniture Photos for Ecommerce Website?
Editing furniture photos is a step-by-step process that transforms raw images into polished visuals perfect for e-commerce. It’s a systematic approach to ensure the final images are optimized. Each step ensures the final photo is clear, professional, and streamlined for online sales.
Below is a rational workflow to guide you step by step through editing tools and adjustments along with scientific reasoning behind each step effectively paired with Photoshop instructions.
Step 1: Cropping and Straightening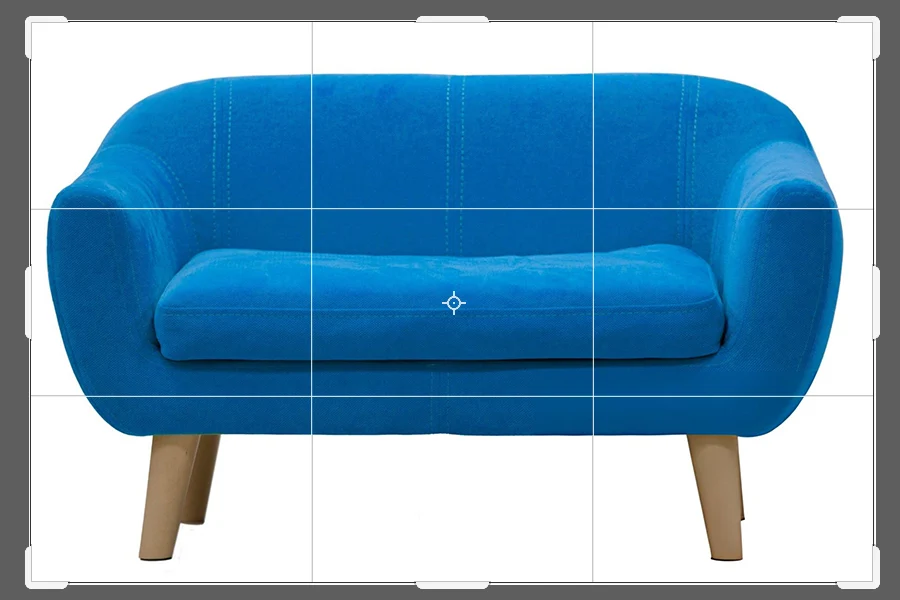
The first step is to crop and straighten the image ensuring the furniture is perfectly aligned within the frame.
Cropping: It removes unnecessary areas, focusing attention on the product. For example, if the image includes clutter or irrelevant elements, cropping wipes out distractions.
Straightening: It ensures the furniture appears level. Crooked lines can distort the viewer’s perspective, making the furniture look unstable or poorly designed.
How to do: You can use gridlines in software like Adobe Photoshop or Lightroom to align the furniture with horizontal and vertical axes. Always leave equal spacing around the furniture for balance. Now, the steps to do Cropping and Straightening in Adobe Photoshop:
- Open the image in Photoshop.
- Choose Crop Tool (C) from the toolbar.
- Adjust the crop frame to center the furniture and remove distractions.
- Use the Straighten Tool (within the Crop Tool) to align the image by dragging along a straight edge in the furniture.
- Lastly, press Enter to apply.
Scientific Note: Scientific research shows human eyes naturally perceive straight lines as more pleasing. Proper alignment enhances visual harmony and balance.
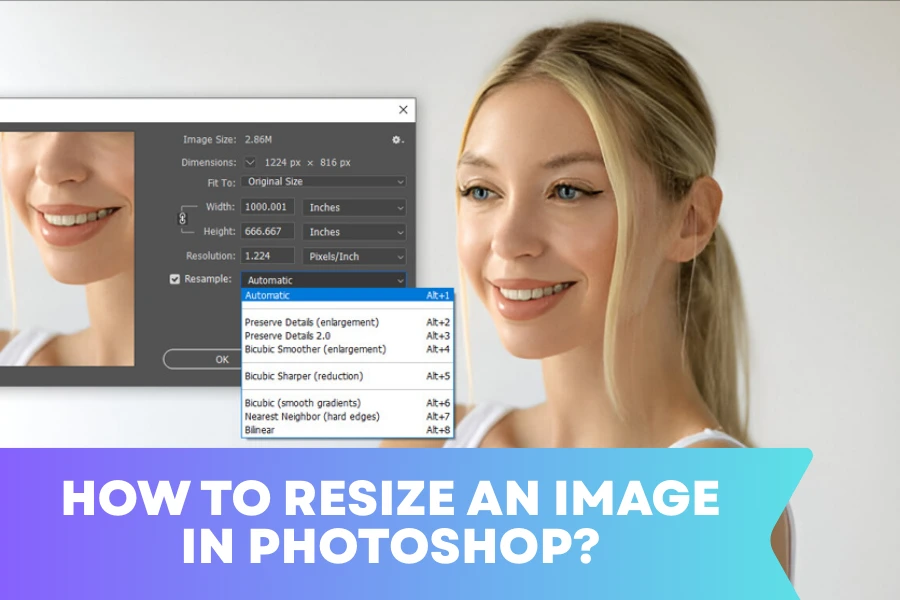
Step 2: Resize the Image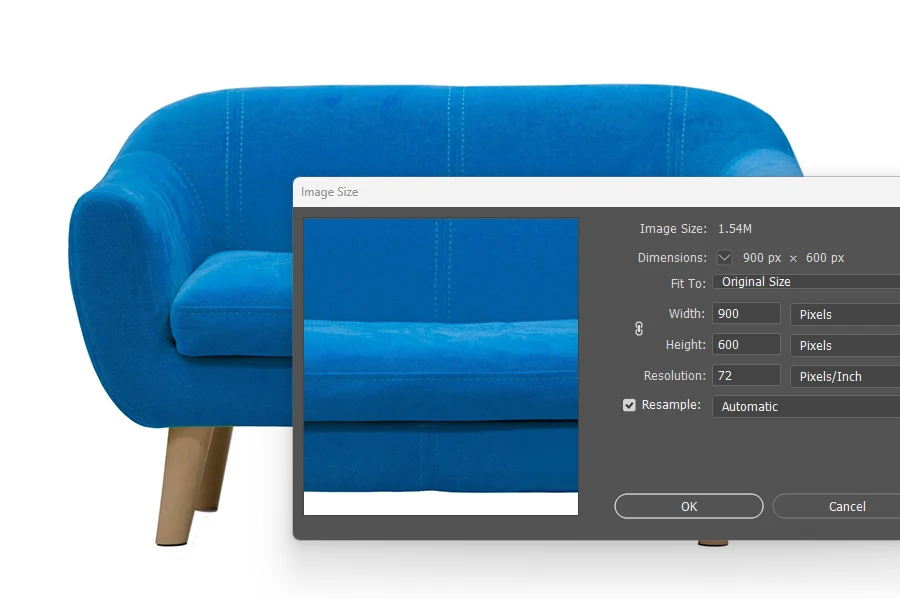
Resizing adjusts the image dimensions to meet the requirements of specific e-commerce platforms. It’s crucial for ensuring compatibility.
The Value of Resizing: Different platforms (like Amazon or Etsy) require specific image dimensions for optimal display. Standard sizes (e.g., 2000 x 2000 pixels) ensure optimal quality without overloading page load times. Resized images also load faster, improving user experience. Maintaining the aspect ratio prevents distortion of the furniture’s proportions.
How to do: Maintain the aspect ratio to avoid distortion. Save resized images in high resolution (e.g., 300 DPI) for zoom-in features while keeping the file sizes optimized. Now, the steps to Resizing the Image in Adobe Photoshop:
- Go to Image > Image Size in Photoshop.
- Enter the Platform’s required dimensions (e.g., 2000 x 2000 pixels for a square format).
- Choose Bicubic Sharper under Resample for high-quality resizing.
- Click OK to save changes.
Practical Tips: Always try to export images in formats like JPEG, PNG, WEBP to preserve quality during resizing.
Step 3: Noise Reduction
Noise, often caused by high ISO settings during photography, appears as grainy or distorting textures.
The Value of Noise Reduction: Apply noise reduction tools to smooth out pixelated areas, particularly in shadows or solid colors. It also works with clearer images, especially for furniture with fine textures. Strike a balance between reducing noise and retaining details.
How to do: Use noise-reduction tools in editing software. Adjust luminance and color noise settings carefully to retain natural texture. Now, the steps to do Noise Reduction in Adobe Photoshop:
- Go to Filter > Noise > Reduce Noise in Photoshop.
- Adjust the Strength, Preserve Details, and Reduce Color Noise sliders for optimal results.
- Preview the changes and click OK.
Scientific Note: Noise occurs due to electronic interference in digital sensors. Reducing noise ensures a cleaner and more professional image.
Step 4: Sharpening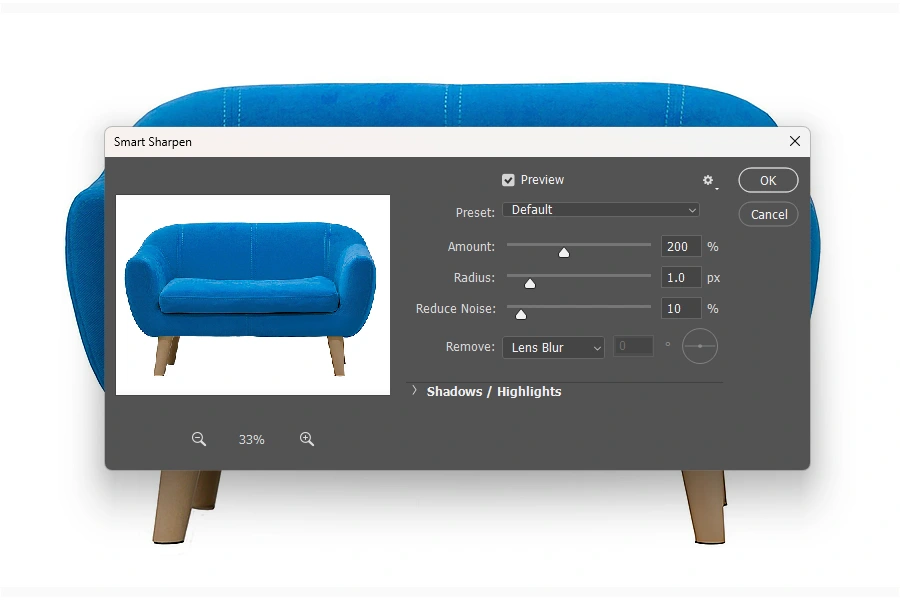
Sharpening enhances the edges and details of the furniture, making the furniture stand out. This is especially important for showcasing intricate textures like wood grain or fabric patterns.
The Value of Sharpening: Clear details, such as wood grain or upholstery texture, help customers make informed decisions. Avoid over-sharpening, as it can create unnatural halos around the edges.
How to do: Use sharpening tools in Photoshop or Lightroom to make the image finer. You can use the “Unsharp Mask” tool in Photoshop. Adjust settings like radius and threshold to avoid over-sharpening, which can cause unnatural halos. Now, the steps to do Sharpen the Image in Adobe Photoshop:
- Go to Filter > Sharpen > Smart Sharpen.
- Adjust the sliders for Amount and Radius. Keep the Threshold low for finer sharpening.
- Preview and click OK to apply.
Practical Tips: Sharpening works by increasing the contrast between adjacent pixels, making edges stand out more prominently.
Step 5: Adjusting White Balance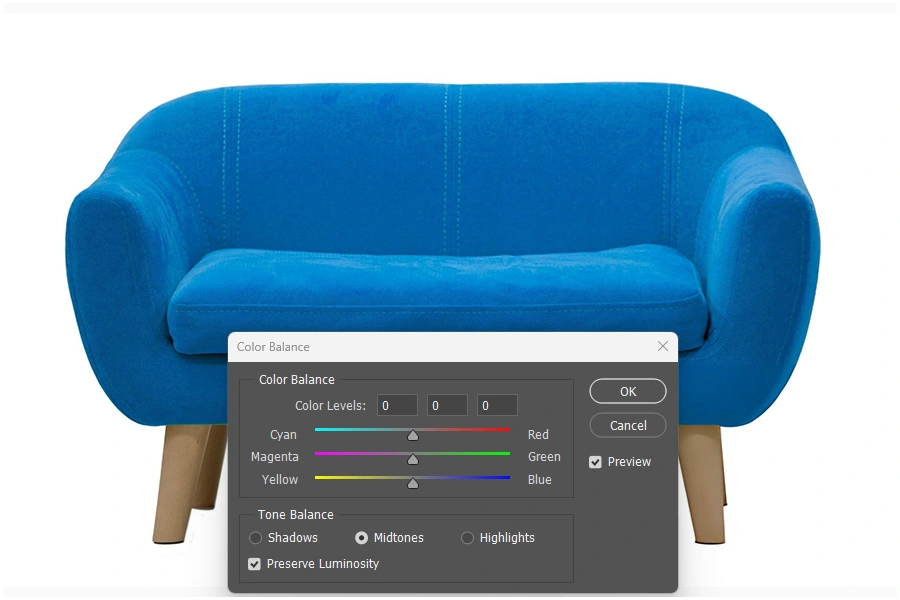
White balance corrects the color temperature to make whites appear neutral. It ensures the color appears natural and true to life.
The Value of White Balance: Incorrect white balance can make furniture look unrealistic making the white furniture appear Blue (cool) or Yellow (warm). Tools in Photoshop or Lightroom allow you to set the correct white point for accurate color representation.
How To Do It: Use the white balance tool and select a neutral area in the image. Adjust sliders for “Temperature” and “Tint” to correct warm or cool tones. Now, the steps to do White Balance in Adobe Photoshop:
- Go to Image > Adjustments > Color Balance in Photoshop.
- Adjust the sliders for Shadows, Midtones, and Highlights to neutralize unwanted tints,
- Use the Eyedropper Tool to sample a neutral white or gray area for precise adjustments.
Scientific Note: White balance adjusts the color temperature of an image to align with the light source, measured in Kelvin.
Step 6: Contrast and Exposure Balance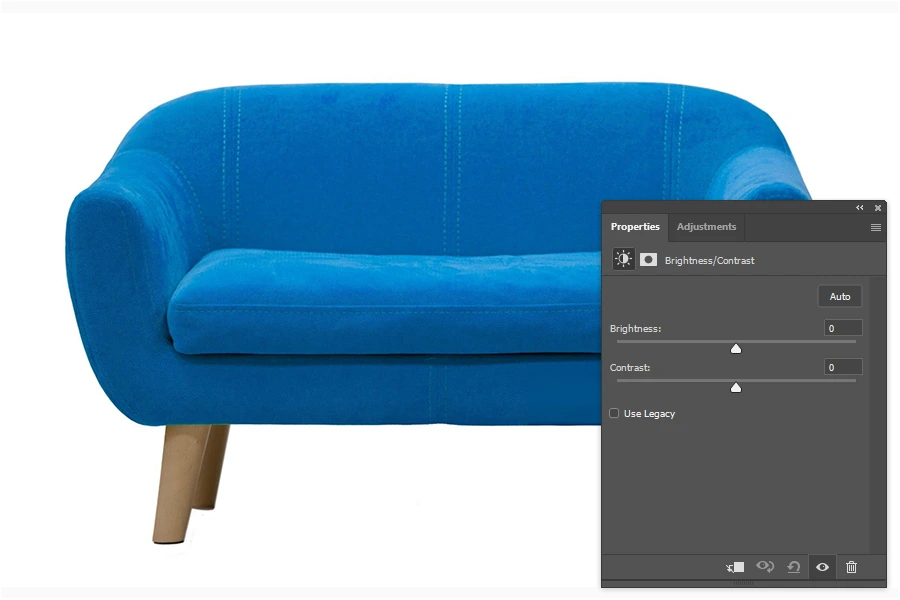
Balancing exposure and contrast ensures the furniture is neither too dark nor overly bright. It simply amplifies the image’s dynamic range.
Contrast: Contrast makes the furniture stand out against the background by deepening shadows and enhancing highlights. Proper contrast showcases the furniture’s structure.
Exposure: Exposure adjusts the overall brightness. It assures brightness matches real-world conditions.
How to do: Try to increase contrast slightly to define edges and textures. Adjust exposure so details are visible in both shadows and highlights. Now, the steps to do Contrast and Exposure Balance in Adobe Photoshop:
- Open the Levels Tool (Ctrl + L).
- Adjust the sliders under the histogram to balance the shadows, mid-tones, and highlights.
- Use the Curves Tool (Ctrl + M) for finer contrast adjustments by creating an S–curve on the graph.
Practical Tips: Use histogram tools to ensure balanced tonal distribution across the image.
Step 7: Color Correction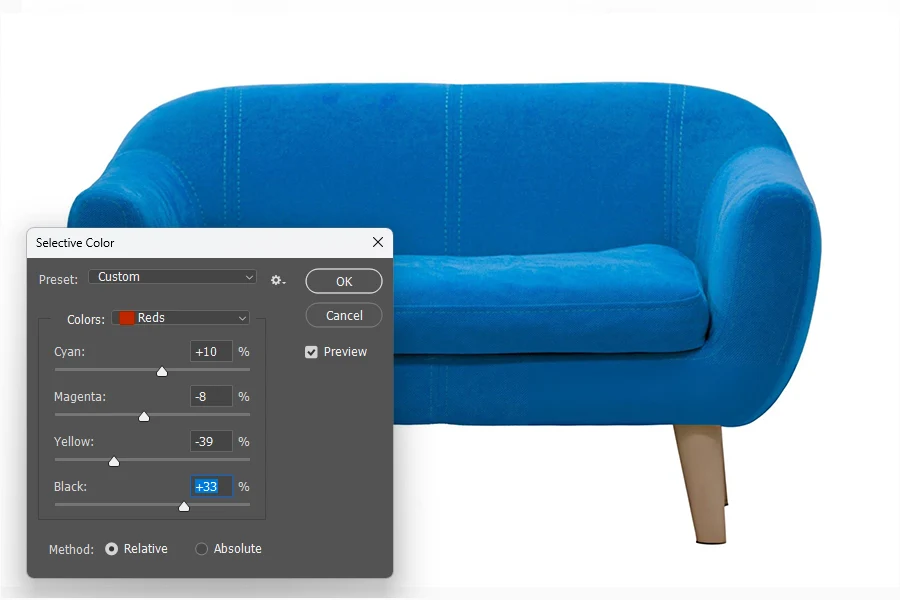
Color correction adjusts hues, saturation, and luminance to ensure the furniture’s color looks accurate and matches its real-life appearance, improving customer trust.
The Value of Color Correction: Color correction fixes color casts caused by lighting conditions. It uses selective color adjustments to amplify key features like wood tones or fabric shades. It creates accurate color and builds trust, as customers expect the product to look the same in person.
How to do: Use “Curves” or “Hue/Saturation” tools to adjust the color balance. Also, you can try to match the edited photo to the actual product’s colors. Now, the steps to do Color Correction in Adobe Photoshop:
- Go to Image > Adjustments > Selective Color in Photoshop.
- Adjust specific Color ranges like Reds or Neutrals to fine-tune the hues.
Scientific Note: Colors are perceived differently under various lighting conditions. Color correction aligns the photo’s color with standard daylight.
Step 8: Saturation, Temperature and Tint Adjustments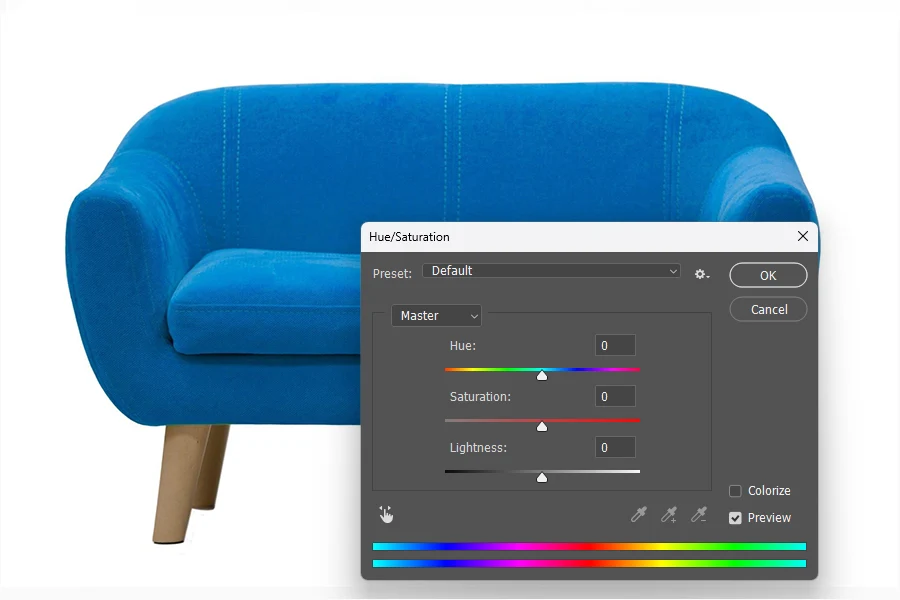
Saturation temperature and tint control the refining of the image’s color. These adjust the overall mood and tone of the image. These adjustments ensure the furniture’s colors are vibrant yet realistic, avoiding overly saturated or washed-out images.
Saturation: It works on the intensity of colors. It can enhance or reduce the intensity of colors. Over-saturation can make the image look unnatural, while under-saturation can make it dull.
Temperature: It especially balances warm (yellow) and cool (blue) tones.
Tint: It adjusts the green-magenta balance, particularly useful for correcting artificial lighting.
How to do: Try to increase saturation slightly for vibrancy, but avoid exaggerating. Make the temperature slider match natural lighting. Now, the steps to do Saturation, Temperature, and Tint in Adobe Photoshop:
- Navigate to Image > Adjustments > Hue/Saturation in Photoshop.
- Increase saturation slightly to make colors pop.
- Use the Tint option in the adjustment layer to neutralize any green or magenta casts.
Scientific Note: All these adjustments align the photo’s color with the human visual system, ensuring they appear natural across different screens.
Step 9: Clipping Path for Precise Selections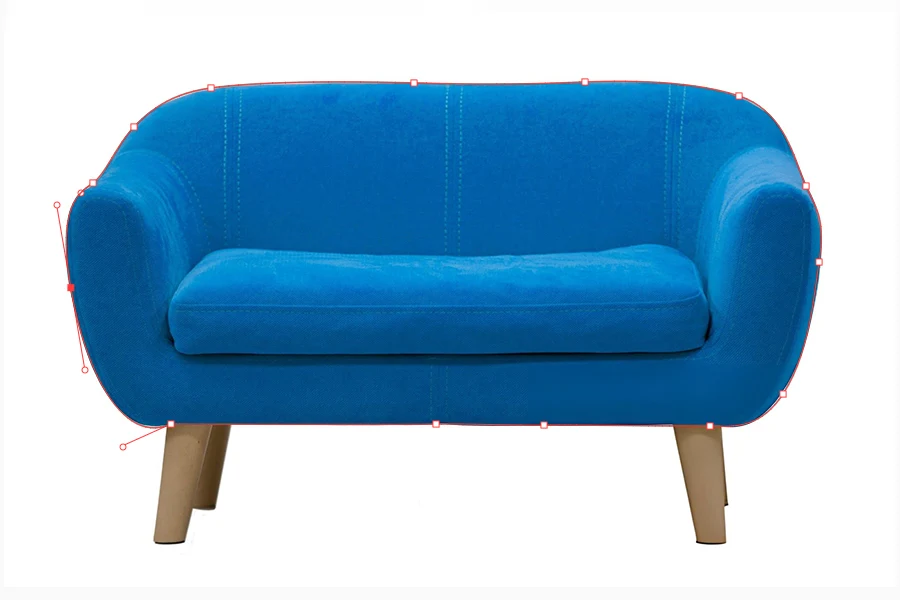
The clipping path isolates the furniture from its background. It helps you focus on specific areas for further editing.
The Value of Clipping Path: It allows background removal or replace the furniture without affecting itself. This technique is critical for ensuring the furniture stands out and maintains a professional look, especially for e-commerce platforms. Editors use clipping paths for background removal, targeted edits, and composite creations.
How to do: Adding Clipping paths as part of the furniture photo editing process ensures precision, efficiency, and professionalism. Now, the steps to do The Clipping path in Adobe Photoshop:
- Select the Pen Tool (P) in Photoshop.
- Carefully trace around the furniture, creating anchor points along the edges.
- Right-click and select Make Selection, then save the path under the Paths Panel.
Practical Tips: For accuracy zoom into the image to trace edges precisely. You can also use smooth anchor points to smooth the curves. Always double-check your path before converting into a selection. Save the path in Photoshop for further refining or modifying.
Step 10: Background Removal and Replacement
A cluttered background can distract customers from the furniture. Removing or replacing those distorted backgrounds can make the image look clean and professional.
The Value of Background Removal: White or neutral backgrounds are standard for e-commerce. Look for the platform’s guidelines before replacing the background. You can use a clipping path for precise selection before removing the background.
How to do: Background removal and replacement, combined with precise clipping paths, significantly elevate the quality of furniture-edited photos. Now, the steps to do The Background Removal and Replacement in Adobe Photoshop:
- Use the Select Subject feature under Select > Subject to quickly isolate the furniture.
- Refine the selection with the Select and Mask tool for a clean edge.
- Delete the background or replace it by dragging in a new layer.
Practical Tips: White or light grey is considered to enhance the focus on furniture. A plain background reduces distractions and emphasizes the furniture’s design.
Step 11: Retouching for Flawless Appearance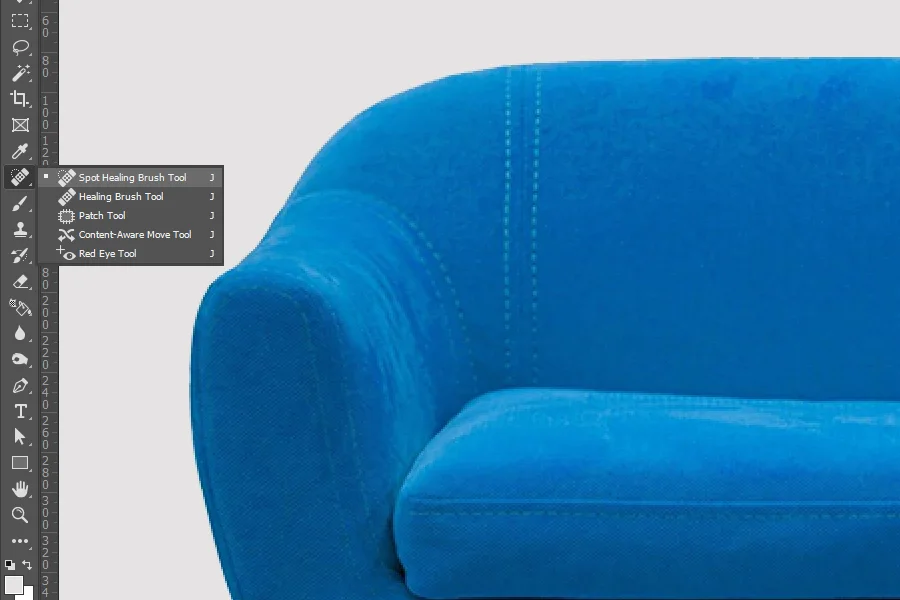
Retouching removes the imperfections from the images.
The Value of Retouching: Retouching enhances the look of intricate details. It creates a polished, professional look by eliminating flaws like scratches, dirt, or uneven textures. Tools like “Spot Healing Brush” and “Clone Stamp Tool” in Photoshop are ideal for fixing flaws.
How to do: Retouching in Adobe Photoshop involves enhancing the overall appearance of furniture by removing imperfections, refining details, and improving texture. Now, the steps to do The Retouching in Adobe Photoshop:
- Select the Spot Healing Brush Tool (J) from the toolbar.
- Click on spots, scratches, or minor imperfections to automatically blend them with the surrounding texture.
- For precise corrections, use the Clone Stamp Tool (S). To sample an area Press Alt. Paint over the imperfection using the sampled texture.
Practical Tips: Retouching focuses on micro-details that improve the overall quality of the image.
Step 12: Shadow Creation
Shadows add depth and make the furniture appear more grounded.
The Value of Shadow Creation: It creates a three-dimensional effect. Enhancing the furniture’s realism. Drop shadows mimic light sources and give natural shadow effects for advanced edits. Reflective shadows simulate the look of furniture placed on reflective surfaces.
How to do: By creating natural and realistic shadows that make your furniture photos appear more professional and appealing, which is essential for any e-commerce platform. Here’s a guide to creating Realistic Shadows in Adobe Photoshop:
- Create a new layer below the furniture image.
- Use the Elliptical Marquee Tool (M) to create a shadow shape.
- Fill it with black and apply Gaussian Blur under Filter > Blur > Gaussian Blur.
- Reduce opacity to make it look natural.
Practical Tips: Adjust opacity, angle, and blur to mimic natural light sources.
Step 13: Liquifying the Photo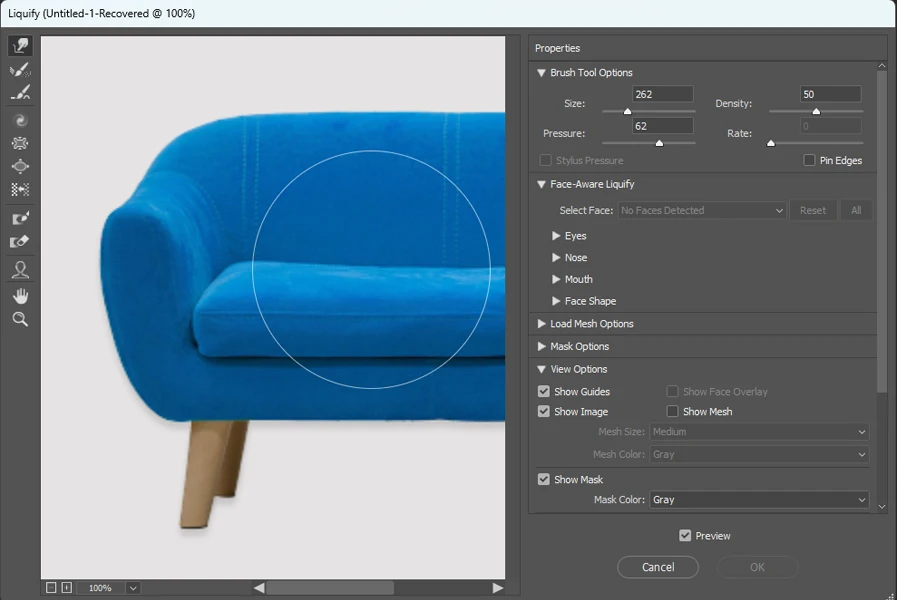
The liquify tool allows you to subtly reshape furniture to correct distortions. It also helps refine proportions, and enhance symmetry while maintaining the natural look of the furniture.
The Value of Liquify Tool: The liquify tool enables editors to achieve flawless results by addressing shape-related issues that could detract from the furniture’s appeal. Use it to fix minor imperfections in angles or dimensions caused during the photoshoot. Avoid overusing this tool to maintain the furniture’s natural look.
How to do: As you know by now, retouching removes flaws from the furniture, while the Liquify Tool adjusts proportions for symmetry. Here’s a guide to using the Liquify Tool in Adobe Photoshop:
- Open Filter > Liquify for fine adjustments like straightening legs or fixing uneven edges.
- Use the Spot Healing Brush Tool (J) to remove imperfections like scratches or dust.
- The Forward Warp Tool is the default tool in liquify workspace.
- If you want subtle shrinking in certain areas of the image, use the Pucker tool (S) or the Bloat Tool (B) to expand the areas.
- To tone down excessive changes, use the Reconstruct Tool (R).
- Use the Freeze Mask Tool (F) to paint over areas you don’t want to distort, after making those changes use the Thaw Mask Tool (D) to unfreeze the protected areas.
Practical Tips: Work in layers to preserve the original image. Use reference guides with the original dimensions of the furniture to maintain accuracy. Use the Reconstruct Tool to undo excessive waring and restore.
Step 14: ISO Adjustment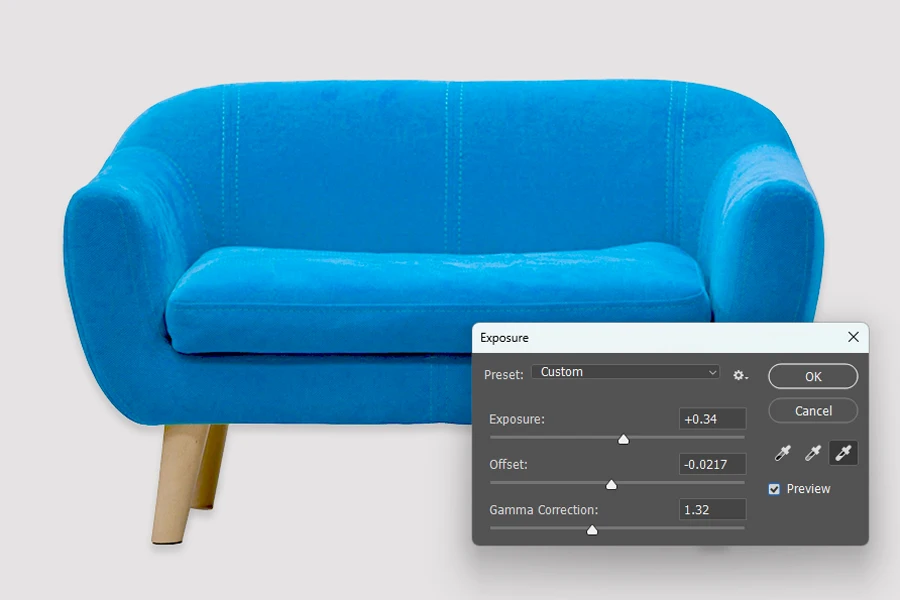
ISO settings control the sensitivity of the camera sensor. Mastering ISO settings and noise reduction is crucial for high-quality photography and editing.
The Value of ISO: Adjust ISO levels in post-processing to ensure optimal brightness without creating noise. High ISO levels in raw photos may introduce noise. Reduce ISO during noise reduction or exposure adjustments, balancing brightness without losing detail.
Low ISO images might appear underexposed, requiring brightness and detail enhancement.
How to do: While ISO is technically a camera setting, you can correct noise and lighting issues caused by high or low ISO in Adobe Photoshop. Now, the steps to do The ISO Adjustments in Adobe Photoshop:
- For High ISO Images (Reduce Noise): Right-click the layer and choose Convert to Smart Object to make non-destructive edits. Navigate to Filter > Noise > Reduce Noise. Adjust noise reduction settings. Check the preview and click OK when satisfied.
- For Low ISO Images (Brighten Underexposed): Press Ctrl + J to duplicate the original layer. Go to Image > Adjustments > Levels. Drag the middle slider slightly to the left to brighten mid-tones. Navigate to Image > Adjustments > Exposure. Adjust Exposure to brighten the image and Gamma Correction to fine-tune details.
Practical Tips: Proper ISO adjustments improve clarity while maintaining natural lighting effects. Reduce ISO during noise reduction or exposure adjustments, balancing brightness without losing detail.
Step 15: Final Review and Export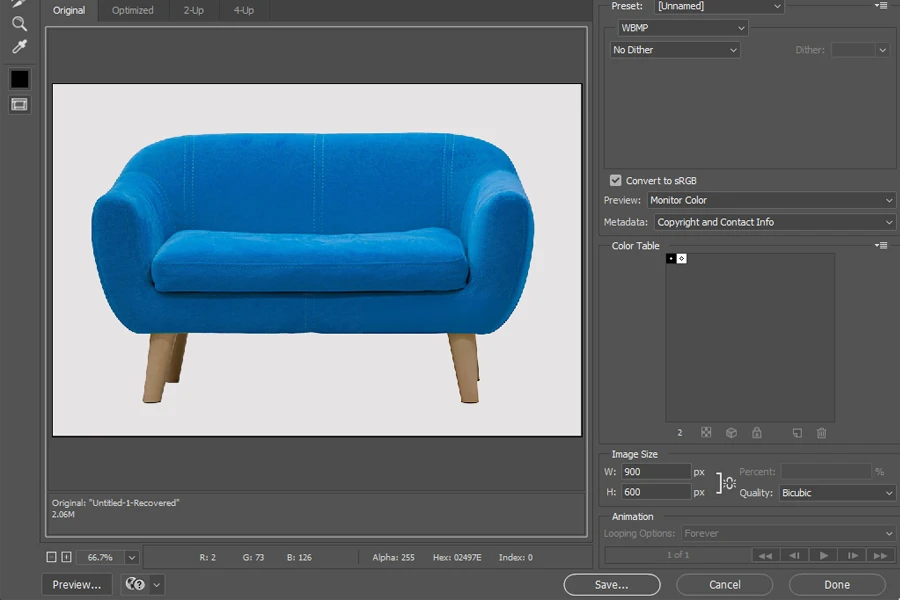
After completing all edits, review the image for consistency and quality. A thorough review ensures every detail meets e-commerce standards. Optimized images load faster, improving user experience and SEO rankings.
How to do: Check for alignment, color accuracy, and resolution. Zoom in for imperfection details. Use calibrated monitors to ensure colors are true to actual furniture.
Export the image in high-quality formats like JPEG, PNG or WEBP with optimized file sizes for faster loading. Choose the right format, JPEG for e-commerce listings, PNG for transparent backgrounds and WEBP for lowest file size. Export at the platform’s recommended dimensions (e.g., 2000 x 2000) pixels for maximum clarity and zoom compatibility.
Practical Checklist: Test on different devices to preview the image on multiple screens. Use Photoshop’s “Save for Web” feature to reduce file size without losing quality. Aim for sizes under 1 MB to ensure fast page loading.
By following these steps, you can create furniture photos that are visually appealing, professional, and ready for e-commerce success. Each step contributes to making your images stand out in competitive marketplaces.
Why Should You Outsource Furniture Photo Editing?
Outsourcing furniture photo editing has become a crucial strategy for businesses, especially in e-commerce, where visuals significantly influence buyer decisions. Below, you’ll find some key reasons why outsourcing this task can benefit your business.
Save Your Precious Time
Editing furniture photos can be time-consuming, requiring precision, and expertise. By outsourcing, you can delegate this task to professionals, freeing up time to focus on core business. This is particularly vital for businesses with large catalogs.
Outsourcing allows you to save precious time that can be better spent growing your business. Instead of spending hours perfecting images, professionals can handle the editing swiftly with turnaround time.
Focus on Your Core Activities
Delegating editing tasks helps you focus on essential business operations like marketing, customer service, inventory management, and strategic planning. By outsourcing, you can ensure high-quality visuals without compromising your core activities.
Cost-Effective Solutions
Hiring and training an in-house team can be expensive. Outsourcing is a more affordable option, especially for small studios or startups. Many editing agencies offer competitive pricing and pay-as-you-go models. This helps studios scale their editing needs without overspending.
Ensure Consistent Quality
Consistency is key in furniture photography, especially for e-commerce platforms. Outsourced editing services use standardized workflows to maintain uniformity in lighting, shadows, and color correction. This will build trust and enhance your brand image.
Access to Professional Expertise
Photo editing requires advanced software like Adobe Photoshop, Lightroom, Fotor, GIMP, and Capture One. These kinds of editing software can be expensive. By outsourcing you’ll gain access to these premium tools and the expertise of professionals who are skilled in using them.
Skilled editors bring years of experience in methods like clipping paths, color correction, shadow creation, and retouching. Outsourcing ensures your photos are edited to the highest standards using industry best practices.
Quick Turnaround Time
Outsourced photo editors work with specialized teams that can handle high-volume tasks efficiently. Whether it’s background removal, exposure correction, or retouching, these services deliver high-quality results within short deadlines, meeting e-commerce demands.
Keep Up with Industry Trends
Professional editors stay updated with the latest tools and methods, ensuring your furniture photos are up to industry standards. Outsourced editors can incorporate trending aesthetics like minimalism or realistic shadow effects that appeal to modern consumers.
As you know by now, by outsourcing furniture photo editing, studios and businesses can save time, reduce costs, and achieve professional-grade results that drive e-commerce success.
How to Choose the Right Furniture Photo Editing Service Provider?
Choosing the right furniture photo editing service provider is crucial for ensuring your e-commerce photos look professional, consistent, and appealing. Consider these key factors when selecting your next photo editing service provider.
Evaluate Their Expertise
Look for providers with a proven track record in furniture photo editing. They should specialize in techniques like clipping path, background removal, color correction, and high-end retouching.
Their portfolio should demonstrate attention to detail and the ability to enhance textures, colors, and dimensions in furniture images.
Look for Their Tools and Software
Reputable providers use advanced software like Adobe Photoshop and Lightroom. Ensure they employ industry-standard tools to handle noise reduction, ISO adjustments, exposure correction, and color balance. These capabilities are essential for creating polished and market-ready images.
Assess Turnaround Time
Timely delivery is critical for e-commerce businesses. Ask about their ability to handle bulk editing projects efficiently without compromising quality.
Providers should offer flexible timelines and meet deadlines consistently.
Review Client Testimonials and Case Studies
Look for testimonials or case studies to understand their reliability and quality of work. Feedback from previous clients offers insights into their expertise, customer service, and consistency.
Pricing & Free Trials
Compare pricing structures to ensure they align with your budget. Many reliable providers offer free trials, allowing you to test their quality before committing.
Prioritize Data Security & NDA
For exclusive designs or sensitive information, ensure the provider offers NDAs and secure file-handling processes to protect your data.
Conclusion
To wrap up, editing furniture photos for e-commerce site is an essential skill for any business looking to stand out online. By carefully adjusting such as cropping, straightening, and ISO corrections, you can ensure your photos look professional. In turn, you can represent your products accurately. Key editing steps like background removal, shadow creation, and color correction help make furniture photos more captivating to customers.
Remember, the right editing methods not only improve the visual appeal of your products but also help your business thrive in the competitive e-commerce space.

Hadi Zaman is a marketing specialist and content writer who loves tech, story writing, and content creation. With years of experience, he creates easy-to-read content that connects with readers. Inspired by new ideas and personal experiences, Hadi makes complex topics clear and relatable.