Building an e-commerce studio can increase your online sales by enhancing the quality of your product photos. High-quality photos attract more potential customers and significantly enhance the overall shopping experience.
Right now, if you are looking to build a place for professional product photography, you’ll need a detailed blueprint of your plan. If you follow the guide, I will walk you through the process of building an e-commerce studio step by step.
Whether you’re looking for an expensive high-end setup or budget-friendly easy ways to create an e-commerce studio, we have got you covered. You no longer need to search for how to build an e-commerce photo studio, as we have the solution for you. Here, I will discuss all the necessary steps and essential equipment to help you focus on achieving your dream studio.
What is E-Commerce Product Photography?
In summary, building an e-commerce photo studio in your workspace functions as a product-based photography studio, where paid professionals or independent photographers take pictures for their clients’ and customers’ marketing, advertising, and sales needs.
This is where the customers understand what they are seeing and buying into. Clear, detailed images can convey a wealth of information about a product’s features, size, color, purpose, and meaning, which can only come from a photo studio. Any exceptional photographer can bring out all of those features, increasing sales by making the goods appear more desirable and reliable.
Is it Possible to Build Your Own Studio?
The answer is yes; you can build your photo studio by yourself with basic knowledge and strategic planning. For easy ways to build an e-commerce photography studio at home or in a large space, you need to follow certain rules to create a professional environment for capturing high-quality images.
One of the crucial factors that need attention is the budget and workspace limitations. The majority of studios don’t understand this constraint; thus, it creates a hindrance to the daily workflow, which impacts the quality of the photos, resulting in rising costs and time-consuming processes.
Building a Photo Studio: One Step at a Time
Now, the crucial part is where we will demonstrate the step-by-step guide to building your photography studio, easing the process for you. So buckle up; we’re embarking on a voyage.
Setting up an e-commerce photography studio will be difficult if you don’t know the guidelines. So taking advantage of our user-friendly and beneficial guide will help you build your dream studio.
Step 1: Determine the Space

Ensure there is sufficient space for your equipment and simple mobility. Building a photography studio in a small place can be challenging due to the need for instruments and flexibility.
Step 2: Draft your Layout
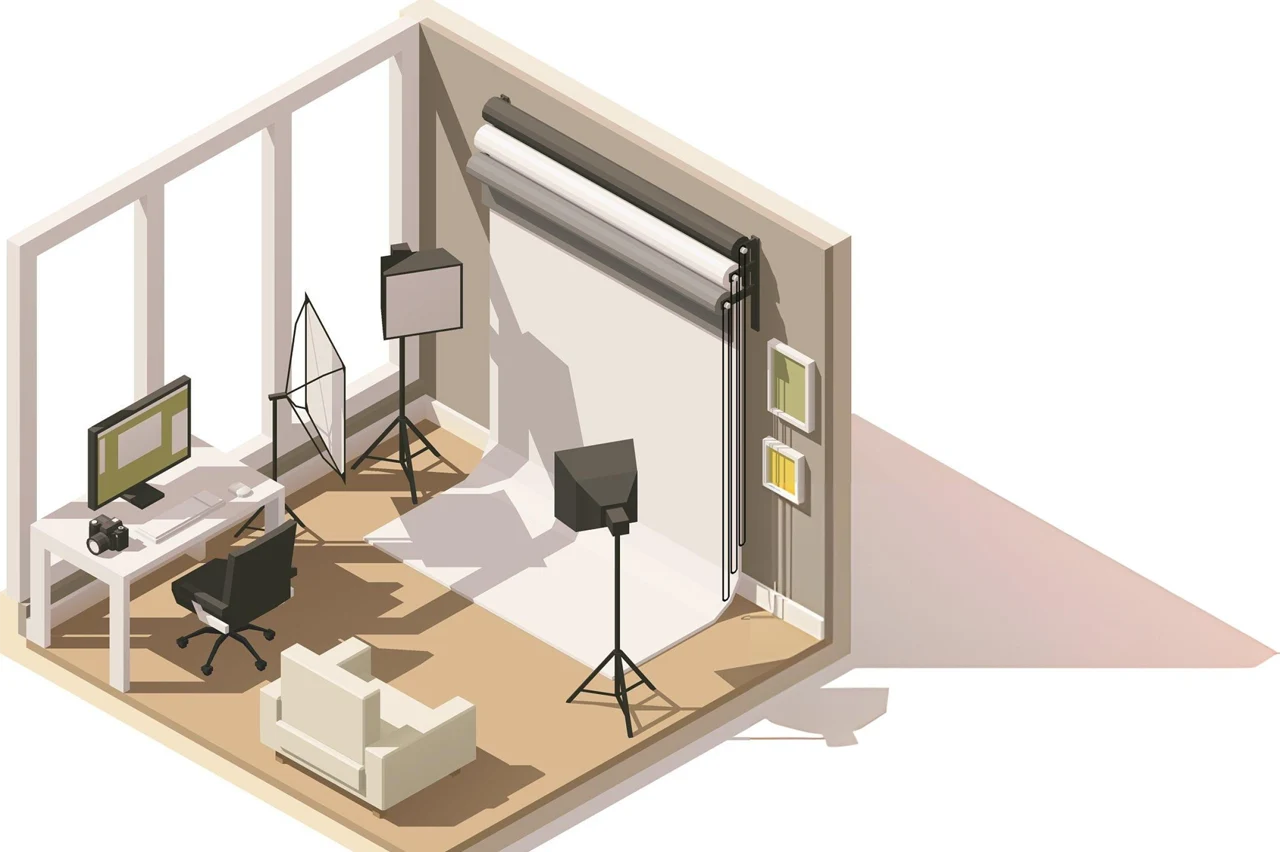
After assessing your preferred space requirement, you need to outline a blueprint for your studio. Plan where your backdrop, camera, and lights will be easily accessible for you.
Remember, a well-organized space will help you focus on work more efficiently and develop better images.
Step 3: Choose Your Backdrops
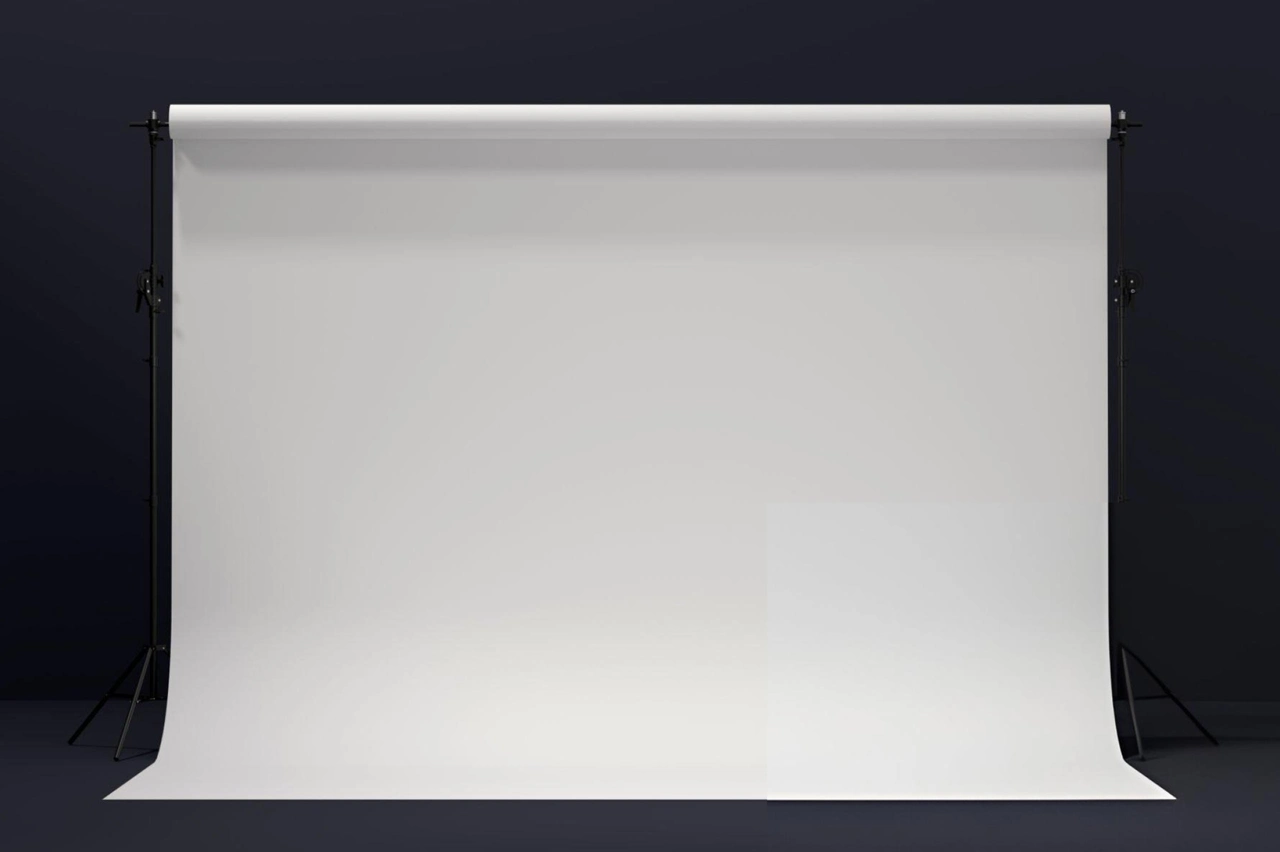
As you formulate your planned layout, you need to determine the best backdrops that complement your products. Generally, for e-commerce products, most of them choose white for a clean look or any other color that matches your product style.
Always keep your backdrop without any wrinkles. The most preferable backdrops are fabrics, floor drops, canvas, collapsible, chroma keys, etc.
Fabric Backdrops: A photo studio primarily uses fabrics to create various textures and effects. There is a wide variety of fabrics available, including muslin, velvet, and silk. Using these kinds of fabrics offers a variety of light absorption, reflection factors, and shadow elements. These fabrics are quite flexible, allowing photographers to create a range of moods, from gentle and elegant to bold and dramatic.
Canvas: Canvas is often associated with heavy-duty fabric, mostly used as a resilient photo studio backdrop. Generally, artists paint or print it on a sturdy sheet of fabric, emphasizing patterns and scenarios. This creates a textured background that enhances the depth of the images. Canvas backdrops are always reliable, long-lasting, and easy to maintain. You can use this for portrait and product photography.
Chroma Key: Most commonly known as a green or blue screen. This method replaces the background with a digital one. We shoot the subject or product against a solid green or blue screen backdrop, then remove it in post-production to add any desired background or special effects.
Collapsible: Collapsible is quite portable and adaptable. Photographers frequently use this because the backdrop is built from fabric strained over a metal frame that can be folded down for use in a compact size. Photographers typically use collapsible backdrops in small studios or on location. They always have two sides with different colors or patterns, so that it can be convenient for the photographer to quickly change the backdrop during a photo session.
Floor-drops: Photographers use floor-drops to create photographic backdrops by simulating various types of surfaces like tile, wood, or stone. Typically, manufacturers craft them from sturdy vinyl or fabric, regularly applying them to create a realistic floor effect for a specific ground texture. It adds depth and realism to the images without needing an expensive set for a shoot.
Step 4: Setting up your Lighting Fixtures
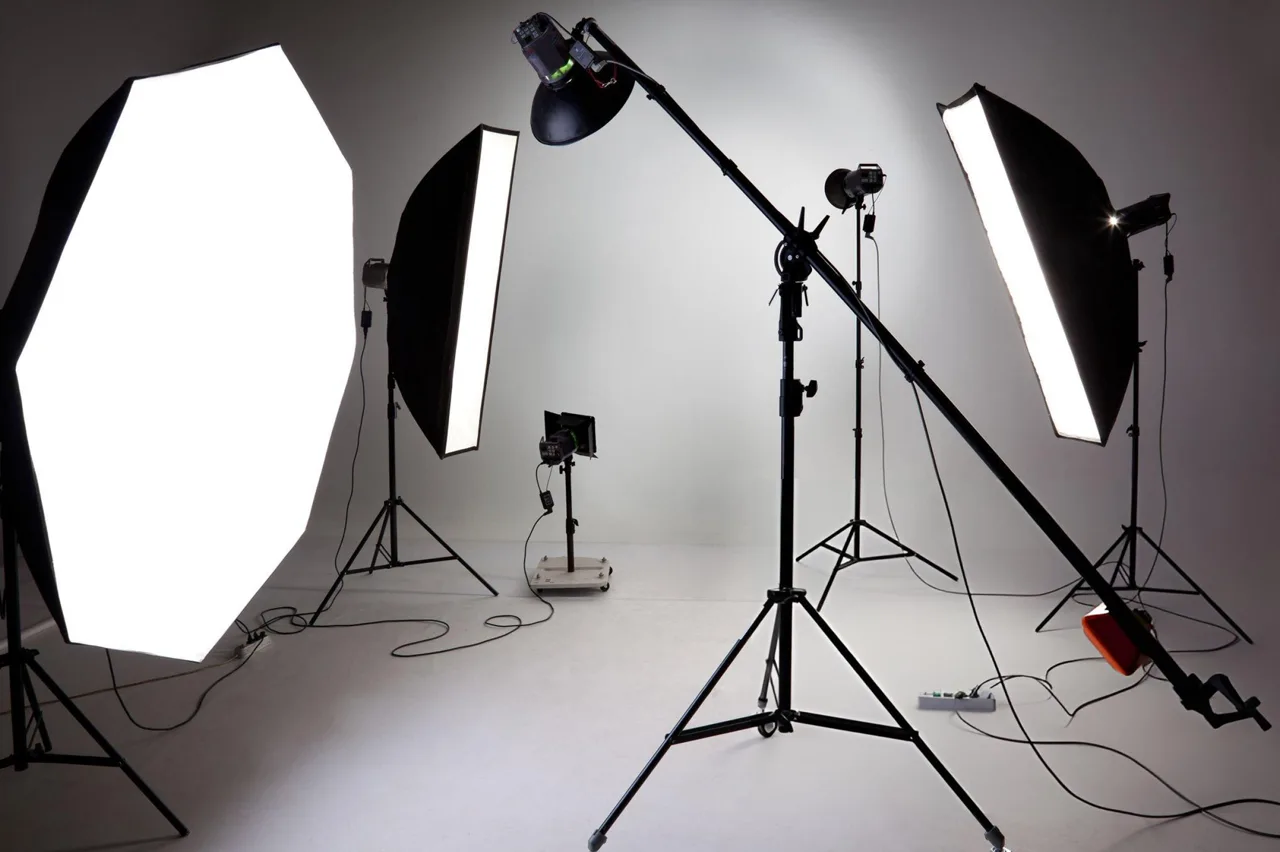
After setting your backdrops, you’re going to need an area for lighting equipment. Lighting is mandatory in every photograph no matter whether you want to shoot e-commerce, portrait, or other photos, it plays an important role in shaping the outcome of your images.
Lighting controls exposure, mood, and detail in images. Lighting ensures the image is neither too dark (underexposed)nor too bright (overexposed).
Correctly setting up the lighting ensures that the colors appear true to life and it prevents any unexpected color casts, keeping the integrity of the image.
In essence, proper lighting enhances both the technical quality and artistic expression of your photography.
Try to make sure there is no slight interference or background commotion. This definition classifies lighting fixtures into two categories: Natural light & Artificial lighting.
Natural Light:
A lot of photographers prefer natural light instead of using artificial light fixtures. It provides a soft, elegant, and balanced luminescence, which is ideal for realistic and enhanced photos. Try to avoid harsh shadows, which could imbalance the image quality.
It could create obscure details, an altered mood, uneven exposure, and an unappealing visage in your image. That’s why photographers shoot outside of the piercing midday hours.
While natural light is quite versatile, the main limitation is its inability to shoot at night because of the variability. For this sole reason, photographers heavily rely on artificial lighting.
Artificial Lighting Fixtures:
In a studio, lighting plays an important role. You can invest in softbox lights or LED light panels to create proper luminance. Precisely position the lights to reduce shadows and highlight the features of your products.
Many photographers use artificial lights such as modifiers, LED lights, fluorescent lights, wardrobe lights, reflectors, etc.
Modifiers: Photographers connect modifiers like soft boxes, grids, and umbrellas to the lights to adjust their quality and direction.
These help to control the light’s spread, intensity, and diffusion to make sure photographers get their desired effects.
LED Lights: If you are looking for an energy-efficient and long-lasting instrument, then LED Lights are the best options of all.
They provide a constant light source with changeable color temperatures. They are known for their consistency and capability to overview the preferred lighting effects in real time.
Fluorescent Lights: People frequently use these lights because of their even, diffused light, which maximizes natural shadows and minimizes glare. The instrument always comes in large panels or tubes. Due to their size, they are quite effective in creating soft, blended natural light effects.
Strobe Lights: For instant sharp and well-lit images, you need a strobe light because their brief, intense burst of light helps freeze the motion, allowing high power output and quick recycling times. They are ideal for dynamic shooting in portrait and product photography.
Reflectors: Reflectors are frequently used to bounce artificial light onto the subject, creating a sort of illumination and reducing shadows. It helps to fill in shadows and improve the light balance in a photo. They are made of varied materials and shapes, with surfaces that are white, silver, and gold, each having unique reflective properties.
Step 5: Assembling Your Desired Camera
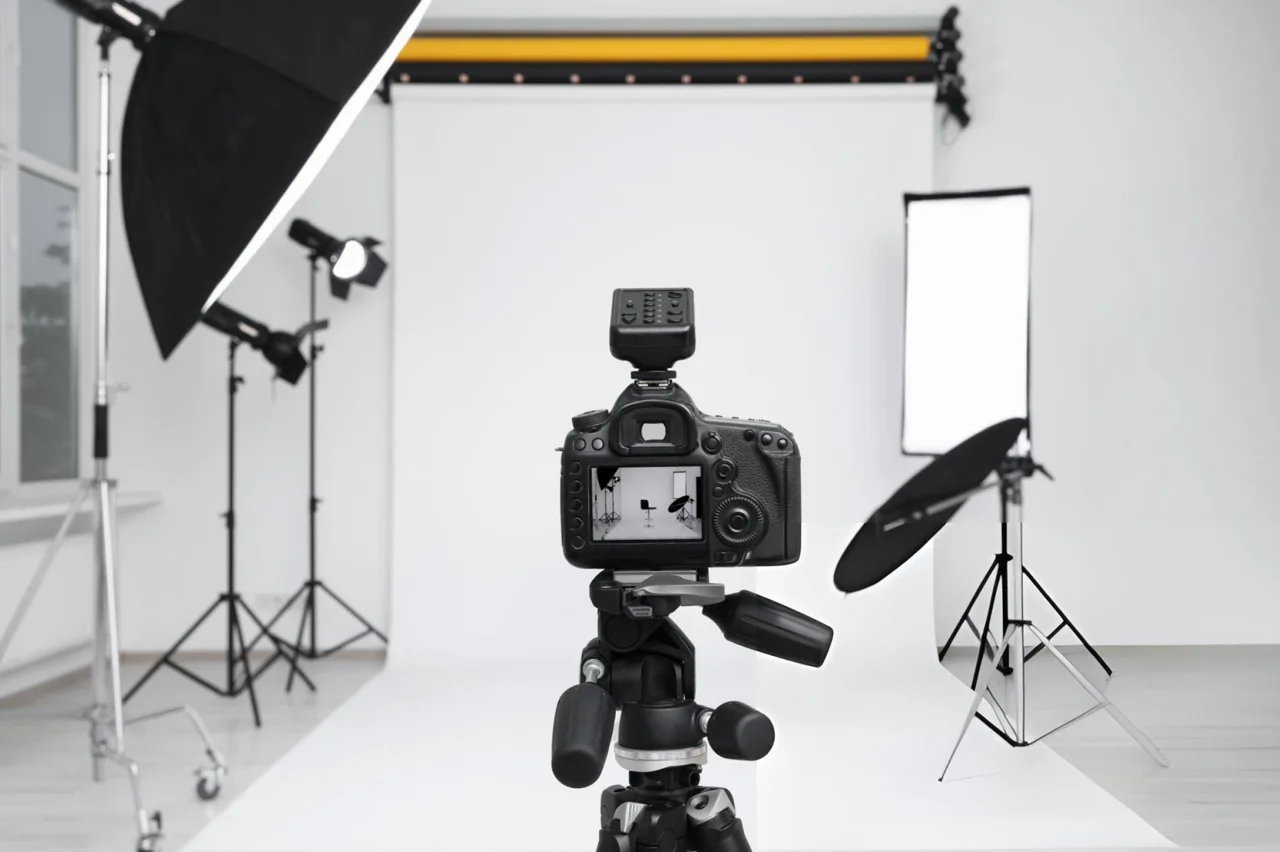
Following the lighting segment, the key component for a photographer is to find the precise camera that meets your requirements for your studio. You need to spend a hefty amount of money since commercial product photography equipment is typically somewhat expensive. Before purchasing a camera, you should ask yourself these types of questions.
-
- Does the photo quality and functionality meet your standards?
-
- When you shoot, is it comfortable for you?
-
- Are the camera’s lenses available?
-
- Does all of this fit into your budget?
Step 6: Focus on the Lens
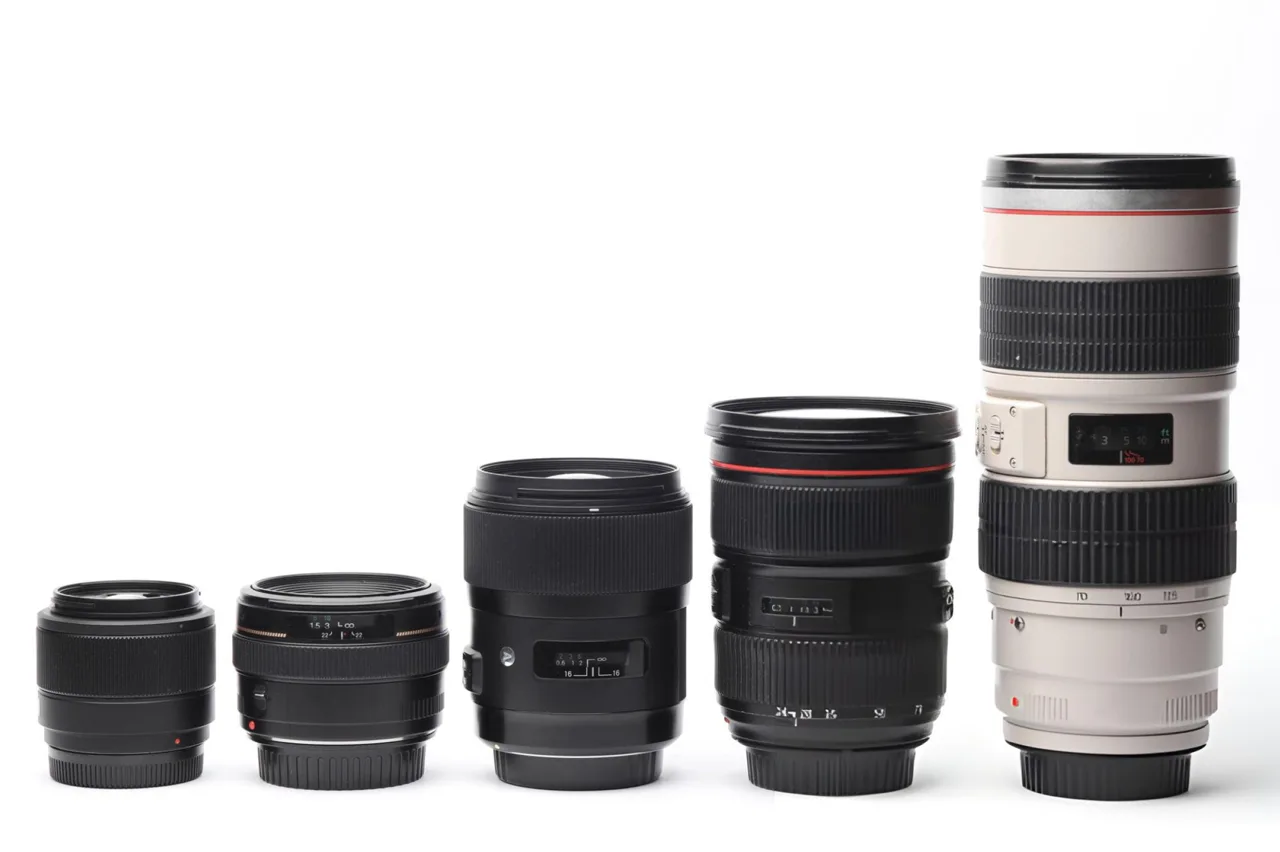
In addition to identifying your camera, it’s crucial to locate the essential lenses for it. The ideal lenses will improve your shooting performance and experience. The guide to selecting a lens will primarily assist those who are new to the buying process. To select a lens for your camera, look for this:
-
- Find the key specifications, including dimension, focal length, and maximum aperture.
-
- Is the camera’s image quality, field of view, and magnification up to your standards?
-
- Does it offer the types of sensors, such as crop or full-frame, and the speed of focus you expect?
Step 7: Installing Props and stands

After completing all the steps, the final step is to determine the types of props required for your studio. There are various kinds of props, stands, and instruments that you’ll need to adjust your camera for the perfect shot. Specifically, you’ll require tripods, memory cards, additional batteries, and cleaning kits for your camera.
Tripods: To stabilize your camera, you’ll need a tripod so you don’t have any motion blur in your pictures. Tripods help prevent motion blur, allowing you to take precise compositions. It will assist you with long-exposure shots. Not only do tripods have adjustable heights and angles, but they also make them quite flexible for different shots.
Memory Cards: During a photographer’s shoot, a significant amount of data is required to store the captured flies. That’s where memory cards come in, with a huge amount of space in those tiny cards to save flies up to 1 TB. High-capacity holding cards offer high speed, making them ideal for high-resolution photography and uninterrupted shooting.
Extra Batteries: A professional photographer always carries extra batteries to remain operational throughout the session on set. For extended shoots, it’s crucial to have extra batteries in case you don’t have access to electricity. With extra batteries, one more thing you can add is a power bank for these kinds of situations.
Camera Cleaning Kits: After some use, the camera becomes dirty, so you should buy a set of camera cleaning kits. This bag of kits usually has brushes, microfiber cloths, air blowers, and some solutions for cleaning the lens. These instruments help to preserve the cleanliness of all the camera parts, preventing any smudges, dust, or debris from affecting any photo quality. If you regularly clean your camera and its components, you can get your gear’s ideal performance and longevity.
Essential E-commerce Photography Studio Equipment:
For a successful e-commerce studio, you’re going to need some essential equipment specifically made for e-commerce photo studios. Though these instruments evolve rapidly due to the release of new versions and innovative photography techniques in upcoming markets for 2024, I have considered this gear specifically for the sole purpose of an e-commerce photo studio.
Camera
You’ll need a DSLR or a mirrorless camera with an ultra-clear resolution, which is quite essential for only an e-commerce photo studio. This type of camera captures detailed-oriented images, which are critical for highlighting products online.
I conducted extensive research on numerous websites to find the ideal camera solely for product photography. For excellent image quality, the Canon EOS R6 Mark II and Sony A7 IV stand out as top choices in the market.
Canon EOS R6 Mark II
Sensor: Full-frame 24.2 MP CMOS
Autofocus: Dual Pixel CMOS AF II with 1,053 AF points; eye detection AF for humans and animals
Continuous Shooting Speed: Up to 40 fps (electronic shutter), 12 fps (mechanical shutter)
ISO range: 100-102,400 (expandable to 50-204,800).
In-Body Image Stabilization: Yes, up to 8 stops of in-body image stabilization.
Viewfinder: 3.69 million-dot OLED EVF
LCD Screen: 3.2-inch, 1.62 million-dot vari-angle touchscreen
Video: 4K at 60p, Full HD at 120p
Battery Life: Approximately 500 shots (CIPA)
Lens
For product photography, a macro lens is perfect for closeups. It allows for sharp, detailed images that focus on small details. The macro lens in question is a Canon EF 100mm f/2.8L Macro IS USM.
If you want a natural photo perspective, a 50mm prime lens is perfect for a wide range of products.
Lighting
If you don’t have the right equipment, achieving consistent and even lighting in your shots can be quite difficult.
I looked through a lot of websites for softbox or LED panels. I think I found the best choice on the market. It provides adjustable brightness and color temperature, reducing shadows and bringing out the true colors of each product.
Godox SL60W LED Video Light
Type: LED Monolight
Color temperature: 5600K (daylight-balanced).
Brightness: 60W
Dimmable: Yes, 10-100% dimming range
CRI (Color Rendering Index): ≥96
Cooling System: Built-in fan for cooling
Power Supply: AC power adapter (100-240V)
Light Control: Wireless control via Godox X-series transmitters (optional)
Mount: Bowens mount for light modifiers
Weight: Approximately 1.7 kg (3.7 lbs)
Backdrop
Look for the most appropriate backdrops for your merchandise. For a minimalist design, white, or any other color that complements your product style, is often the color of choice for e-commerce items. Maintain a wrinkle-free background at all times.
Neutral backgrounds, such as white or gray, are adaptable and suit a variety of items. E-commerce photographs often utilize recessed areas made of fine paper or cloth. The best backdrop options are Chroma Key, Fabrics, Floor-drops, Canvas, and Collapsible.
Tripod
In a photo studio, holding a camera is difficult due to its weight.
This necessitates the use of a sturdy tripod such as the Manfrotto 055 Aluminum 3-Section Tripod, renowned for its stability and consistent framing. It is necessary for creating sharp and blur-free images.
Reflectors
For research, I visited a lot of websites to find the right reflector, namely the Neewer 5-in-1 Collapsible Multi-Disc Reflector.
We use it to bounce light and fill in shadows, thereby creating a balanced lighting layout.
Props & Stands
Props can help enhance the demonstration of products by adding context or style. Stands support items positioned at the correct angle, making sure they are shot from their best side.
Editing Software
The last stage of e-commerce photography is post-production. There are quite a few tools for editing in post-production.
Such tools are Adobe Photoshop, GIMP, Photoshop, Lightroom, etc. Adobe Photoshop and Lightroom are industry standards. But if you are looking for more budget-friendly alternatives, then you can give a try at GIMP and Pixlr.
How Much Does It Cost to Assemble a Photography Studio?
You see, assembling a studio can vary based on your needs and location. now that you are looking to build a photo studio, you need to evaluate the expenses. After carefully reviewing the cost, here is a detailed breakdown of building a photo studio on a budget:
Space: Renting or purchasing a space can range from $500 to $2000 per month, depending on size and location.
Camera: Range from $1,000 to $4,000 for any high-quality DSLR or mirrorless camera.
Lenses: The price varies depending on the effect the lens can produce. The price ranges from $500 to $2,000 each, depending on the photography styles.
Lighting: Professional lighting equipment ranges from $200 to $1,000, which includes softbox, strobes, and flickering lights.
Backdrops: Cost ranges from $100 to $500, depending on the fabrics or paper rolls.
Furniture: chairs, desks, cabinets, and storage units can cost up to $300 to $1,000.
Software: Professional photo editing software like Adobe Photoshop (US$22.99/month or US$263.88/year) and Lightroom (US$9.99/month) can cost about $10-$50 per month, depending on the subscription package. Budget-friendly software expenses can vary from one another.
Miscellaneous: Props, maintenance, and utilities can add an extra $200 to $500 depending on the work per month or year.
Setting up a basic studio can cost between $3,000 and $10,000. Investing in quality full equipment and an apt space will boost your studio’s capabilities and professionalism.
FAQs
1. How to Make Your Work Stand Out from the Rest?
- Opportunities to do work that has no potential for creative excellence or improving your portfolio, reputation, and day rate are going to be a waste of time for you.
- Try to make sure that you specialize in high-value products or services that have grand budgets, then try your best to consistently deliver high-caliber work that exceeds your client’s expectations.
- Develop a signature style that differentiates your work from others. Make your vision and technical quality benchmarks higher than those of your fellow professionals.
- Retain ownership of your images. If you sell all rights to images, make it expensive.
- I suggest always observing the latest trends and implementing your market leadership. One study proposes that people are spending more on celebrating and socializing, and photography is a key to both.
Remember, building a photo studio doesn’t have to be overwhelming. With the right apparatus and setup, you’ll be on your way to capturing stunning product photos that drive success for your future and your client.
2. Is Photo Studio profitable?
A studio generates significant revenue from various sources. Only high-quality product photos can lead to more revenue and attract many clients. After thoroughly researching, I have found the price range of services and products.
| Service/Product | Price Range [$] | Facts | |
| Portraiture Sessions | $100 – $600+ | This depends on the number of participants, length of the session, and included prints/files. | |
| Headshots & Close-ups | $150-$500 | It involves a variety of edited photos. | |
| Event Shoots | $600 – $3,000+ | Depending on the event’s magnitude, it also benefits albums. | |
| Art Prints and Canvas Art | $100-$300 | Size and content determine cost. | |
| Bundles of digital photos | $200 – $1000 | provides a range of altered images | |
| Infant & Maternity Portraits | $200-$800 | Only maternity and newborn photos fall under the category of specialized photo services. | |
| Creative, Conceptual, and Custom Photography | $300 – $2,000+ | The program features themed or creatively designed destination sessions with unique photo shoots and creative extras. |
Investing in a professional setup for e-commerce product photography can yield a favorable return.
3. What is a good size for a photography studio?
The bare minimum for a photo studio is 10×15 feet, the perfect length/width of the rooms for a studio.
This kind of space is quite sufficient for a studio, providing enough room for equipment and mobility while keeping expenses manageable. On the other hand, 30×45 is a perfect studio that will allow for proper shoots with models.
4. How Do I Get Studio Quality Photos?
If you want to get studio-quality photos, you can invest in high-quality instruments like a decent DSLR or mirrorless camera, prime lenses, and proficient lighting.
Obtaining top-notch equipment will make it simpler for you to take studio-caliber pictures.
5. Should I invest in Studio Lights?
Financing for specialized lighting tools is significant if you want your photography to level with industrial standards, which can give you creative freedom and consistency, increase image quality, and save time.
In the end, your photos will appear professional.
Conclusion
Creating an e-commerce photo studio can significantly improve the quality of your product photos, resulting in increased online revenue and marketing. Starting a photography business can serve as a primary source of income or a secondary source if you have a passion for photography.
The photography market is highly competitive. There are a lot of photographers who have been able to find their niche and build a sustainable career. You see, photography serves as a bridge between people’s past and present.
Expand your services to include photography, gifts, gift printing, photo editing, and other related services. By delivering images that compel engagement and response, you can assist your clients in increasing their revenue by selling more products and services.

Hadi Zaman is a marketing specialist and content writer who loves tech, story writing, and content creation. With years of experience, he creates easy-to-read content that connects with readers. Inspired by new ideas and personal experiences, Hadi makes complex topics clear and relatable.