Layer mask is a powerful option in Adobe Photoshop. It gives editors non-destructive and flexible options when creating or editing images. They offer various options, such as refining selections, blending layers, or adding subtle adjustments.
By applying layer masks, editors can control what parts of a layer are visible, giving them complete control over their image. Editors can easily apply the layer mask without permanently altering any elements in an image. Layer masks offer endless possibilities for creativity and precision.
In this guide, we will explore everything from simple to complex techniques and tips for layer masks.
What is a Layer Mask?
A layer mask in Adobe Photoshop is a dynamic tool that lets you control the transparency of different layer parts without permanently altering anything. When you apply a layer mask in Photoshop, you can hide or reveal parts of a layer by simply painting on the mask. In turn, this gives you full control over which parts of the image stay visible or hidden.
When applying layer masks on the image, you must first create a mask from a selection or simply add a blank mask using black or white to hide or reveal areas. This gives a main advantage: hiding layers so that you can always re-edit or undo the changes, making your workflow more flexible.
Layer masks are easy to use if you’re making a simple mask on an object in Photoshop without permanently altering changes. When refining edges, adjusting opacity, or masking specific details, applying layer masks ensures precision and non-destructive editing.
Types of Masking in Photoshop:
Adobe Photoshop offers several masking techniques that allow precise control when editing images. Knowing these masking types can help you bring more depth to your work.
Layer Mask
Layer mask is one of the most commonly used option for masking an object in Photoshop. It simply allows you to hide or reveal parts of a layer. It doesn’t permanently delete or alter the images. This process is quite essential for blending backgrounds.
After applying a layer mask, you can selectively edit areas of an image or combine multiple layers seamlessly. By painting the mask with black or white, you can control which parts of the layer are hidden or revealed.
Clipping Mask
When you want one layer to take on the shape of another, the clipping mask is one of the most useful masking tools. This tool uses the transparency of one layer to control what parts of the layer are visible.
For example, if you want to fill text with an image, you would apply a clipping mask. Clipping masks are ideal for creating designs where a photo or any texture needs to be confined to specific shapes like text or a vector object.
Vector Mask
The vector mask is created by using paths. This technique is known as resolution-independent. Vector mask is excellent for clean, sharp edges when masking objects in Photoshop, such as logos or shapes.
Unlike layer masks, vector masks provide sharpness even when scaling or resizing the image. By applying vector masks, you can hide layers while ensuring crisp and precise outlines.
Quick Mask
Quick masks are a temporary way to create selections in Adobe Photoshop. They are handy for when you need to make fast adjustments without making a permanent mask right away. When you apply a quick mask, you can use a brush to paint over the areas you want to select.
Once you’ve found the mask that best suits you, you can refine the masks further. Each of these masking techniques allows editors to create different layers to hide layers, edit layer masks, or apply image layer masks to improve design.
Whether you’re masking an object, creating a clipping mask, or simply making a layer mask from a selection, mastering these options will significantly enhance your image editing skills.
8 Steps to Applying Layer Mask in Photoshop:
Below, you will find an easy-to-follow guide on applying layer masks, editing them, or using them to hide or reveal parts of your layers.
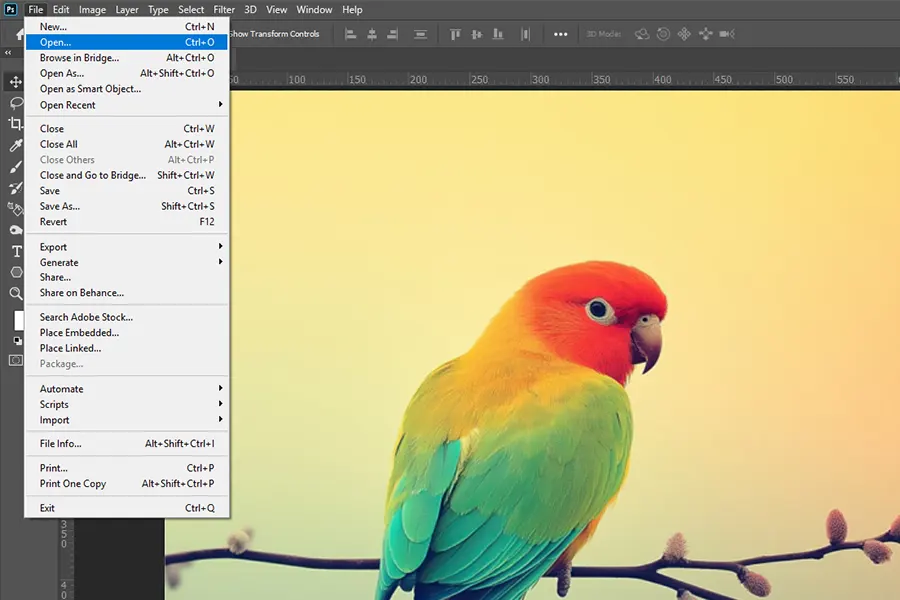
Step 1: Open Your Image
First, open the image you’re going to work with. You can do this by going to File > Open. Then, select your image file.
Step 2: Select the Layer
Look at the layers panel, and you’ll find a selection of layers. Select the layer you want to mask. It can be an image layer, a text layer, or any other type.
Step 3: Add a Layer Mask
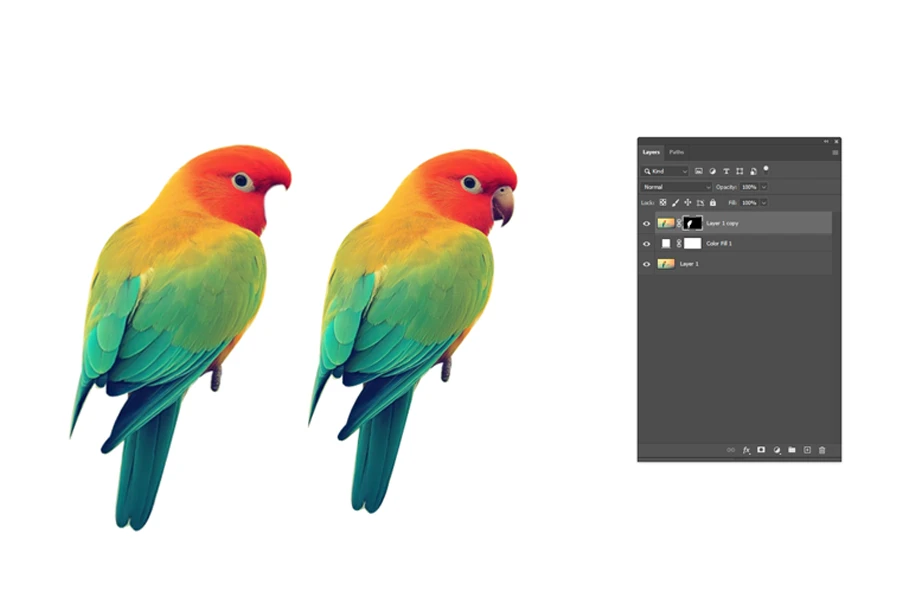
To apply a layer mask, click the Add Layer Mask icon at the bottom of the Layers Panel (it looks like a rectangle with a circle inside). It will create a white layer mask thumbnail next to your selected layer, indicating the visible layer.
Step 4: Use Masks to Hide Layers
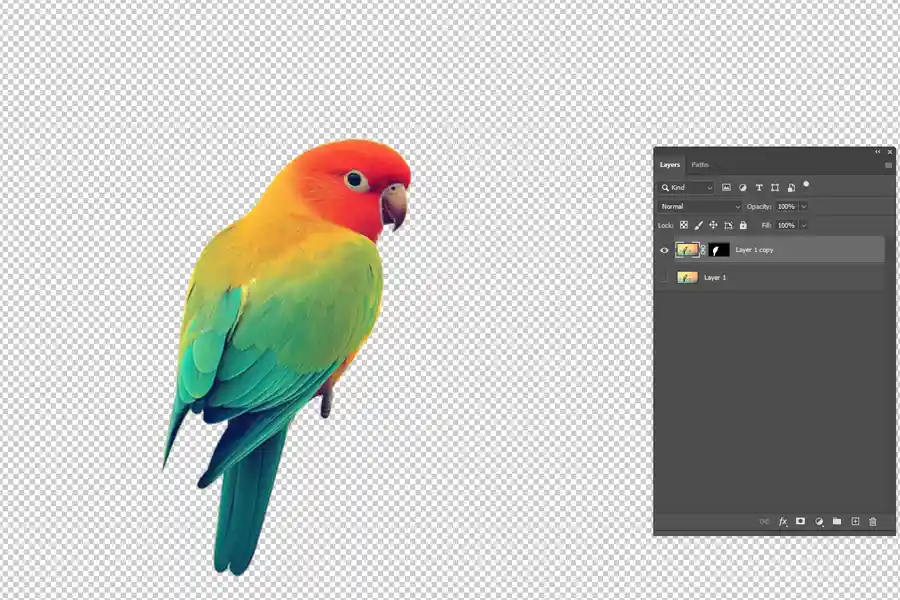
When masking an object in Photoshop, always ensure the layer mask thumbnails are selected. This will create a border around the object. If you need to hide certain areas, select the Soft Brush with Black Paint.
After painting with black on the mask, those parts of the layer will become invisible.
Step 5: Reveal Parts of the Layer
If you need to reveal the hidden parts of the layer, switch the Brush Color to White. This will reverse the effect and bring back the hidden parts of your image. You can also use the different brush sizes and opacities to create subtle adjustments
Step 6: Edit Layer Masks
Editing layer masks is a direct process. You can utilize the Brush Tool to adjust the mask further. To refine the mask, you can use the Properties Panel. You can simply adjust the density and feathering of the mask for smooth transitions.
This flexibility allows editors to precisely control the image.
Step 7: Apply a Clipping Mask (Optional)
This step is optional because of the clipping mask. This will allow masking a layer using clipping. Just select the layer you want to use as a mask.
Then, Right-Click and choose Create Clipping Mask. This will limit the visibility of the selected layer to the content of the layer below it. Editors use this step for creative compositional methods.
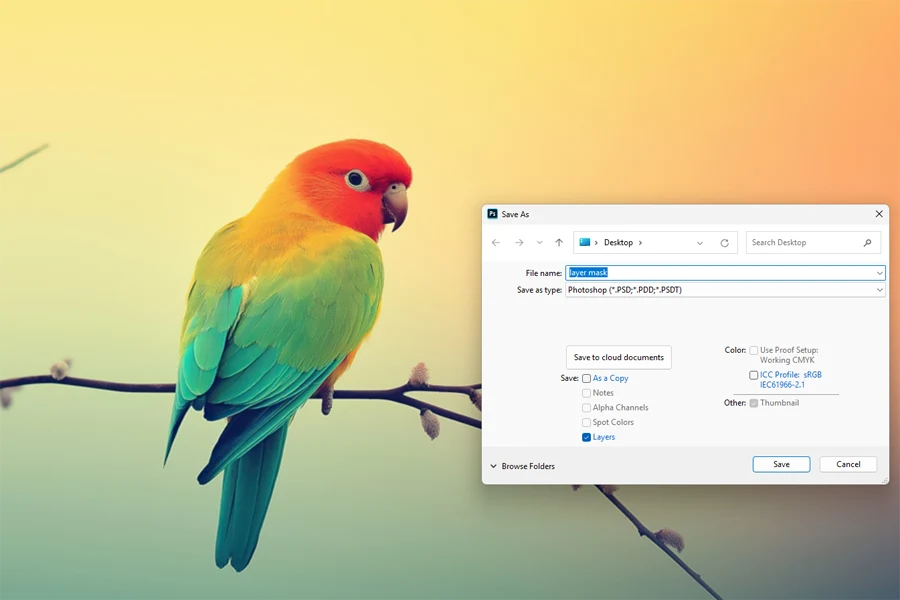
Step 8: Save Your Work
Once you are satisfied with your work, you can save it. Go to File > Save As to copy or save your work with intact layer masks. This way, you can even return to edit your layer masks without losing your progress.
By following all these steps, you can easily apply layer masks in Adobe Photoshop to easily create simple or complex compositions with your images.
What are the Difference Between a Layer Mask and a Clipping Mask?
The layer mask and clipping mask are two different process used in Photoshop by editors, below we are going discuss the differences between them from its purpose, how it helps, and why you need to know the difference.
| Feature | Layer Mask | Clipping Mask |
| Definition | Layer mask allows selective visibility control of the layer to which it is applied. It uses a grey-scale mask to dictate what parts are visible or hidden. Visible – White & Hidden – Black | Clipping mask limit the visibility of one layer to the area defined by another layer. For intricate compositions, it works as a mask based on the shape of the layer below. |
| Purpose | Layer mask offers non-destructive editing, which hide or reveal parts of the same layer using masks. This helps blending multiple elements easefully. | Clipping mask offers visible effects and adjustments in a shape of another layer. This is ideal for projects that require creative layering textures or designs. |
| How to Apply | Select the desired layer and click the Add Layer Musk icon at the bottom of layers panel. For a shortcut, use (Alt + Click on the Icon) to add a mask that starts as hidden. | Positioned the desired layer above the one you want to clip, then Right-Click and select Create Clipping Mask. For a shortcut, Hold the Alt button. This will hover between the layers until the mouse cursors changes, and then start clicking. This shortcut works well with the MacOS. |
| Hiding & Showing Parts | To hide the layers, start by painting with Black on the layer and to show the layers paint with White. This process allows for adjustments, using shades of gray. | This process automatically shows where the underlying layer is visible. This means that even complex shapes or patterns can be revealed through clipping mask. |
| Editing Methods | Layer mask can easily edit by using these tools, such as, Brush Tools, Erasers, or gradient fills. This can also adjust the mask’s feathering, density, or apply filters for more intricate effects. | Clipping masks are also non-destructive, which allows modifying or removing them without affecting the main layers. This helps editors to move or transform the clipping mask layer independently of the base layer. |
| Creating from Selection | Firstly, create a mask from selection from your image selection. Then, click the layer mask icon. This is helpful for editors to quickly isolating subjects or elements in an image. | Clipping mask do not use selection directly, but relay on the content of the layer below for visibility. For intricate shapes use the pen tool to create clipping path. |
| Use Cases | This is ideal for masking an object in Photoshop. This method isolates a subject or blends it together in a way to create seamless compositions. | This is ideal for combining layers, such as filling text or shapes with texture while using an underlying layer to define visible area, which is great for complex patterns or unique effects. |
| Flexibility | Layer masks provide vast flexibility in controlling layer visibility through painting and adjustments. This can be animated in video editing or used with layers of adjustments for dynamic effects. | Clipping mask offers endless possibilities for design, allowing one layer to take the shape of another for creative effects. This can also be used to create multi-layered compositions for interactions with textures. |
| Rare Insights | Adobe After Effects allows for animated layer masks, allowing transitions where elements can appear or disappear. This is great for dynamic elements in video projects. | In graphic design, a clipping mask can be applied to text layers, allowing for unique effects like filling text with an image. This can also rearrange layers without losing the visual connection. |
In summary, layer masks in Photoshop can selectively hide layers, which is essential for photo retouching and blending. Layer masks provide versatility and control for complex compositions while clipping masks restrict visibility based on the underlying layer, which is ideal for designs using specific shapes or textures.
Understanding these methods provides precision in editing and unlocks creative possibilities, enabling more dynamic and engaging visual content.
Tips for Working with Layer Masks in Photoshop:
Working with layer masks in Photoshop is a game changer. This tool allows for precise, non-destructive edits, achieving a perfect vision. Below, you’ll find some practical tips to help you get the most out of applying layer masks in Photoshop:
- Start with a Soft Brush: A soft brush is ideal when applying layer masks to blend different layers seamlessly. Whether you are masking an object in Photoshop or editing layer masks with subtle transitions, the soft brush creates smoother results.
- Use Masks to Hide Layers Partially: This helps you hide or reveal specific areas of a layer by adjusting the opacity of your brush or using shades of gray on the mask.
- Create a Mask from a Selection: Create a mask if you need precise control. Simply select the area, then apply the layer mask to convert your selection into a mask. This helps when you want to use image layer masks accurately without affecting the rest of the image.
- Experiment with Gradients on Layer Mask: Applying gradients to layer masks is a great way to make smooth and gradual transitions. You can use the gradient tool directly on the mask. This offers to blend backgrounds or merge layers without harsh edges.
- Apply a Clipping Mask for Layer Control: Clipping masks are handy for limiting one layer’s visibility to another’s boundaries. This is quite useful if you want to mask an object in Photoshop by applying texture, effects, or color adjustments to specific elements without affecting the entire layer.
- Alt-Click to Edit the Layer Mask Directly: To see exactly what’s on your mask, Alt-Click (Windows) or Option-Click (Mac) the layer mask thumbnail. This view makes it easier to refine layer masks and spot rough edges.
- Duplicate and Reuse mask: If you’re working on similar layers, you can easily duplicate the mask by dragging it to another layer while holding down the Alt key. This saves time and helps ensure consistency.
- Invert the mask: Simply, toggle what’s visible by inverting the mask with Ctrl + I (Windows) or Cmd + I (Mac). This is crucial when you need to apply layer mask in Photoshop but want to hide the entire layer initially.
By following the tips and techniques, you’ll be able to apply layer masks in Photoshop with ease, using them to hide layers and make fine adjustments. This can add effects naturally without ever forcing changes. These tips will help keep your edits flexible, powerful, and professional.
FAQs
1. How to View Layer Mask in Photoshop?
Hold Down Alt (Windows) or Option (Mac) to view a layer mask in Photoshop. Then click on the layer mask thumbnail in the layers panel. This action lets you see the mask in black and white so that you can edit it easily.
This makes it simple to apply image layer masks and refine them for more controlled results.
2. What is the Layer Mask Photoshop Shortcut Key?
The shortcut key to quickly add a layer mask in Photoshop is Ctrl + Alt + G (Windows) or Cmd + Option + G (Mac). To invert or edit layer masks, use Ctrl + I (Windows) or Cmd + I (Mac).
This tool makes it quick to adjust the mask’s visibility without deleting or erasing parts of the layer itself. It helps you apply layer masks in Photoshop efficiently and saves time when editing.
Key Takeaway
In conclusion, learning to apply layer masks in Photoshop is a powerful skill that elevates your editing precision and creativity. By using masks to hide layers or selectively reveal details, you can make non-destructive edits and refine your images seamlessly, whether you’re masking an object in Photoshop or looking to create a mask from a selection.
Layer masks give you full control to enhance specific areas without losing original content. Applying a clipping mask, editing layer masks, or making a layer mask for more complex compositions can open new possibilities for advanced editing.
Mastering these techniques makes Photoshop a more flexible and effective tool, helping you easily achieve professional results.
Hadi Zaman is a marketing specialist and content writer who loves tech, story writing, and content creation. With years of experience, he creates easy-to-read content that connects with readers. Inspired by new ideas and personal experiences, Hadi makes complex topics clear and relatable.
