One of the most common tasks for designers and photographers in Photoshop is the resizing of an image. This guide shows on resizing images in Photoshop while ensuring that clarity and sharpness are retained. During resizing, Photoshop uses very sophisticated algorithms that take care of professionals when creating graphics for the web, print, and other digital media.
This guide is complete in the sense that it contains the most basic techniques and alternative solutions to common complications in resizing. Very simple instructions will help you work, giving you the reasons why the quality is lost. This will also provide you with detailed instructions on how to execute the work.
Our goal is to address the needs of visitors and provide the practical tips necessary to assist in completing different image projects. The approaches outlined have been put together in such a way that they can be put into action immediately through the use of clear illustrations and examples. Get the best tips and helpful recommendations to resize an image in Photoshop through this guide successfully.
Can I Resize an Image in Photoshop?
Yes, resizing an image in Photoshop is very easy, as this software enables you to manipulate the dimensions with inbuilt tools. You are able to increase and decrease the size of the image as you wish with nothing more than Photoshop. There is no need for any external software when it comes to resizing an image.
The image can be resized without quality loss. Even novices can operate the software, but professional users will also receive satisfaction from the tools provided. You can set the pixel dimensions and the resolution at the same time. The help advances scaling clarity. The resize options are located under “Image Size” where there are custom sizes available and preset dimensions.
Enter the prompt and click next to set custom values. This is something that is required for many digital projects to be completed.
Adjust the settings until the result is optimal.
Why Does an Image Lose Quality When Resized in Photoshop?
Photoshop can change the size of an image, although the quality may be reduced due to pixel interpolation. Changing the sample also modifies the original pixel grid, which can cause blurry images or even distortion. If an image is being increased in size, new pixels are created; however, they are estimated based on the surrounding pixels.
The same goes for reducing the size; masking the details in the image does not correspond to the image’s resolution. Photoshop employs
a variety of algorithms for upscaling and downscaling images. Some of them are more efficient in preserving the details than others;
however, none are completely free from quality loss.
Compression artifacts may also appear if the file format is not appropriate. Color shifts and softening of edges can occur during processing. Choosing the wrong resampling method worsens the issue. Inaccurate settings can lead to poor results. Professional photographers often adjust image resolution manually to minimize degradation. Proper preparation and careful adjustment of dimensions are critical.
Always work on a duplicate file. Testing various settings may reveal the best balance. Ultimately, quality loss is a result of limitations in digital image manipulation and hardware capabilities. Understanding these principles helps improve your workflow significantly. Careful planning and proper settings adjustments can prevent severe quality loss and ensure optimal image performance.
How to Resize Images Without Losing Quality in Photoshop?
This guide explains how to resize images in Adobe Photoshop without losing quality. It combines scientific principles with practical steps for advanced Photoshop users and beginners alike. You will learn about essential factors such as Resolution, Constraints, and Re-Sampling, as well as key settings like Image Size, Dimensions, Fit To, Width & Height.
Each section builds on previous information so that every concept is connected and clearly explained. The guide is organized into distinct segments, each answering your common questions and providing in-depth details. Follow along to learn how to maintain image clarity while scaling. Select the right re-sampling method and apply best practices for consistent results in your digital projects.
Fundamentals of Image Resizing:
Before diving into the step-by-step process, it’s vital to understand the core factors that affect image quality when resizing.
Resolution: Resolution refers to the amount of detail in an image and is measured in Pixels-per-Inch (PPI) or Dots-per-Inch (DPI). Higher resolution means more pixels per unit area, which directly impacts the clarity of the images when it is enlarged or reduced. Maintaining the correct resolution is vital for ensuring that the final image remains sharp and detailed, especially for high-definition displays or prints.
Constraints: Constraints primarily involve preserving the original aspect ratio and preventing distortion. When resizing an image, it is important to keep the proportions consistent. This means that if you change one dimension (Width), the other (Height) should adjust proportionally. Constraint also refers to other settings that ensure the integrity of the image, such as locked proportions or smart object conversion, which protects the original pixel data.
Re-Sampling: Re-Sampling is the process of adding or removing pixels to change the image dimensions. Photoshop uses various algorithms to determine how new pixel values are generated when an image is resized. This process is fundamental because it directly affects the final quality. The re-sampling method chosen can either preserve detail or introduce artifacts, so understanding the differences is key to achieving optimal results.
With these foundational concepts in mind, it’ll help you to get used to Photoshop’s interface using these factors through specific settings.
Understanding Image Size, Dimensions, Fit To, Width & Height:
Photoshop’s Image Size dialog is the central hub for controlling your image’s properties. Here’s a detailed look at each setting:
Image Size: The Image Size dialog box provides a comprehensive view of your image’s current state, including its pixel dimensions, resolution, and document size. This is where you adjust the overall size of your image. Knowing your starting point helps you plan the new dimensions without degrading quality.
Dimensions: Dimensions refer to the width and height of the image, usually measured in pixels, inches, or centimeters. These settings determine the scale of your image. Maintaining proper dimensions is essential for both digital display and printing. When you change dimensions, you directly affect the number of pixels in your image, which is why understanding pixel interpolation and re-sampling
is so important.
Fit To: Some versions of Photoshop offer a Fit To option, which automatically adjusts the image dimensions to fit a specified output size or device. This is particularly useful when you need your image to meet specific display or print requirements without manually calculating the proportions.
Width & Height: Width and Height are the fundamental parameters for resizing. These values can be entered manually, and Photoshop will recalculate the other dimensions if constraints (like aspect ratio) are active. Ensuring that both the width and height are set correctly avoids stretching or squashing the image.
Now that you are familiar with these settings, let’s move to the practical, step-by-step instructions for resizing your image in Photoshop without quality loss.
Step-by-Step Guide to Resizing Images in Photoshop:
Follow these detailed steps to resize your image while maintaining clarity and quality. Each step builds on the previous one with
practical settings.
Step 1: Open & Duplicate Your Image
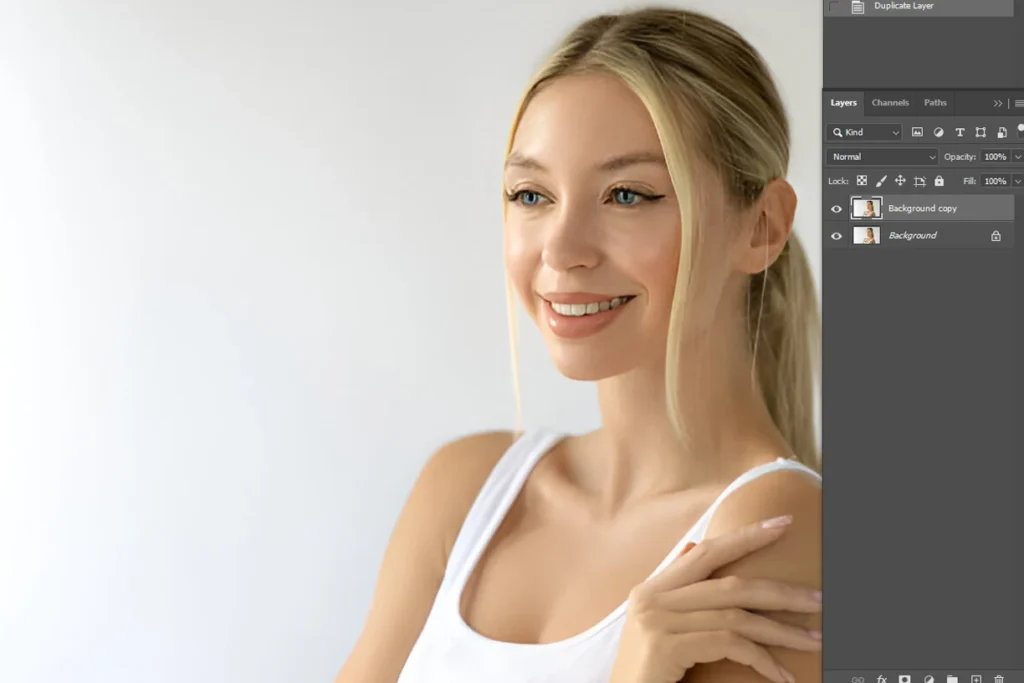
- Launch Photoshop: Open Adobe Photoshop and load your image via File > Open.
- Duplicate The Layer: Right-click on the background layer and select Duplicate Layer or press the appropriate shortcut.
Working on a duplicate ensures that the original image remains untouched, which is essential for non-destructive editing.
- Duplicate The Layer: Right-click on the background layer and select Duplicate Layer or press the appropriate shortcut.
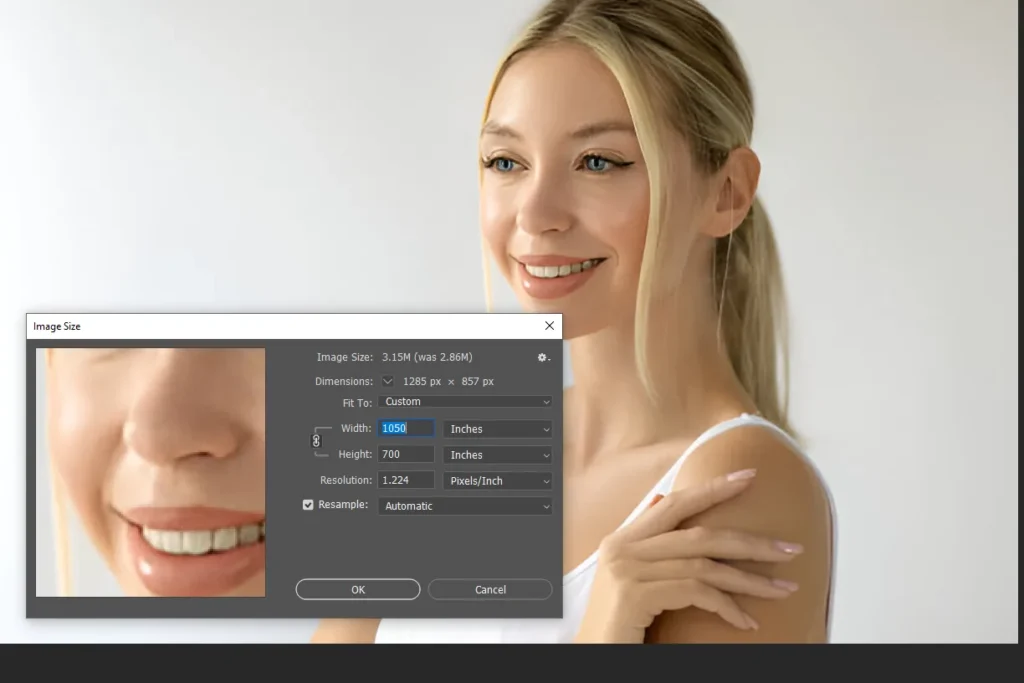
Step 2: Access The Image Size Dialog
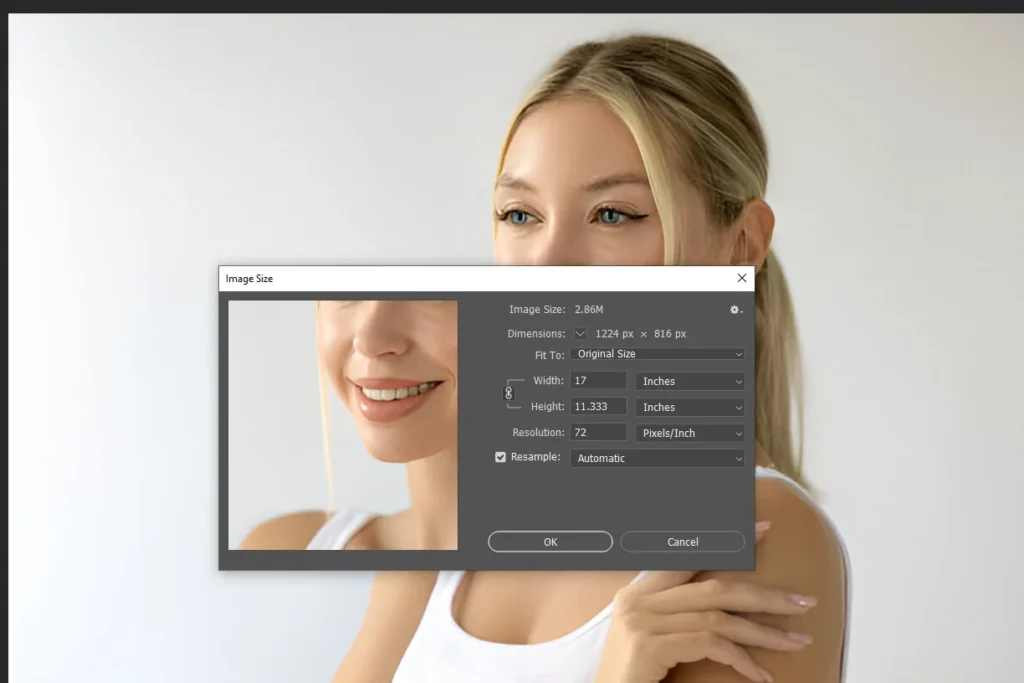
- Navigate to The Image Size Dialog: Go to Image > Image Size to open the dialog box.
Here, you’ll see your image’s current dimensions. Resolution and file size.
- Navigate to The Image Size Dialog: Go to Image > Image Size to open the dialog box.
- Review Current Settings: Note the current resolution, width, height, and document size.
This provides a baseline for your adjustments.
- Review Current Settings: Note the current resolution, width, height, and document size.
Step 3: Adjust the Resolution
- Set the Desired Resolution: Enter your target resolution based on your intended use.
For web images, 72-96 PPI may suffice; for print, consider 300 PPI or higher.
- Set the Desired Resolution: Enter your target resolution based on your intended use.
- Scientific Note: Increasing resolution adds pixels that the software must interpolate,
while decreasing resolution removes pixels. Both actions require careful re-sampling to avoid artifacts.
- Scientific Note: Increasing resolution adds pixels that the software must interpolate,
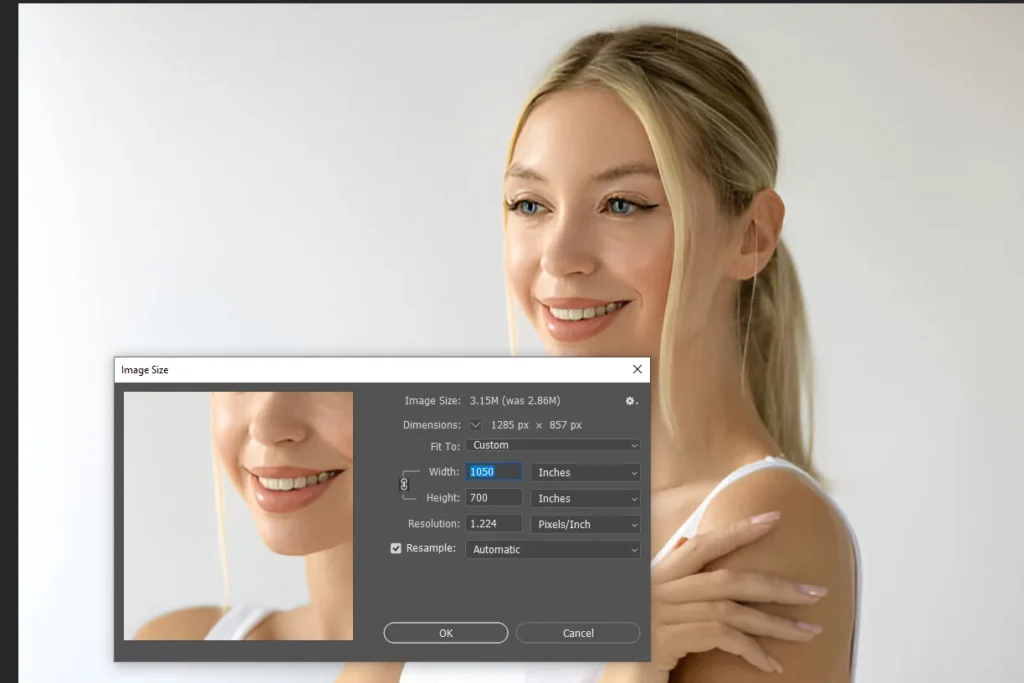
Step 4: Define Dimensions with Constraints

- Maintain Proportions: Ensure the “Constrain Proportions” option is checked.
This locks the aspect ratio, so any change in width will automatically adjust the height proportionally.
- Maintain Proportions: Ensure the “Constrain Proportions” option is checked.
- Input New Width & Height: Enter the new dimensions in the respective fields.
If you’re targeting a specific output size, use the Fit To option if available.
- Input New Width & Height: Enter the new dimensions in the respective fields.
- Scientific Insight: By maintaining the aspect ratio, you preserve the spatial connections within the image,
preventing distortion and ensuring visual coherence.
- Scientific Insight: By maintaining the aspect ratio, you preserve the spatial connections within the image,
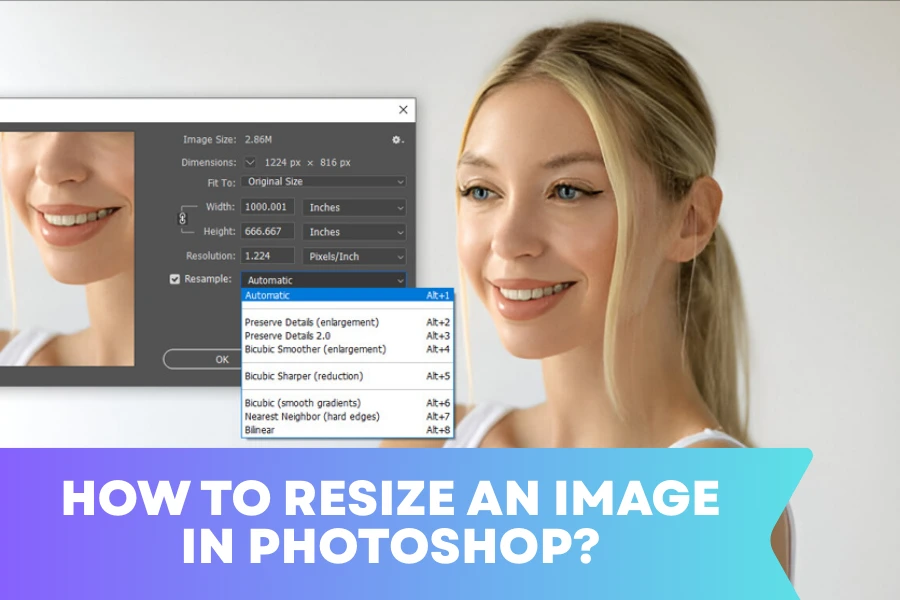
Step 5: Select The Appropriate Re-Sampling Method
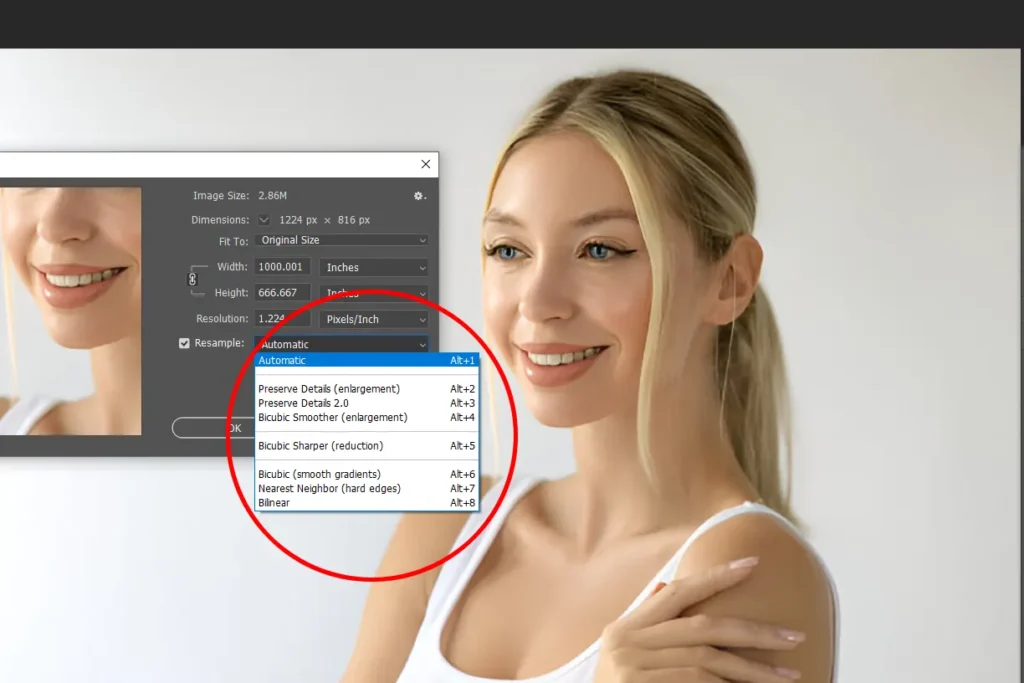
At this stage, choosing the correct re-sampling method is crucial. The re-sampling drop-down list in Photoshop offers
several options, each with unique characteristics. Re-Sampling Methods Explained:
- Automatic: Photoshop selects an algorithm based on the current image characteristics and the direction of resizing.
This option is convenient for general purposes but may not always yield the best results for critical tasks.
- Automatic: Photoshop selects an algorithm based on the current image characteristics and the direction of resizing.
- Preserve Details: Designed for enlargements, this method uses advanced algorithms to maintain edge details and texture.
It minimizes the appearance of artifacts and is ideal for images that need to be scaled up significantly.
- Preserve Details: Designed for enlargements, this method uses advanced algorithms to maintain edge details and texture.
- Preserve Details 2.0: An enhanced version of preserve details, this method improves on its predecessor by further
reducing noise and preserving fine details. It is well-suited for high-resolution images and professional workflows.
- Preserve Details 2.0: An enhanced version of preserve details, this method improves on its predecessor by further
- Bicubic: A balanced approach that works well for both enlargements and reductions, bicubic interpolation uses cubic
convolution to estimate new pixel values. It provides a good mix of smooth gradients and detail retention.
- Bicubic: A balanced approach that works well for both enlargements and reductions, bicubic interpolation uses cubic
- Bicubic Sharper: Optimized for reductions, bicubic sharper preserves sharpness by emphasizing edge details.
When downsizing an image, this method helps maintain clarity and definition.
- Bicubic Sharper: Optimized for reductions, bicubic sharper preserves sharpness by emphasizing edge details.
- Bicubic Smoother: Best for enlargements, Bicubic Smoother generates a softer, smoother image by averaging
surrounding pixel values. It is effective at minimizing pixelation during upscaling.
- Bicubic Smoother: Best for enlargements, Bicubic Smoother generates a softer, smoother image by averaging
- Nearest Neighbor: This method is fast and simple. It does not create new pixel values but instead replicates existing ones. Nearest Neighbor is ideal for images that require hard edges and is often used for pixel art or graphics with limited color palettes. However, it can lead to jagged edges in photographs.
- Bilinear: Bilinear interpolation calculates pixel values using a linear interpolation of the nearest two pixels in each direction. It
is faster than Bicubic methods but may produce a slightly softer image, making it less ideal for images that demand high detail.
- Bilinear: Bilinear interpolation calculates pixel values using a linear interpolation of the nearest two pixels in each direction. It
With the Re-Sampling method chosen, you are now ready to apply these changes & complete the resizing process.
Step 6: Preview & Apply Adjustments
- Examine The Preview: Use the preview window within the Image Size dialog to check the effect of your adjustments.
Zoom in to inspect the edges and fine details.
- Examine The Preview: Use the preview window within the Image Size dialog to check the effect of your adjustments.
- Make Incremental Adjustments: If the preview indicates any loss of quality or unwanted artifacts, adjust the dimensions
or try a different Re-sampling method. Often. Small, incremental changes yield the best results.
- Make Incremental Adjustments: If the preview indicates any loss of quality or unwanted artifacts, adjust the dimensions
- Scientific Approach: Treat the preview as a mini-experiment. Each change represents a controlled variable, and your goal
is to optimize the outcome by comparing before and after views.
- Scientific Approach: Treat the preview as a mini-experiment. Each change represents a controlled variable, and your goal
Step 7: Finalize & Save Your Image
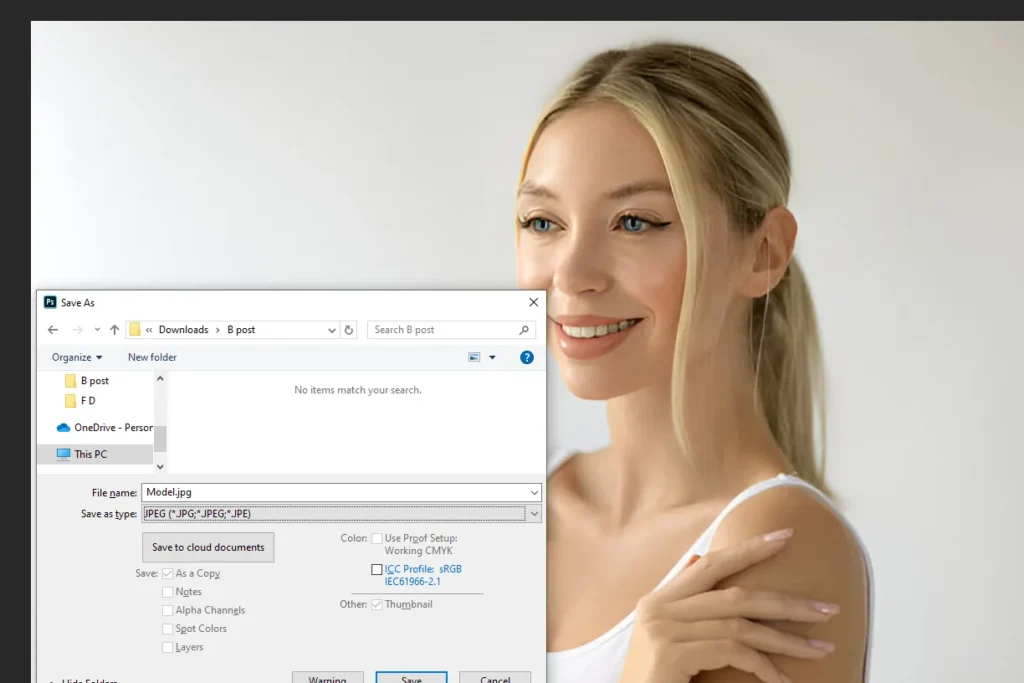
- Confirm Settings: Once you are satisfied with the preview, click OK to apply the changes.
- Save a New Version: Save your resized image using File > Save As to ensure that the original remains unaltered.
Choose a file format that supports high quality, such as TIFF or PNG, especially if further editing is anticipated.
- Save a New Version: Save your resized image using File > Save As to ensure that the original remains unaltered.
After these steps, you have successfully resized your image without compromising on quality. The next section covers
additional tips and advanced insights to further refine your process.
Advanced Tips for Maintaining Image Quality:
Even after following the step-by-step guide, there are additional techniques and best practices to ensure optimal image
quality during resizing.
Use Smart Objects for Non-Destructive Editing
- Convert to Smart Object: Before applying any transformations, convert your layer to a smart object.
This preserves the original data, allowing you to resize repeatedly without degradation.
- Convert to Smart Object: Before applying any transformations, convert your layer to a smart object.
- Benefits: Smart objects maintain vector-like flexibility and let you experiment with different re-sampling
methods without permanent changes.
- Benefits: Smart objects maintain vector-like flexibility and let you experiment with different re-sampling
Leverage Adjustments Layers
- Non-Destructive Enhancement: Use adjustment layers to fine-tune brightness, contrast, and color balance after resizing.
This approach prevents direct modifications to the image pixels.
- Non-Destructive Enhancement: Use adjustment layers to fine-tune brightness, contrast, and color balance after resizing.
- Scientific Note: Adjustment layers work independently of the original image data, ensuring that corrections can be reverted or modified without impacting the underlying quality.
Monitor & Compare at 100% Zoom
- Detail Inspection: Always view your image at 100% zoom to examine fine details and potential
artifacts introduced during re-sampling.
- Detail Inspection: Always view your image at 100% zoom to examine fine details and potential
- Repetitive Process: Comparing the before and after states of your image helps you refine your
settings and select the optimal re-sampling method.
- Repetitive Process: Comparing the before and after states of your image helps you refine your
Maintain Consistency in Workflow
- Document Settings: Keeping a record of the settings and adjustments you make can help you replicate
successful resizing on other images.
- Document Settings: Keeping a record of the settings and adjustments you make can help you replicate
- Establish Best Practices: Regularly update your workflow based on new Photoshop updates and industry
standards to ensure continued quality optimization.
- Establish Best Practices: Regularly update your workflow based on new Photoshop updates and industry
The advanced tips serve as a supplement to the step-by-step guide, reinforcing scientific principles with practical applications.
Extensive Review: Connecting the Steps for Ultimate Quality
Let’s tie together all the concepts and steps covered in this guide:
Fundamental Factors:
- The resolution ensures that the image has sufficient detail.
- Constraints keep the image proportional and free from distortion.
- Re-sampling methods, such as Preserve Details and Bicubic Sharper, determine how new pixels are generated.
Key Settings in Photoshop:
- The Image Size dialog is where you set the overall dimensions, resolutions, and re-sampling methods.
- Dimensions, Fit To, Width & Height are critical for ensuring that your image scales correctly without stretching or squashing.
Step-by-Step Workflow:
- Open and duplicate your image to safeguard the original file.
- Use the Image Size dialog to review and adjust the current resolution and dimensions.
- Maintain constraints to keep the aspect ratio intact.
- Choose the appropriate re-sampling method from the drop-down list based on your specific needs.
- Preview changes, apply adjustments incrementally, and finally save your work in a high-quality format.
Re-Sampling Options Detailed:
- The methods provided in the re-sample drop-down list each serve a specific purpose, whether for enlarging or reducing an image.
- By understanding the scientific basis of each algorithm, you can make an informed decision that balances processing speed and image fidelity.
Integrating these connected steps and techniques provides a holistic approach to image resizing that ensures both technical
accuracy and visual excellence.
Common Drawbacks & Mistakes to Avoid During Image Resizing:
When resizing images in Photoshop, several common pitfalls can undermine quality and workflow efficiency.
Below is a refined guide outlining these mistakes with practical insights and solutions.
Over-Enlargement & Pixelation:
Drawbacks: Enlarging an image beyond its native resolution forces the software to generate new pixels.
This process, known as pixel interpolation, can lead to pixelation and loss of detail if not managed correctly.
Insight: Interpolation algorithms (e.g., Bicubic, Preserve Details 2.0) estimate new pixel values mathematically.
Over-enlargement overwhelms these models, resulting in blurred or blocky areas.
Best Practice: Use the highest-quality source images when planning significant enlargements.
Employ advanced re-sampling methods optimized for enlargement to minimize quality loss.
Incorrect Re-Sampling Method:
Drawbacks: Selecting an inappropriate re-sampling method can result in either over-softened images
or excessive sharpness with unwanted artifacts.
Insight: Each re-sampling (e.g., Bicubic – Smoother for enlargements & Sharper for reductions) is designed for specific scenarios.
The mathematical models behind these algorithms impact how edges, texture, and gradients are rendered.
Best Practice: Test multiple methods (Automatic, Preserve Details – 1.0 & 2.0) on a sample section before applying globally.
Compare the outcomes by zooming in at 100% to ensure that the chosen algorithm meets your quality standards.
Neglecting Resolution Settings
Drawbacks: Ignoring resolution settings (PPI/DPI) during resizing can lead to images that either lose fine details
or become overly large for their intended use.
Insight: Resolution defines pixel density. For print, a resolution of 300 PPI or higher is ideal.
The web images typically use 72-96 PPI. An incorrect resolution disrupts the balance between image size & clarity.
Best Practice: Always set the resolution to the appropriate value based on the final output medium. Always Re-calculate
& adjust resolution in the Image Size dialog, ensuring that the new resolution aligns with the intended use without compromising quality.
Not Duplicating the Original File
Drawbacks: Editing directly on the original image increases the risk of irreversible mistakes.
A single misstep can permanently degrade the original file, reducing flexibility for further adjustments.
Insight: A non-destructive workflow preserves the original pixel data, which is essential for iterative experimentation
& scientific analysis of changes.
Best Practice: Always work on a duplicate layer or save a copy of the original file before starting any resizing adjustments.
This practice supports non-destructive editing & allows you to compare before & after states.
Ignoring Aspect Ratio Constraints
Drawbacks: Disabling the “Constrain Proportions” option can lead to distorted images where the width & height
are no longer proportional. This distortion disrupts the natural appearance & visual balance of the image.
Insight: The aspect ratio is a fundamental parameter that maintains the spatial relationships within an image.
Altering it inadvertently changes how viewers perceive the image.
Best Practice: Always lock the aspect ratio when resizing. Use the “Constrain Proportions” feature to ensure that
any changes to one dimension are automatically adjusted in the other.
Mismanagement of Color profiles
Drawbacks: Using incorrect or inconsistent color profiles can result in images that appear dull or display inaccurate
colors across different devices.
Insight: Color profiles control how colors are represented. Mismatches between embedded profiles & output devices
can cause unexpected shifts in hue & saturation.
Best Practice: Calibrate your monitor & embed the correct color profile in your images. Consistently check color settings
in Photoshop to maintain fidelity across digital & print outputs.
Improper Cropping & Insufficient Previewing
Drawbacks: Over-cropping or failing to preview changes at 100% zoom can eliminate essential details or mask errors
introduced during resizing.
Insight: A full-resolution preview is critical for detecting subtle artifacts & ensuring that the resizing process has not
compromised image integrity.
Best Practice: Always preview your image at 100% to verify that details are intact & no unexpected artifacts have emerged.
Make incremental adjustments rather than drastic changes to maintain control over the final output.
Failure to Document Settings
Drawbacks: Not recording the settings & adjustments used during resizing makes it challenging to replicate successful
results in future projects.
Insight: Documentation acts as a control log, similar to scientific experiments, enabling you to analyze the effects
of various changes on image quality.
Best Practice: Maintain a detailed log of resolution settings, re-sampling methods, & adjustments applied during the resizing process.
This documentation helps streamline future workflows & fosters continuous improvement in image quality optimization.
Overuse of Filters & adjustments
Drawbacks: Applying too many filters & adjustments after resizing can over-process the image, leading to an unnatural
look & potential degradation of quality.
Insight: Each additional filter introduces its algorithmic changes, which can compound & distort the image if not applied judiciously.
Best Practice: Use adjustment layers sparingly & evaluate the impact of each change incrementally. Compare before
& after images to ensure that each adjustment enhances rather than detracts from the overall quality.
By understanding & addressing these common pitfalls, which range from over-enlargement & incorrect resampling to mismanagement of color profiles & insufficient preview, you can easily enhance your Photoshop image resizing process.
Essential Tips & Tricks for Scaling Images in Photoshop
Below are detailed, scientifically informed tips and tricks for scaling images in Photoshop. Each segment builds on previous insights, ensuring you understand the process from non-destructive editing to advanced re-sampling methods.
Utilized Smart Objects for Non-Destructive Editing
Convert to Small Objects: Before scaling, convert your layer to a Smart Object. This preserves the original pixel data,
enabling multiple adjustments without quality loss.
Flexibility: Smart Objects let you experiment with different scaling and re-sampling methods, ensuring that you can revert or tweak changes as needed.
Workflow Integration: Incorporating Smart Objects early in your process creates a safety net and streamlines your editing workflow.
Adjust the Resolution and Pixel Density
Resolution Management: Understand that the resolution (PPI/DPI) directly influences image clarity during scaling. For print,
opt for 300 PPI or higher; for web, 72-96 PPI may suffice.
Pixel Interpolation: Increasing or decreasing resolution involves pixel interpolation. Mathematical models predict new pixel values,
ensuring smooth transitions.
Scientific Insight: These adjustments prevent pixelation and ensure that your image maintains sharpness regardless of size changes.
Choosing the Right Re-Sampling Method
Experiment with Options: Photoshop offers several re-sampling methods, such as Automatic, Preserve Details,
Preserve Details 2.0, Bicubic Smoother, Bicubic Sharper, Bicubic, Nearest Neighbor, and Bilinear.
Method Selection: Preserve Details and 2.0 is ideal for enlargement, reducing noise and maintaining fine textures. Bicubic Smoother and Sharper is used to balance clarity with minimal artifacts. Bicubic Smoother is ideal for enlargements, and Sharper is ideal for reductions. Nearest Neighbor/Bilinear is suitable for simpler graphics or pixel art, though it may introduce jagged edges in photographs.
Scientific Rationale: Each method relies on distinct algorithms for pixel calculation; testing various methods ensures optimal results.
Maintain Proportional Scaling and Use Adjustment Layers
Lock Aspect Ratio: Always enable “Constrain Proportions” to avoid distortion. This maintains the natural width-to-height ratio.
Adjustment Layers: Apply non-destructive adjustment layers (e.g., sharpening, noise reduction) post-scaling.
This fine-tunes quality without altering original data.
Consistent Review: Zoom in at 100% to monitor changes and catch artifacts early.
Document your Process
Track Settings: Keep records of your resolution, dimensions, re-sampling method, and adjustments.
Continuous Improvement: Regularly experiment and update methods as Photoshop evolves, ensuring long-term quality optimization.
Additional Info
- Experiment with different resampling options.
- Always duplicate your layer before resizing.
- Use smart objects to retain original image data.
- Maintain the aspect ratio to prevent distortion.
- Adjust the resolution based on the final output medium.
- Use the preview function to compare quality changes.
- Save in formats that preserve image clarity.
- Fine-tune brightness and contrast post-resize if needed.
- Avoid excessive enlarging to reduce pixelation.
- Document your settings for future reference.
- Practice resizing with various images to learn nuances.
- Compare resized images with the originals.
- Use layer masks to blend details effectively.
- Consider using batch processing for multiple images.
- Update Photoshop to access the latest tools.
- Review online tutorials for advanced methods,
- Test different methods on duplicate flies.
- Adjust dimensions gradually to monitor changes.
- Balance image quality and file size carefully.
By following these interconnected tips, you ensure every scaling decision is informed, scientific,
and tailored for high-quality, professional results.
Conclusion
In conclusion, our comprehensive guide has explored the multifaceted process of image resizing in Photoshop, including scientific details
& practical steps. Detailed discussions on key settings, like image size, dimensions, fit to, width & height, provide insights on pixel density & aspect ratios during scaling.
Advanced re-sampling techniques, including preserve details, bicubic smoother, etc., ultimately, these strategies empower you to achieve high-quality, professional results.
In the end, following this guide will enhance your Photoshop image resizing skills, ensuring every pixel is managed optimally. Use these methods & witness a significant improvement in your Photoshop image resizing workflow.

Hadi Zaman is a marketing specialist and content writer who loves tech, story writing, and content creation. With years of experience, he creates easy-to-read content that connects with readers. Inspired by new ideas and personal experiences, Hadi makes complex topics clear and relatable.