Drop shadow can significantly impact how your images look. When done right, a simple drop shadow can add depth, naturality, and a grounded effect, enhancing the image’s realism. Creating a drop shadow for an e-commerce product will add an added layer of professionalism.
Attaching drop shadows to an object will create realistic shadows that blend into its background. This method is quite valuable for e-commerce stores where clean, polished visuals impact viewers.
Also, drop shadows play a vital role in designing graphics and creating perfect realism. Perfecting these methods for adding natural shadows in photos will present them at their best, which helps them stand out and make a long-lasting impression.
In this guide, you’ll learn how to create a perfect drop shadow in Photoshop. We’ll cover everything in this blog, from selecting the object to adjusting opacity and angles to achieve a flawless look.
What is a Drop Shadow?
The drop shadow is one of Photoshop’s most influential visual effects. It creates an artificial shadow behind an object, giving it a lifelike appearance. It mimics how light interacts with real objects, helping them stand out. After adding the drop shadow to an object, not only does it enhance the object’s depth, but it also improves its overall presentation.
Image editors use this to make the image more natural and engaging. When creating drop shadow effects, editors can manually adjust the shadow’s position, size, and opacity to match the image’s lighting. This ensures the shadow looks authentic. For example, a well-placed shadow can make a product look more appealing when you add drop shadows in the image.
If you’re learning to create a drop shadow, always focus on the light source and the surface where the shadow falls. This approach helps create realistic shadows that blend seamlessly, making them more professional.
Why Use Drop Shadows in Images?
The Drop shadow plays a significant role in making images look realistic and professional. After adding the effect to an object, you can create depth and dimension, giving it a grounded appearance. Knowing how to make a realistic drop shadow in Photoshop allows designers to control shadows’ direction, softness, and opacity.
This helps make realistic shadows in Photoshop that complement the object and its setting. This is particularly important for product photography, where every detail matters to attract customers.
Adding drop shadows to an image for product photography ensures the object stands out against a clean and busy background. This highlights the product’s details and makes it more appealing by simulating natural light and shadows. Whether you’re adding natural shadow in a photo or working on enhancing product appeal, adding the effects adds a touch of professionalism.
How to Create a Perfect Drop Shadow in Photoshop:
Creating drop shadows in Photoshop is an essential skill for designers and photographers. This effect adds depth and realism, making objects natural rather than floating. Adding drop shadows to an object or a product image can be easy with the right steps.
Below, you’ll find an easy-to-follow, simple guide to creating a perfect drop shadow.
Step 1: Open Your Image in Photoshop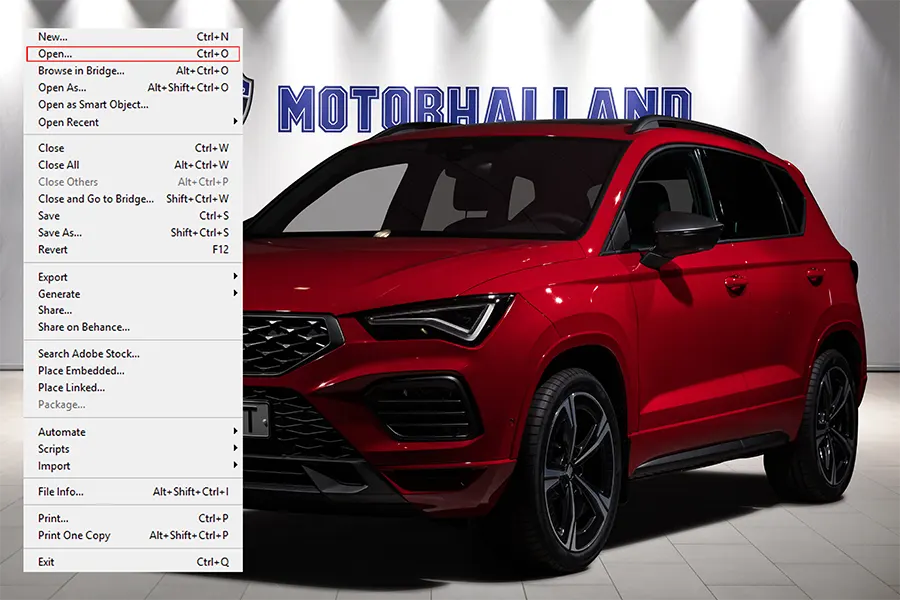
- Launch Photoshop and open the file you want to edit by going to File > Open.
- If you’re working on a product photo, ensure the object is on a separate layer. If not, you’ll need to isolate it first.
Step 2: Isolating the Object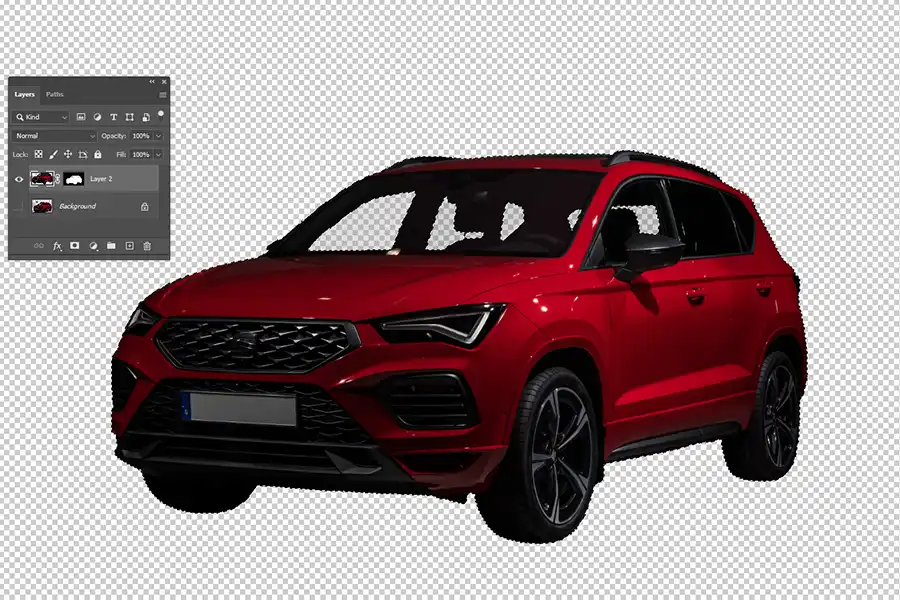
The object must be separate from the background to create a drop shadow.
- Use a Selection Tool: Select the object using the Quick Selection Tool, Pen Tool, or Magic Wand Tool. Try to be as precise as possible to ensure the shadow aligns naturally.
- Refine Your Selection: Click Select > Modify > Feather to soften the selection edges slightly. This helps in making realistic shadows in Photoshop.
- Create a New Layer: Copy the object onto a new layer using Ctrl + J or Command + J. This ensures the shadow won’t interfere with the original image.
Step 3: Add the Drop Shadow Effects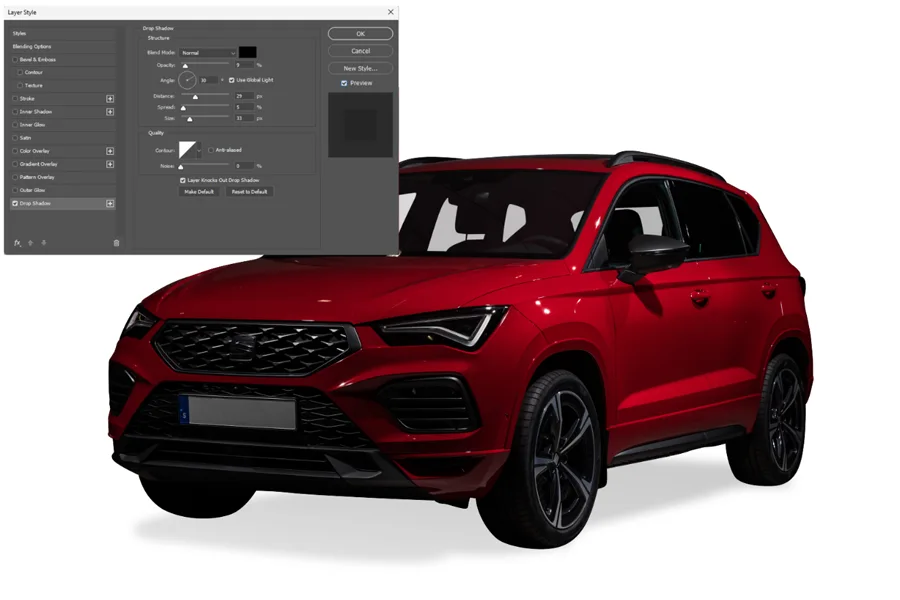
Once the object is isolated, it’s time to create the shadow.
- Open Layer Style: Right-click on the object layer and select Blending Options from the menu. In the Layer Style Window, choose Drop Shadow from the list.
- Customize the Shadow Settings: Customize the shadow settings depending on the object’s realism and authentic look.
Opacity: Set the opacity between 40-60% for a natural shadow.
Angle: Adjust the angle to match the light source in the image. A 45° angle is commonly used, but it varies depending on the scene.
Distance: Determines how far the shadow is from the object. Keep it subtle for realistic effects.
Spread: It controls the sharpness of the shadow edges. A lower spread works for soft shadows.
Size: It blurs the edges, helping to blend the shadow naturally into the background.
By altering these parameters, you can create a drop shadow in Photoshop that aligns with the image’s lighting.
Step 4: Add a Natural Touch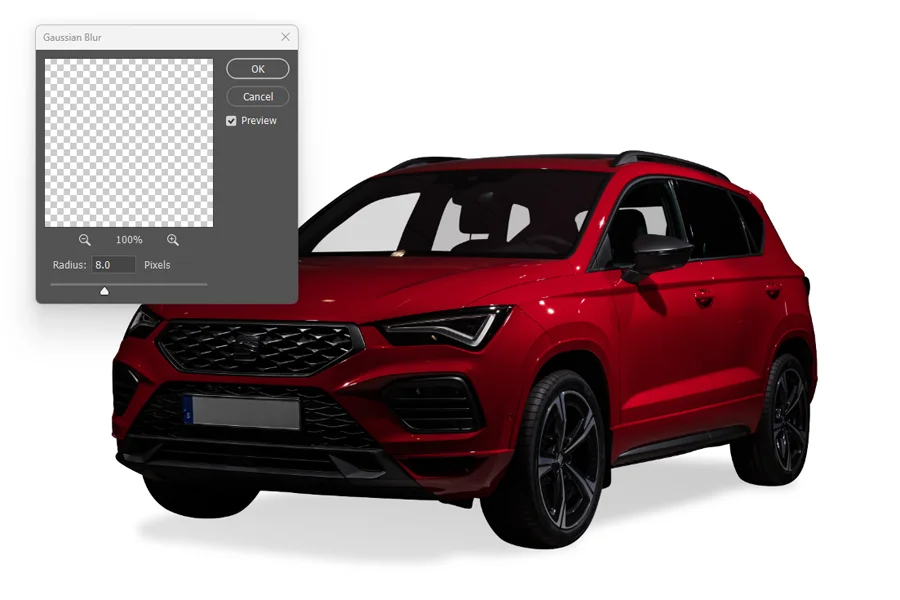
Sometimes, drop shadows appear too artificial. If necessary, you can refine a photo to add natural shadows.
- Duplicate the Shadow Layer: To give the shadow depth, duplicate it and adjust the second layer’s opacity and blur settings.
- Apply Gaussian blur: Go to Filter > Blur > Gaussian Blur to soften the edges. This creates a gradient effect, making the shadow fade naturally.
- Match the Background: If the object is placed on a textured background, adjust the shadow’s blending mode to Multiply. This ensures the shadow appears realistic.
Step 5: Test and Refine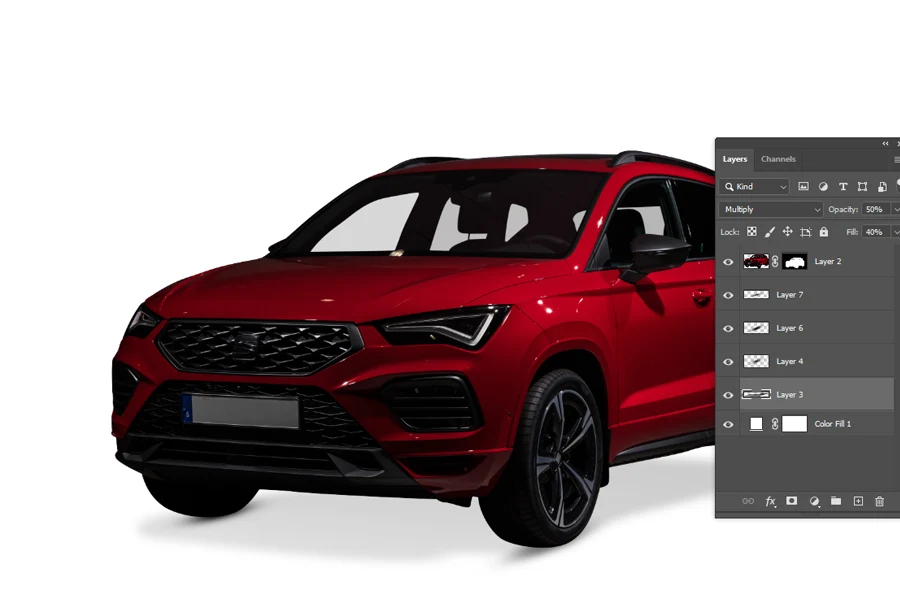
Before finalizing the work, zoom out and review the image. The shadow should look seamless as if it’s part of the photo. If something doesn’t meet your vision, always adjust the opacity, distance, or angle.
Creating drop shadows enhances professionalism in product images. To avoid any floating effect, make sure the drop shadow aligns perfectly with the object’s base.
Step 6: Save Your Work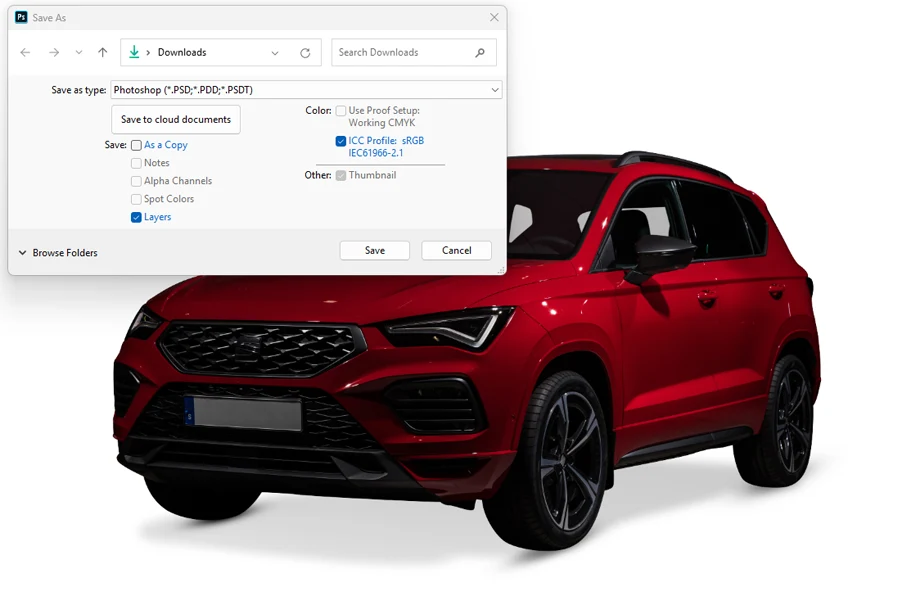
Once you’re satisfied with the result, save the file in a high-quality format. For best results, use File > Save As and choose a format like PNG or JPEG.
- Understand Lighting: Always ensure the shadow direction matches the light source in the photo.
- Keep it Subtle: Overly dark or sharp shadows can make the image look fake.
- Blend seamlessly: Always blend the shadow into the background for a natural effect.
Following these steps, you’ll master creating a drop shadow. This skill is invaluable, especially when editing E-Commerce product images or working on creative projects. This will make a significant difference in your final image.
Importance of Product Shadows in E-Commerce Images
Perfect shadows are vital in e-commerce images because they bring products to life, creating a professional, polished look that attracts buyers. Creating drop shadow is an art that combines subtlety with precision. Adding a drop shadow to an object helps the product appear grounded and realistic when placed against plain or white backgrounds.
Without the drop shadows, objects may look flat or appear floating, which can detract from the overall presentation. For example, adding drop shadow in a product image creates a dynamic contrast between the object and the background. This visual clarity is vital for catching a customer’s attention.
In online shopping, where customers can’t touch or examine products in person, visuals play a significant role in decision-making. Making realistic shadows in Photoshop ensures that the lighting and shadow placement align with the product’s perspective. Moreover, adding shadow to a photo can evoke a sense of authenticity.
Whether you’re showcasing fashion items, electronics, or home decor, using tools like Photoshop to create a perfect drop shadow ensures the product looks professional. Mastering the technique of creating drop shadow effects will elevate your images, helping your brand stand out and ultimately increasing sales conversions.
FAQs.
1. Should Product Photos Have Shadows?
Yes, shadows are crucial for product photos as they provide depth and realism. A well-applied shadow ensures the product looks natural and visually appealing. The product may appear unnatural or disconnected from its background without the shadows.
This is especially important in e-commerce, where visual appeal is everything and can directly impact sales.
2. How to Adjust the Opacity of Drop Shadow in Photoshop?
Adjusting the opacity is simple. Just find the Opacity slider under the Drop Shadow settings in the Layer Style Panel.
Drag the slider left for a lighter shadow or suitable for a darker one. Keeping the opacity between 50% and 70% makes realistic shadows in Photoshop, as it balances visibility without overpowering the object.
3. Can I Change the Color of a Drop Shadow?
Yes, editors can customize the color of a drop shadow to match the lighting or style of your image. In Photoshop, click on the color box to pick a new shade in the Drop Shadow settings.
For example, a soft gray works well for adding natural shadow to a photo, while a darker tone may be ideal for solid lighting contrasts.
4. When to Use a Natural Shadow in an E-Commerce Image?
Natural shadows work best when the goal is authenticity. Adding natural shadows to a photo is ideal for lifestyle images, such as products on natural surfaces like tables or floors.
These shadows mirror real-world lighting, creating drop shadow effects that make the product look professional.
5. When to Use an Original Shadow in an E-Commerce Image?
An original shadow is often used to retain the object’s authentic look. This works well for adding drop shadow in product image setups where the lighting and placement are intentionally designed.
Original shadows can enhance visual storytelling, adding depth without altering the object’s real-world appeal.
Final Verdict
In conclusion, mastering how to create a realistic drop shadow in Photoshop is essential for enhancing the realism of your images. Drop shadow effects can transform flat, lifeless photos into visually engaging ones that stand out.
These methods will allow any editor to add natural shadows in photos, ensuring the e-commerce products are well-presented. This helps them stand out and create an everlasting impression. With consistent effort, you’ll soon find yourself confidently creating drop shadows that elevate every project you work on.
Hadi Zaman is a marketing specialist and content writer who loves tech, story writing, and content creation. With years of experience, he creates easy-to-read content that connects with readers. Inspired by new ideas and personal experiences, Hadi makes complex topics clear and relatable.
